Agentic Ai Mcp
What is Agentic Ai Mcp
agentic-ai-mcp is a sample application that demonstrates the integration of Agentic AI with MCP servers, utilizing REST services, a PostgreSQL database, and document storage.
Use cases
Use cases for agentic-ai-mcp include financial transaction processing, data management applications, and AI-powered RESTful services that require efficient data handling and storage.
How to use
To use agentic-ai-mcp, install the required dependencies by setting up a virtual environment and running the provided scripts to populate financial transaction data. Configuration files must be set up according to the instructions in the README.
Key features
Key features of agentic-ai-mcp include seamless integration with REST APIs, support for PostgreSQL databases, document storage capabilities, and a structured setup process for easy deployment.
Where to use
agentic-ai-mcp can be used in various domains such as financial services, data analysis, and application development where AI-driven interactions with databases and APIs are required.
Clients Supporting MCP
The following are the main client software that supports the Model Context Protocol. Click the link to visit the official website for more information.


Overview
What is Agentic Ai Mcp
agentic-ai-mcp is a sample application that demonstrates the integration of Agentic AI with MCP servers, utilizing REST services, a PostgreSQL database, and document storage.
Use cases
Use cases for agentic-ai-mcp include financial transaction processing, data management applications, and AI-powered RESTful services that require efficient data handling and storage.
How to use
To use agentic-ai-mcp, install the required dependencies by setting up a virtual environment and running the provided scripts to populate financial transaction data. Configuration files must be set up according to the instructions in the README.
Key features
Key features of agentic-ai-mcp include seamless integration with REST APIs, support for PostgreSQL databases, document storage capabilities, and a structured setup process for easy deployment.
Where to use
agentic-ai-mcp can be used in various domains such as financial services, data analysis, and application development where AI-driven interactions with databases and APIs are required.
Clients Supporting MCP
The following are the main client software that supports the Model Context Protocol. Click the link to visit the official website for more information.
Content
What?
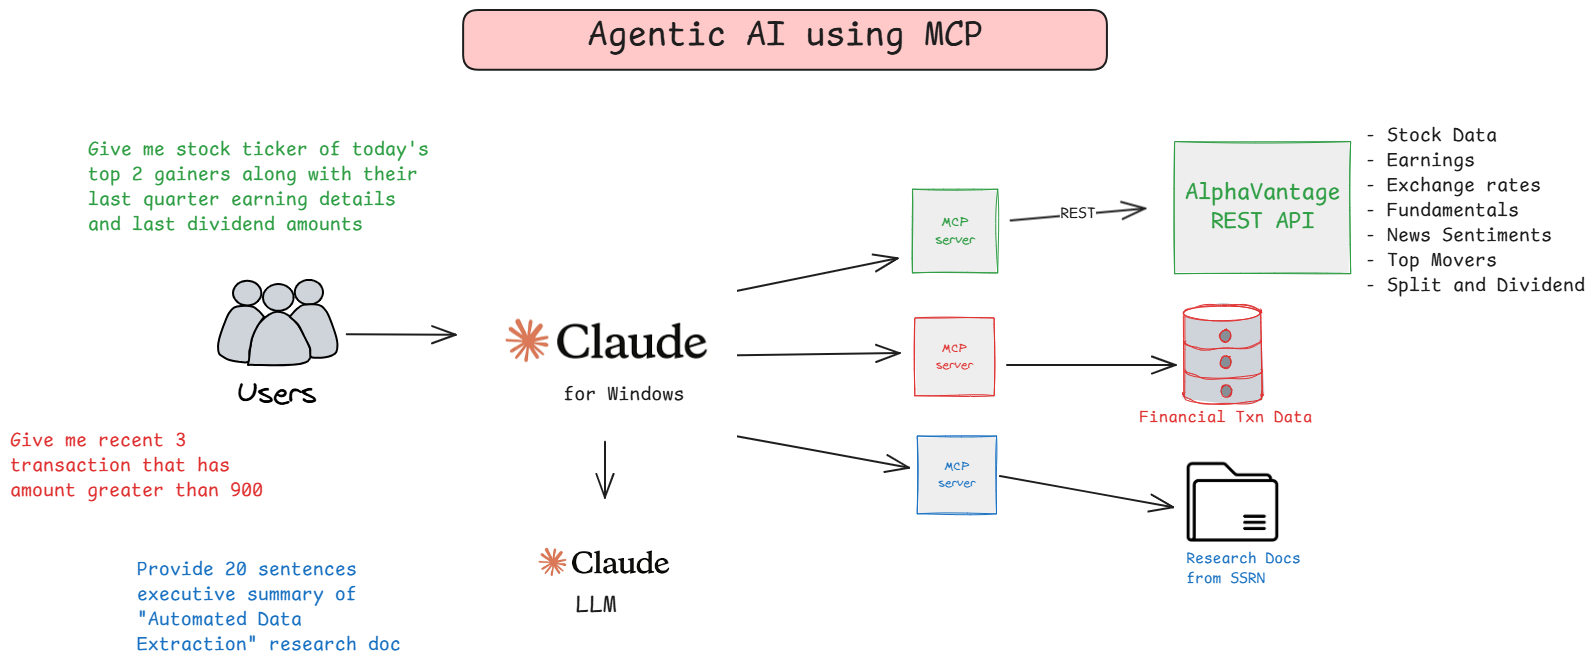
Sample application showing Agentic AI using MCP Server connecting to REST API, PostgreSQL Database and Document Storage
Setup
UV Installation and Setup
-
Install UV
To install UV, run the following command:pip install uv -
Verify Installation
Confirm that UV is installed by running:uv --version
Using pyproject.toml
Setting Up a Virtual Environment and Installing Dependencies
-
Create a Virtual Environment
Run the following command to create a virtual environment:python -m venv venv -
Activate the Virtual Environment
- On Windows:
venv\Scripts\activate - On macOS/Linux:
source venv/bin/activate
- On Windows:
-
Install Dependencies from
pyproject.toml
Usepipto install dependencies specified in thepyproject.tomlfile:pip install . -
Verify Installation
Ensure all dependencies are installed correctly:pip list -
Run Test Cases
Ensure all test cases are passed using pytest:pytest
Populate Financial Txn Data
- Run the Script to Populate Data
Execute the following command to populate sample financial transaction data:python util/populate_data.py
Configure MCP Client - Claude for Windows
-
Locate the Sample Configuration File
Use the providedconfig/sample_claude_desktop_config.jsonfile as a template. -
Copy the Configuration File
Place the file in the following directory:~\AppData\Roaming\Claude -
Rename the File
Rename the file toclaude_desktop_config.json. -
Update Configuration Details
- Open the
claude_desktop_config.jsonfile in a text editor. - Update the Alpha Vantage API Key with your key.
- Update the Database Connection Details with the appropriate credentials and connection string.
- Open the
Restart Claude Desktop
Restart Claude Desktop, you might have to kill tasks from Task manager. Note that once you restart it,
- You should be able to see number of tools along with hammer icon.
- This will start python program for each tool in background.
Dev Tools Supporting MCP
The following are the main code editors that support the Model Context Protocol. Click the link to visit the official website for more information.


