Chrome Extension Bridge Mcp
What is Chrome Extension Bridge Mcp
chrome-extension-bridge-mcp is a Chrome extension that establishes a WebSocket connection between web pages and a local MCP server, allowing interaction with web page resources and execution of functions from the MCP server.
Use cases
Use cases include controlling web-based editors like the Three.js editor, developing interactive web applications that require server-client communication, and accessing and manipulating web page resources dynamically.
How to use
To use chrome-extension-bridge-mcp, clone the repository, install dependencies, and load the extension in Chrome by enabling Developer mode and selecting the extension folder. You can then access browser APIs and execute JavaScript functions from your local MCP server.
Key features
Key features include the ability to access browser APIs and DOM elements from the local server, execute JavaScript functions in the context of web pages, retrieve resources from web pages, and interact with the global window object exposed by certain websites.
Where to use
chrome-extension-bridge-mcp can be used in web development, particularly for applications that require real-time interaction between a web page and a local server, such as game development and interactive web applications.
Clients Supporting MCP
The following are the main client software that supports the Model Context Protocol. Click the link to visit the official website for more information.


Overview
What is Chrome Extension Bridge Mcp
chrome-extension-bridge-mcp is a Chrome extension that establishes a WebSocket connection between web pages and a local MCP server, allowing interaction with web page resources and execution of functions from the MCP server.
Use cases
Use cases include controlling web-based editors like the Three.js editor, developing interactive web applications that require server-client communication, and accessing and manipulating web page resources dynamically.
How to use
To use chrome-extension-bridge-mcp, clone the repository, install dependencies, and load the extension in Chrome by enabling Developer mode and selecting the extension folder. You can then access browser APIs and execute JavaScript functions from your local MCP server.
Key features
Key features include the ability to access browser APIs and DOM elements from the local server, execute JavaScript functions in the context of web pages, retrieve resources from web pages, and interact with the global window object exposed by certain websites.
Where to use
chrome-extension-bridge-mcp can be used in web development, particularly for applications that require real-time interaction between a web page and a local server, such as game development and interactive web applications.
Clients Supporting MCP
The following are the main client software that supports the Model Context Protocol. Click the link to visit the official website for more information.
Content
Chrome Extension Bridge MCP
A Chrome extension that establishes a WebSocket connection between web pages and a local MCP server. This allows you to interact with web page resources and execute functions from your mcp server.
Inspired by playcanvas/editor-mcp-server.
Overview
This project consists of two main components:
- Chrome Extension: Injects a client script into web pages that establishes a WebSocket connection to your local server.
- Local MCP Server: A WebSocket server that can send commands to the extension and receive responses.
With this setup, you can:
- Access browser APIs and DOM elements from your local server
- Execute JavaScript functions in the context of web pages
- Retrieve resources and information from web pages
- Especially, access the global object like editor, e.x : https://threejs.org/editor/. You can use
window.editorwhich is exposed by the website to control the editor. Just like playcanvas/editor-mcp-server.
Installation
Setup
- Clone the repository:
git clone https://github.com/yourusername/chrome-extension-socket-mcp.git
cd chrome-extension-socket-mcp
- Install dependencies:
npm install
Development
Run the following command to build the extension in development mode:
npm run debug
Loading the Extension
- Open Chrome and navigate to
chrome://extensions/ - Enable “Developer mode” by toggling the switch in the top right corner
- Click “Load unpacked” and select the
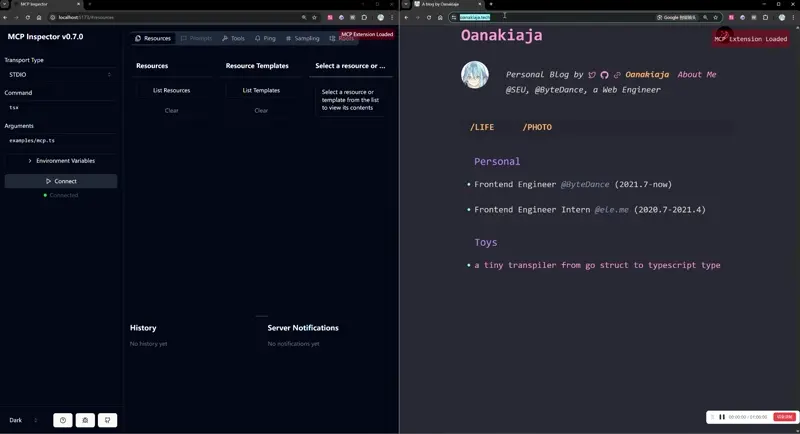
extensionfolder from this project - The extension is now installed. You should see a small red indicator in the top right corner of any web page indicating “MCP Extension Loaded”
Usage
Server-side
import { McpServer } from "@modelcontextprotocol/sdk/server/mcp.js";
import { StdioServerTransport } from "@modelcontextprotocol/sdk/server/stdio.js";
import { z } from "zod";
import { Client } from "../src/client";

// Define the port for WebSocket connection
// This should match the port in your Chrome extension's WebSocket connection
const port = 54319;
const client = new Client(port);

// Establish connection to the Chrome extension
await client.connect();

// Create a new MCP server instance with name and version
const server = new McpServer({
  name: "Extension-Socket-Server",
  version: "1.0.0",
});

// Register a tool that executes the window.alert function in the browser
// This demonstrates how to interact with browser APIs from your server
server.tool(
  "alert",                  // Tool name
  "use window.alert",       // Tool description
  { message: z.string() },  // Tool parameters schema using Zod
  async ({ message }) => {  // Tool implementation function
    // Call the extension to execute alert in the browser context
    const response = await client.callToolExtension("alert", { message });
    return response;
  }
);

// Register a resource to retrieve the browser's user agent
// This demonstrates how to access browser properties from your server
server.resource(
  "userAgent",              // Resource name
  "useragent://chrome",     // Resource URI template
  async (uri) => {          // Resource handler function
    // Get the user agent from the browser
    const { content } = await client.callResourceExtension("navigator.userAgent");
    // Return the formatted resource
    return {
      contents: [
        {
          uri: uri.href,
          text: content[0].text,
        },
      ],
    };
  }
);

// Set up a transport layer for the MCP server
// StdioServerTransport uses standard input/output for communication
const transport = new StdioServerTransport();
await server.connect(transport);

// Handle application termination gracefully
process.on("SIGINT", async () => {
  console.log("SIGINT signal received");  // Log when SIGINT is received
  await client.dispose();                 // Close the WebSocket connection
  process.exit(0);                        // Exit the process
});
Extension-side
The extension automatically connects to ws://localhost:54319 by default. You can modify this in extension/content.js.
The extension exposes two main entry points for server commands:
mcp:resource.*- For accessing browser resources and propertiesmcp:tool.*- For executing functions in the browser context
API Reference
Client
new Client(port)- Create a new client instance connecting to specified portconnect()- Connect to the MCP servercallToolExtension(toolName, params)- Call a tool in the browsercallResourceExtension(resourceName, params)- Get a resource from the browserdispose()- Close the connection
WebSocket Protocol
The extension uses a simple JSON-RPC-like protocol:
Request:
{
  "id": "unique-request-id",
  "method": "mcp:resource.navigator.userAgent",
  "params": {}
}Response:
{
  "id": "unique-request-id",
  "result": "Mozilla/5.0 ..."
}
License
Dev Tools Supporting MCP
The following are the main code editors that support the Model Context Protocol. Click the link to visit the official website for more information.


