Hh Mcp Comfyui
What is Hh Mcp Comfyui
hh-mcp-comfyui is an image generation service based on the Model Context Protocol (MCP), allowing users to generate images through API calls to a local ComfyUI instance, enabling creative freedom in image creation.
Use cases
Use cases include generating unique artwork for digital media, creating images for marketing materials, and automating the design process in creative projects.
How to use
To use hh-mcp-comfyui, ensure that a local ComfyUI instance is running (default address: http://127.0.0.1:8188). Install the necessary dependencies and run the server using the provided commands. Clients like Cherry Studio and Cline can then interact with the service via JSON formatted requests.
Key features
Key features include image generation via the MCP protocol, dynamic replacement of parameters such as prompts and dimensions in workflows, and automatic loading of workflow files from the specified directory.
Where to use
hh-mcp-comfyui can be used in various fields such as digital art creation, graphic design, and any application requiring automated image generation based on user-defined parameters.
Clients Supporting MCP
The following are the main client software that supports the Model Context Protocol. Click the link to visit the official website for more information.


Overview
What is Hh Mcp Comfyui
hh-mcp-comfyui is an image generation service based on the Model Context Protocol (MCP), allowing users to generate images through API calls to a local ComfyUI instance, enabling creative freedom in image creation.
Use cases
Use cases include generating unique artwork for digital media, creating images for marketing materials, and automating the design process in creative projects.
How to use
To use hh-mcp-comfyui, ensure that a local ComfyUI instance is running (default address: http://127.0.0.1:8188). Install the necessary dependencies and run the server using the provided commands. Clients like Cherry Studio and Cline can then interact with the service via JSON formatted requests.
Key features
Key features include image generation via the MCP protocol, dynamic replacement of parameters such as prompts and dimensions in workflows, and automatic loading of workflow files from the specified directory.
Where to use
hh-mcp-comfyui can be used in various fields such as digital art creation, graphic design, and any application requiring automated image generation based on user-defined parameters.
Clients Supporting MCP
The following are the main client software that supports the Model Context Protocol. Click the link to visit the official website for more information.
Content
ComfyUI MCP 服务
![]()
![]()
这是一个基于Model Context Protocol (MCP)的ComfyUI图像生成服务,通过API调用本地ComfyUI实例生成图片。
功能特性
- 通过MCP协议提供图像生成服务,实现自然语言生图自由
- 支持动态替换工作流中的提示词和尺寸等参数
- 自动加载workflows目录下的工作流文件作为资源
新增功能记录
- [2025-05-11] 支持工作流文件目录动态配置
- [2025-05-09] 增加docker构建方式,支持Python 3.12+
- [2025-05-07] 增加pip构建方式
- [2025-05-06] 把项目目录src/hh修改成src/hh_mcp_comfyui,增加uvx构建方式
- [2025-04-26] 增加图生图和移除背景样例工作流及支持图生图工具
- [2025-04-20] 加入文生图生成工具
效果
-
Cherry Studio中使用效果
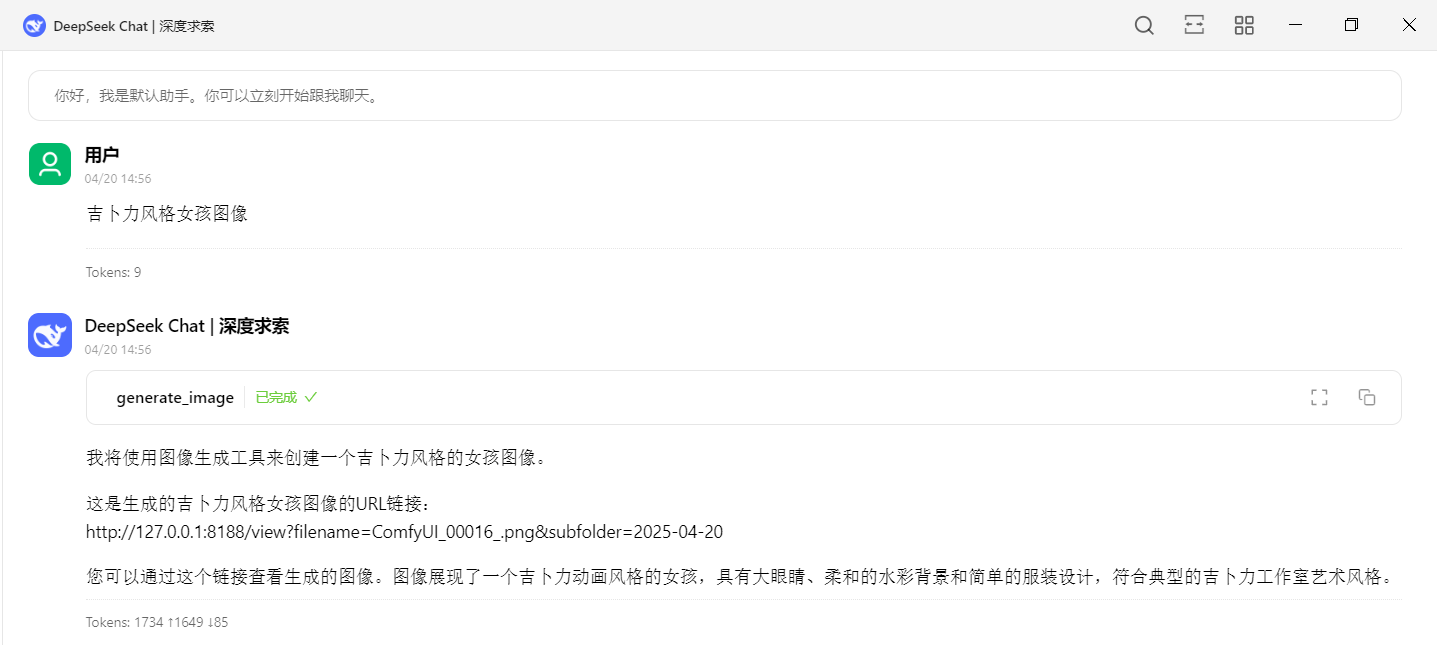
-
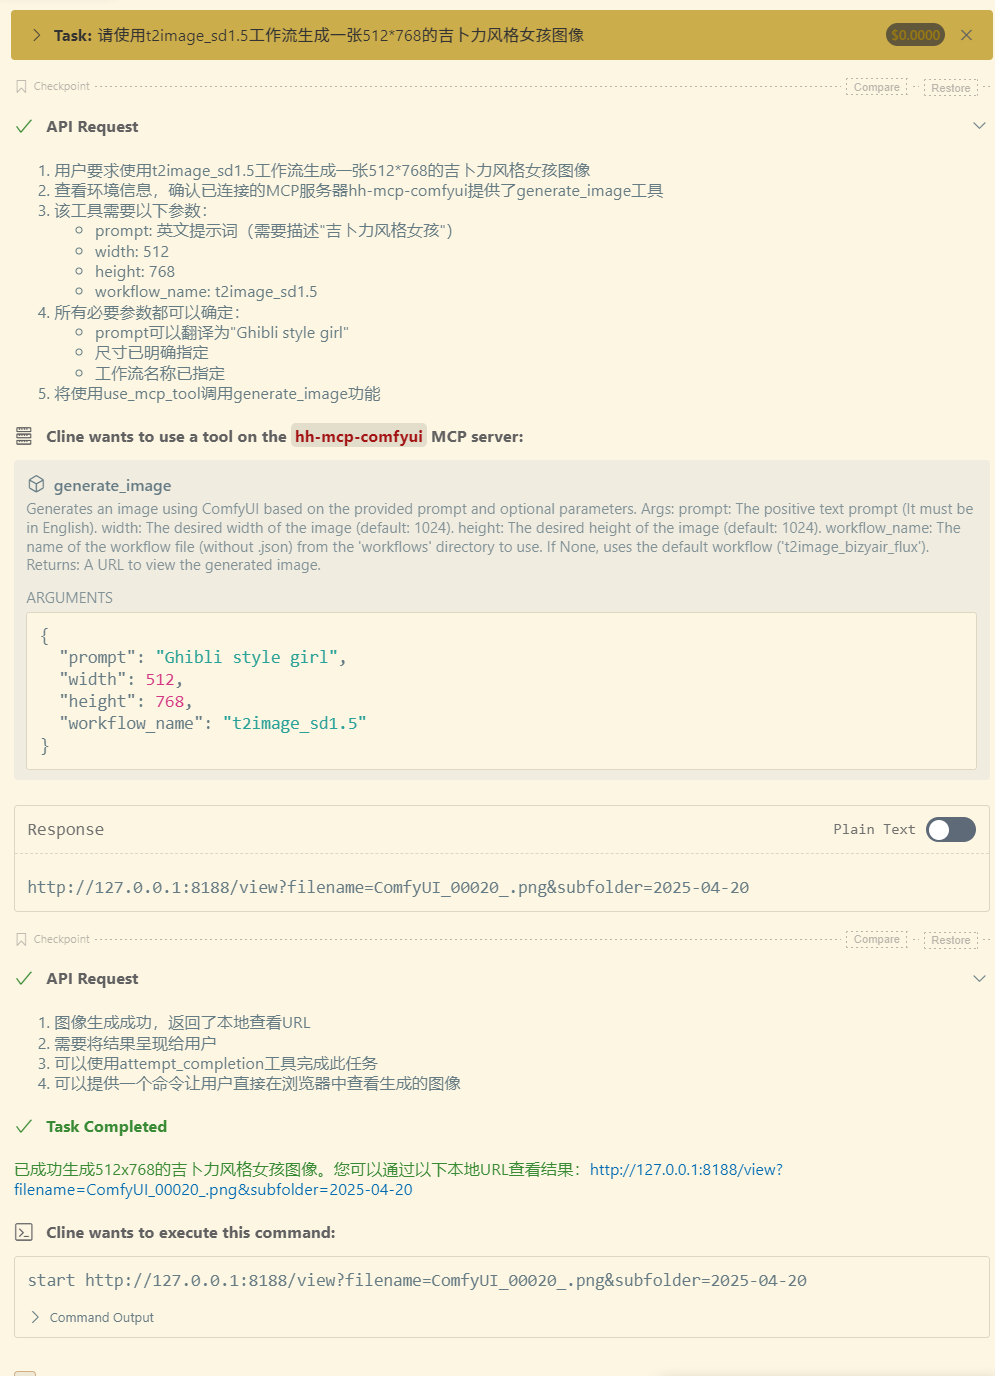
Cline中使用效果

安装依赖
1. 确保已安装Python 3.12+
2. 使用uv管理Python环境:
- 安装uv:
# On macOS and Linux.
$ curl -LsSf https://astral.sh/uv/install.sh | sh

# On Windows.
$ powershell -ExecutionPolicy ByPass -c "irm https://astral.sh/uv/install.ps1 | iex"

# 更新uv(非必要操作):
$ uv self update
测试运行服务
- uvx方式
$ uvx hh-mcp-comfyui INFO:hh_mcp_comfyui.server:Scanning for workflows in: C:\Users\tianw\AppData\Local\uv\cache\archive-v0\dp4MTo0f1qL0DdYF_BYCL\Lib\site-packages\hh_mcp_comfyui\workflows INFO:hh_mcp_comfyui.server:Starting ComfyUI MCP Server... - pip方式
$ pip install hh_mcp_comfyui

$ python -m hh_mcp_comfyui

INFO:hh_mcp_comfyui.server:Scanning for workflows in: F:\Python\Python313\Lib\site-packages\hh_mcp_comfyui\workflows
INFO:hh_mcp_comfyui.server:Starting ComfyUI MCP Server...
出现上面的信息表示服务启动成功
使用方法
必须确保本地ComfyUI实例正在运行(默认地址: http://127.0.0.1:8188) ComfyUI安装地址
Cherry Studio、Cline、Cursor等客户端的使用方式
uvx MCP服务配置
{
  "mcpServers": {
    "hh-mcp-comfyui": {
      "command": "uvx",
      "args": [
        "hh-mcp-comfyui"
      ],
      "env": {
        "COMFYUI_API_BASE": "http://127.0.0.1:8188",
        "COMFYUI_WORKFLOWS_DIR": "/path/hh-mcp-comfyui/workflows"
      }
    }
  }
}
pip MCP服务配置
需要先执行命令窗口先执行:pip install hh_mcp_comfyui
{
  "mcpServers": {
    "hh-mcp-comfyui": {
      "command": "python",
      "args": [
        "-m",
        "hh_mcp_comfyui"
      ],
      "env": {
        "COMFYUI_API_BASE": "http://127.0.0.1:8188",
        "COMFYUI_WORKFLOWS_DIR": "/path/hh-mcp-comfyui/workflows"
      }
    }
  }
}
docker MCP服务配置
前提是已安装docker
{
  "mcpServers": {
    "hh-mcp-comfyui": {
      "command": "docker",
      "args": [
          "run",
          "--net=host",
          "-v",
          "/path/hh-mcp-comfyui/workflows:/app/workflows",
          "-i",
          "--rm",
          "zjf2671/hh-mcp-comfyui"
      ],
      "env": {
        "COMFYUI_API_BASE": "http://127.0.0.1:8188"
      }
    }
  }
}
样例工作流copy到指定工作流目录:
(注意:使用下面uvx或pip方式找到你的安装工作流目录的位置把样例工作流添加进去,然后重启你的MCP服务)
-
uvx
$ uvx hh-mcp-comfyui
-
pip
#首先安装依赖
$ pip install hh_mcp_comfyui
$ python -m hh_mcp_comfyui
测试
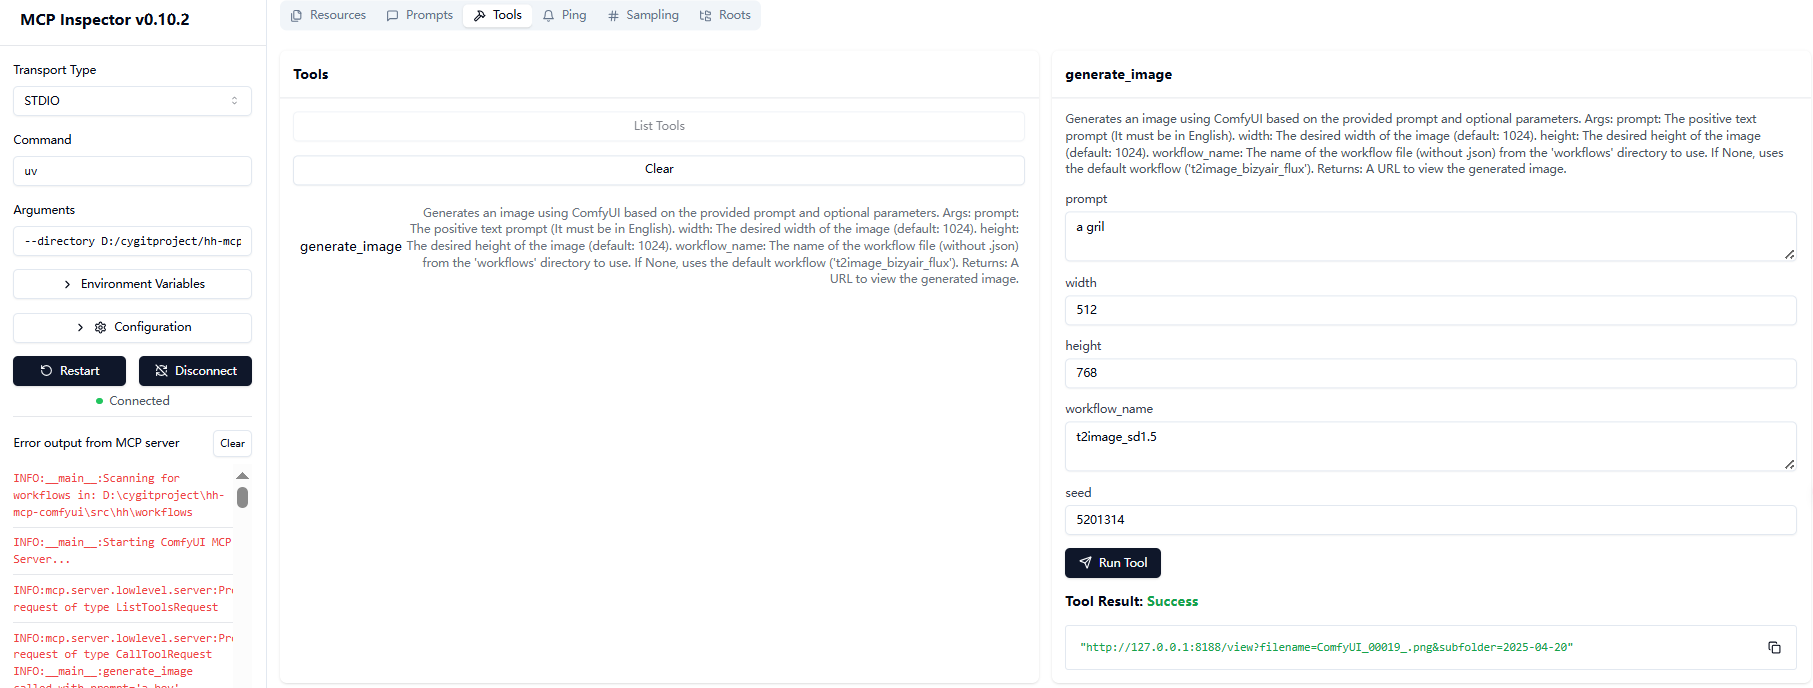
使用MCP Inspector测试服务端工具
- uvx方式
$ npx @modelcontextprotocol/inspector uvx hh-mcp-comfyui - pip方式
$ pip install hh_mcp_comfyui $ npx @modelcontextprotocol/inspector python -m hh_mcp_comfyui - docker方式
$ npx @modelcontextprotocol/inspector docker run --net=host -i --rm zjf2671/hh-mcp-comfyui
然后点击连接如图即可调试:
使用注意事项(针对没有用过comfyui的特别注意)
- 默认工作流为
t2image_bizyair_flux - 图片尺寸默认为1024x1024
- 服务启动时会自动加载workflows目录下的所有JSON工作流文件
- 如果你使用的是本项目中的样例工作流需要在comfyui中下载个插件,详细操作请查看:样例工作流插件安装教程
- 如果使用你本地的comfyui工作流的话,先要保证你的工作流能在comfyui正常运行,然后需要导出(API)的JSON格式,并放入到你本地的
/path/hh_mcp_comfyui/workflows目录中
添加新工作流
-
将工作流JSON文件放入
/path/hh_mcp_comfyui/workflows目录中如果是uvx和pip启动方式请看上面 《样例工作流copy到指定工作流目录》 的使用方式
-
重启服务自动加载新工作流
开发
项目结构
.
├── .gitignore
├── .python-version
├── pyproject.toml
├── README.md
├── uv.lock
├── example/              # 示例工作流目录
│   └── workflows/
│       ├── i2image_bizyair_sdxl.json
│       ├── t2image_bizyair_flux.json
│       ├── i2image_cogview4.json
│       └── t2image_sd1.5.json
├── src/                  # 源代码目录
│   └── hh_mcp_comfyui/
│       ├── comfyui_client.py    # ComfyUI客户端实现
│       ├── server.py            # MCP服务主文件
│       └── workflows/           # 工作流文件目录
初始化项目开发环境:
# Clone the repository.
$ git clone https://github.com/zjf2671/hh-mcp-comfyui.git

$ cd hh-mcp-comfyui

# Initialized venv
$ uv venv

# Activate the virtual environment.
$ .venv\Scripts\activate

# Install dependencies.
$ uv lock
Resolved 30 packages in 1ms

# sync dependencies.
$ uv sync
Resolved 30 packages in 2.54s
Audited 29 package in 0.02ms
检查服务是否正常
$ uv --directory 你本地安装目录/hh-mcp-comfyui run hh-mcp-comfyui

INFO:__main__:Scanning for workflows in: D:\cygitproject\hh-mcp-comfyui\src\hh_mcp_comfyui\workflows
INFO:__main__:Registered resource: workflow://t2image_bizyair_flux -> t2image_bizyair_flux.json
INFO:__main__:Starting ComfyUI MCP Server...
使用MCP Inspector测试服务端工具
$ npx @modelcontextprotocol/inspector uv --directory 你本地安装目录/hh-mcp-comfyui run hh-mcp-comfyui
MCP配置
{
  "mcpServers": {
    "hh-mcp-comfyui": {
      "command": "uv",
      "args": [
        "--directory",
        "项目绝对路径(例如:D:/hh-mcp-comfyui)",
        "run",
        "hh-mcp-comfyui"
      ],
      "env": {
        "COMFYUI_API_BASE": "http://127.0.0.1:8188",
        "COMFYUI_WORKFLOWS_DIR": "/path/hh-mcp-comfyui/workflows"
      }
    }
  }
}
贡献
- Fork项目
- 创建特性分支 (
git checkout -b feature/AmazingFeature) - 提交更改 (
git commit -m 'Add some AmazingFeature') - 推送到分支 (
git push origin feature/AmazingFeature) - 打开Pull Request
如有问题可以到公众号中联系我:

Dev Tools Supporting MCP
The following are the main code editors that support the Model Context Protocol. Click the link to visit the official website for more information.


