Inbox Zero MCP Server
What is Inbox Zero MCP Server
Inbox Zero is an open-source AI-powered email assistant designed to help users achieve inbox zero efficiently by managing their email tasks and automating several actions through an intuitive interface.
Use cases
It is useful for busy professionals looking to streamline their email management, automate responses, track replies, categorize emails, unsubscribe from unwanted communications, and analyze email activity through various features.
How to use
Users can self-host the application by following the setup instructions provided in the documentation, which includes configuring environment variables, setting up Google OAuth, and defining Redis and Postgres settings. Once set up, users can run the application, manage their email, and customize settings to fit their needs.
Key features
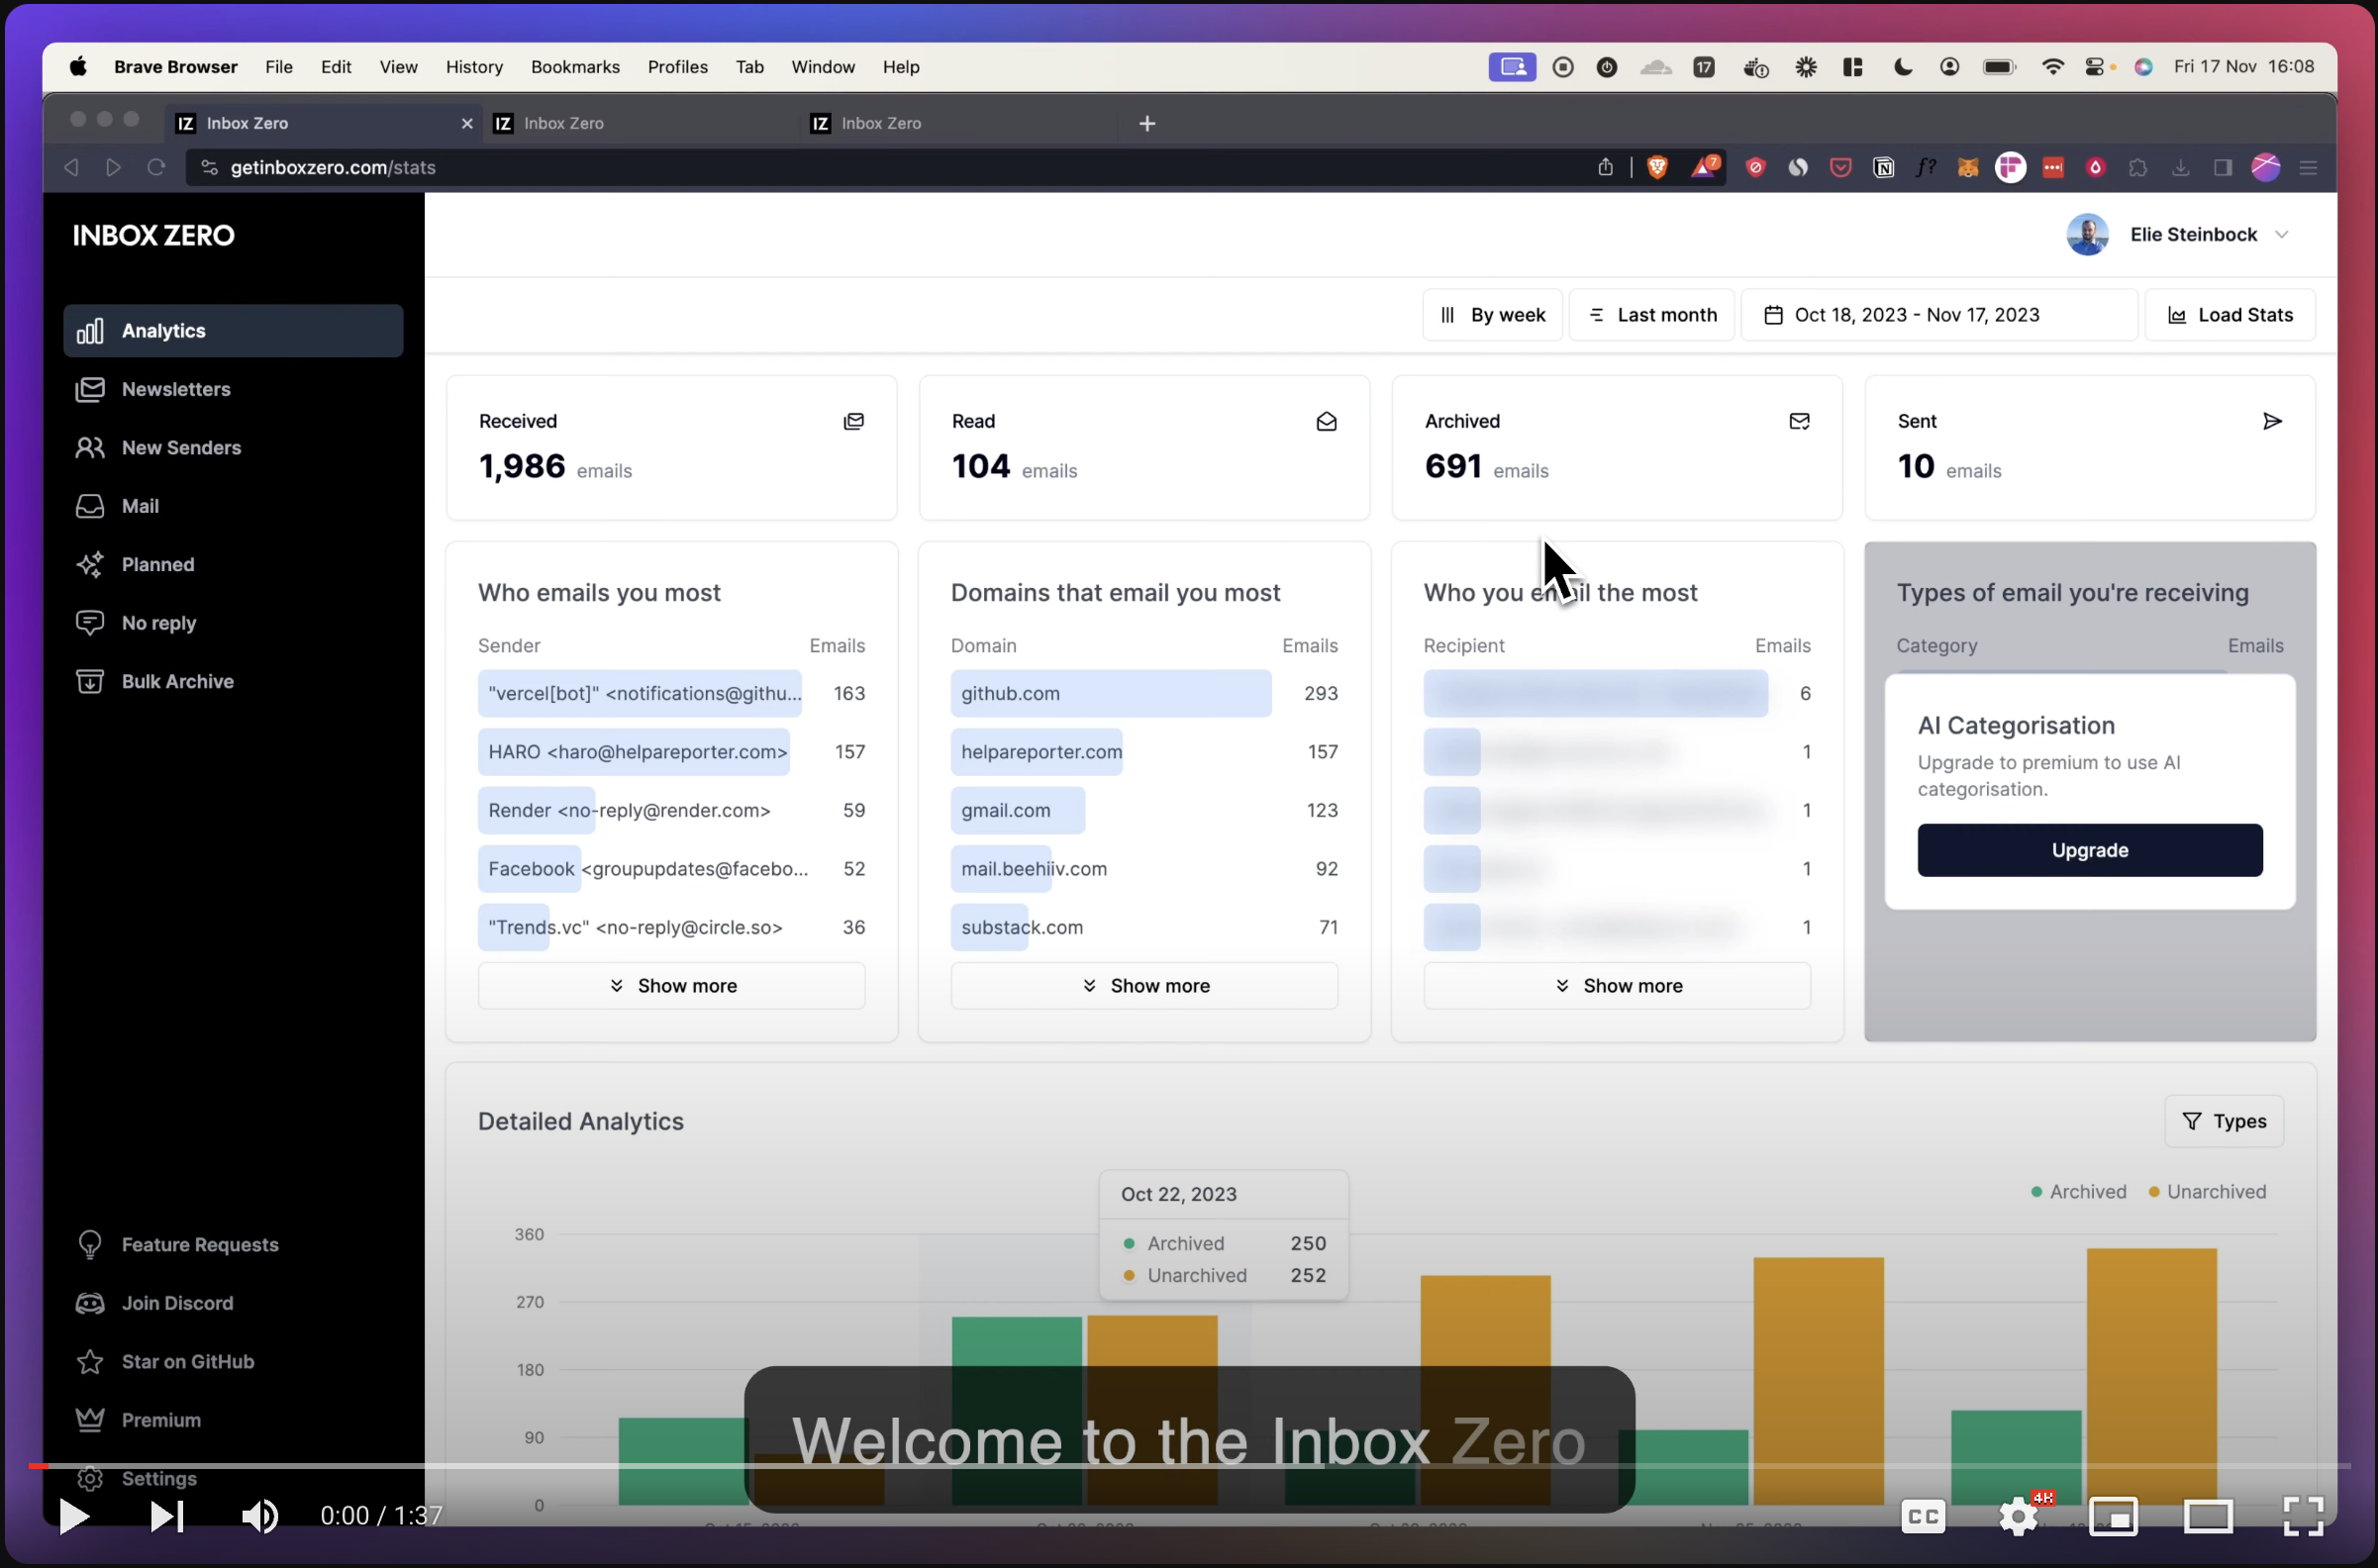
Key features include an AI personal assistant for email management, a reply tracking system, smart email categorization, a bulk unsubscriber, a cold email blocker, and email analytics to track user activity over time.
Where to use
Inbox Zero can be used on a personal computer or server as a web application accessible via a browser, making it versatile for both self-hosted environments or through the provided hosted version.
Clients Supporting MCP
The following are the main client software that supports the Model Context Protocol. Click the link to visit the official website for more information.


Overview
What is Inbox Zero MCP Server
Inbox Zero is an open-source AI-powered email assistant designed to help users achieve inbox zero efficiently by managing their email tasks and automating several actions through an intuitive interface.
Use cases
It is useful for busy professionals looking to streamline their email management, automate responses, track replies, categorize emails, unsubscribe from unwanted communications, and analyze email activity through various features.
How to use
Users can self-host the application by following the setup instructions provided in the documentation, which includes configuring environment variables, setting up Google OAuth, and defining Redis and Postgres settings. Once set up, users can run the application, manage their email, and customize settings to fit their needs.
Key features
Key features include an AI personal assistant for email management, a reply tracking system, smart email categorization, a bulk unsubscriber, a cold email blocker, and email analytics to track user activity over time.
Where to use
Inbox Zero can be used on a personal computer or server as a web application accessible via a browser, making it versatile for both self-hosted environments or through the provided hosted version.
Clients Supporting MCP
The following are the main client software that supports the Model Context Protocol. Click the link to visit the official website for more information.
Content
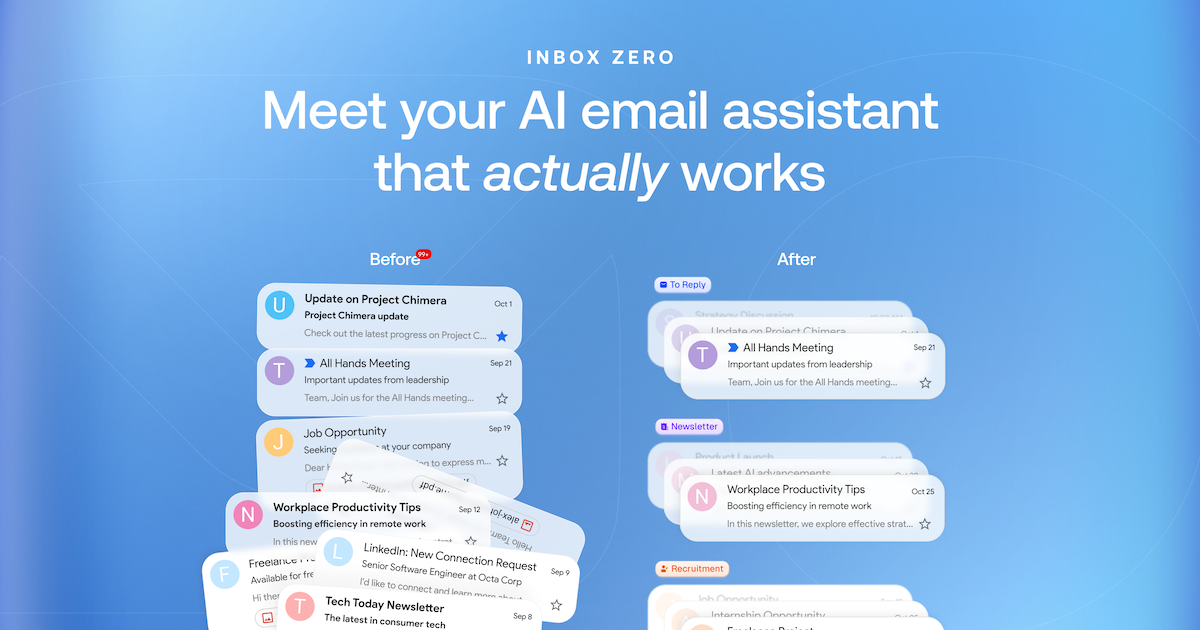
Inbox Zero - Your AI Email Assistant
Open source email app to reach inbox zero fast.
Website
·
Discord
·
Issues
About
There are two parts to Inbox Zero:
- An AI email assistant that helps you spend less time on email.
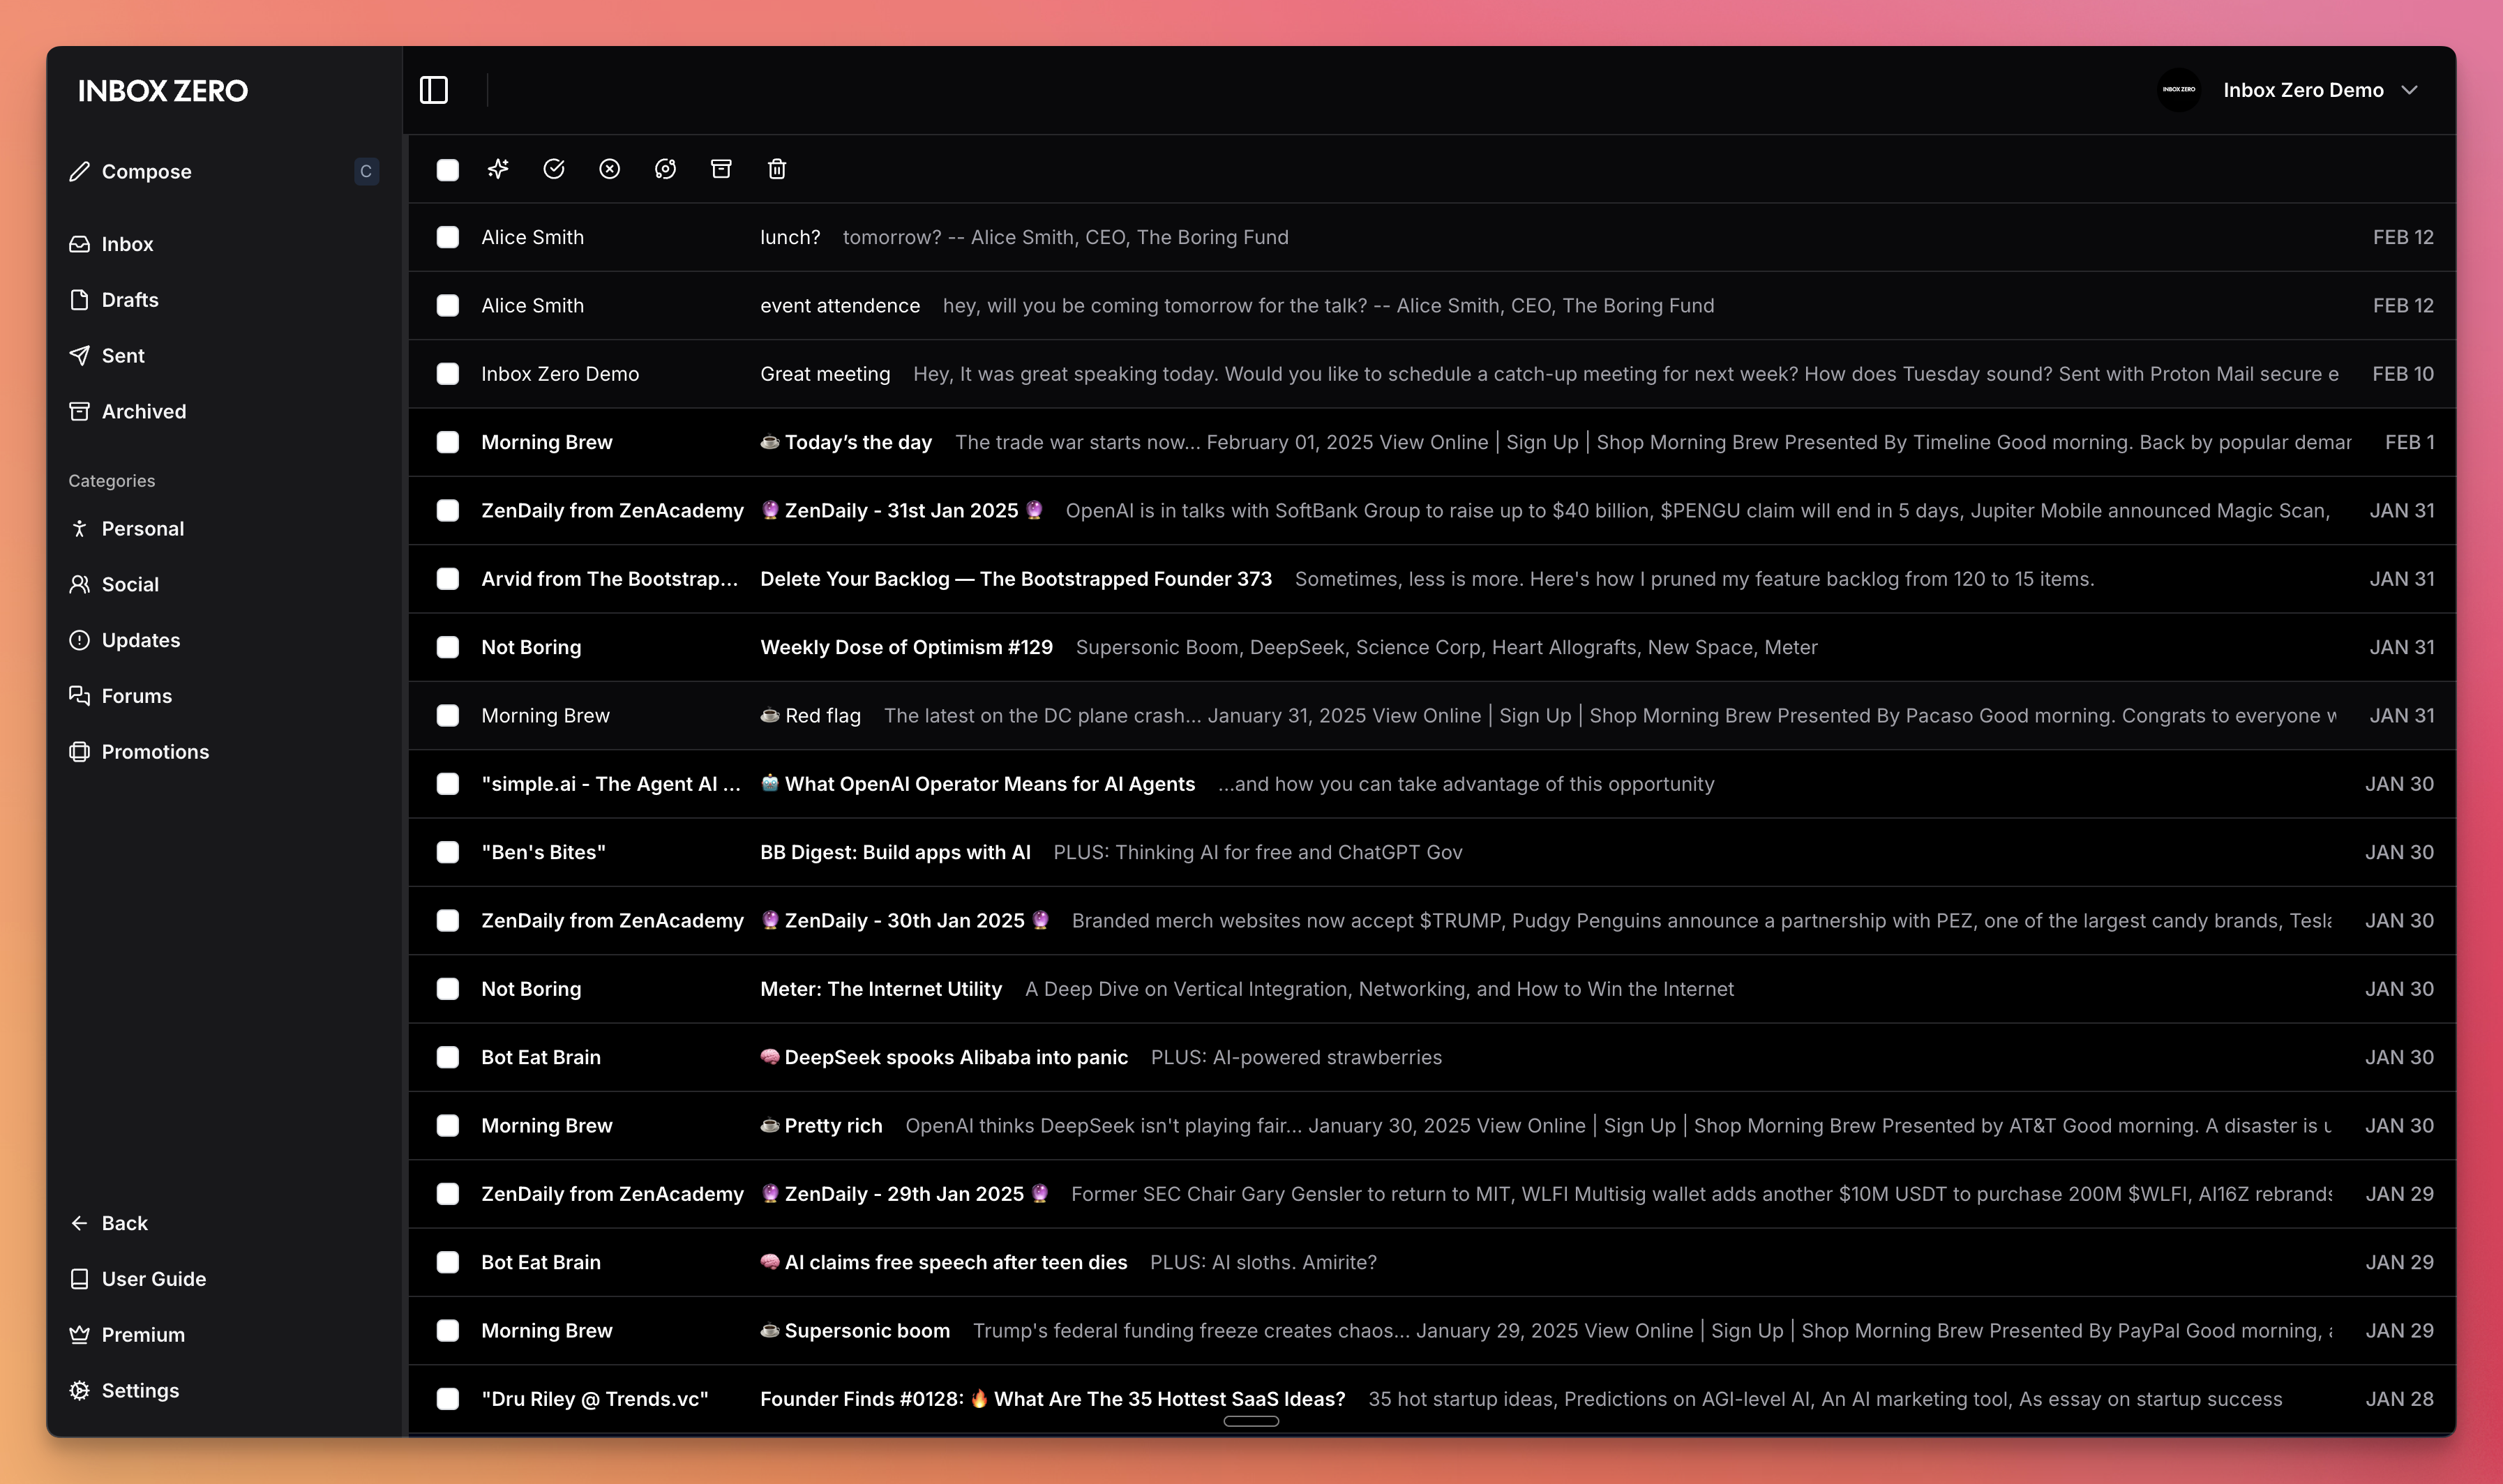
- Open source AI email client.
If you’re looking to contribute to the project, the email client is the best place to do this.
Thanks to Vercel for sponsoring Inbox Zero in support of open-source software.
Features
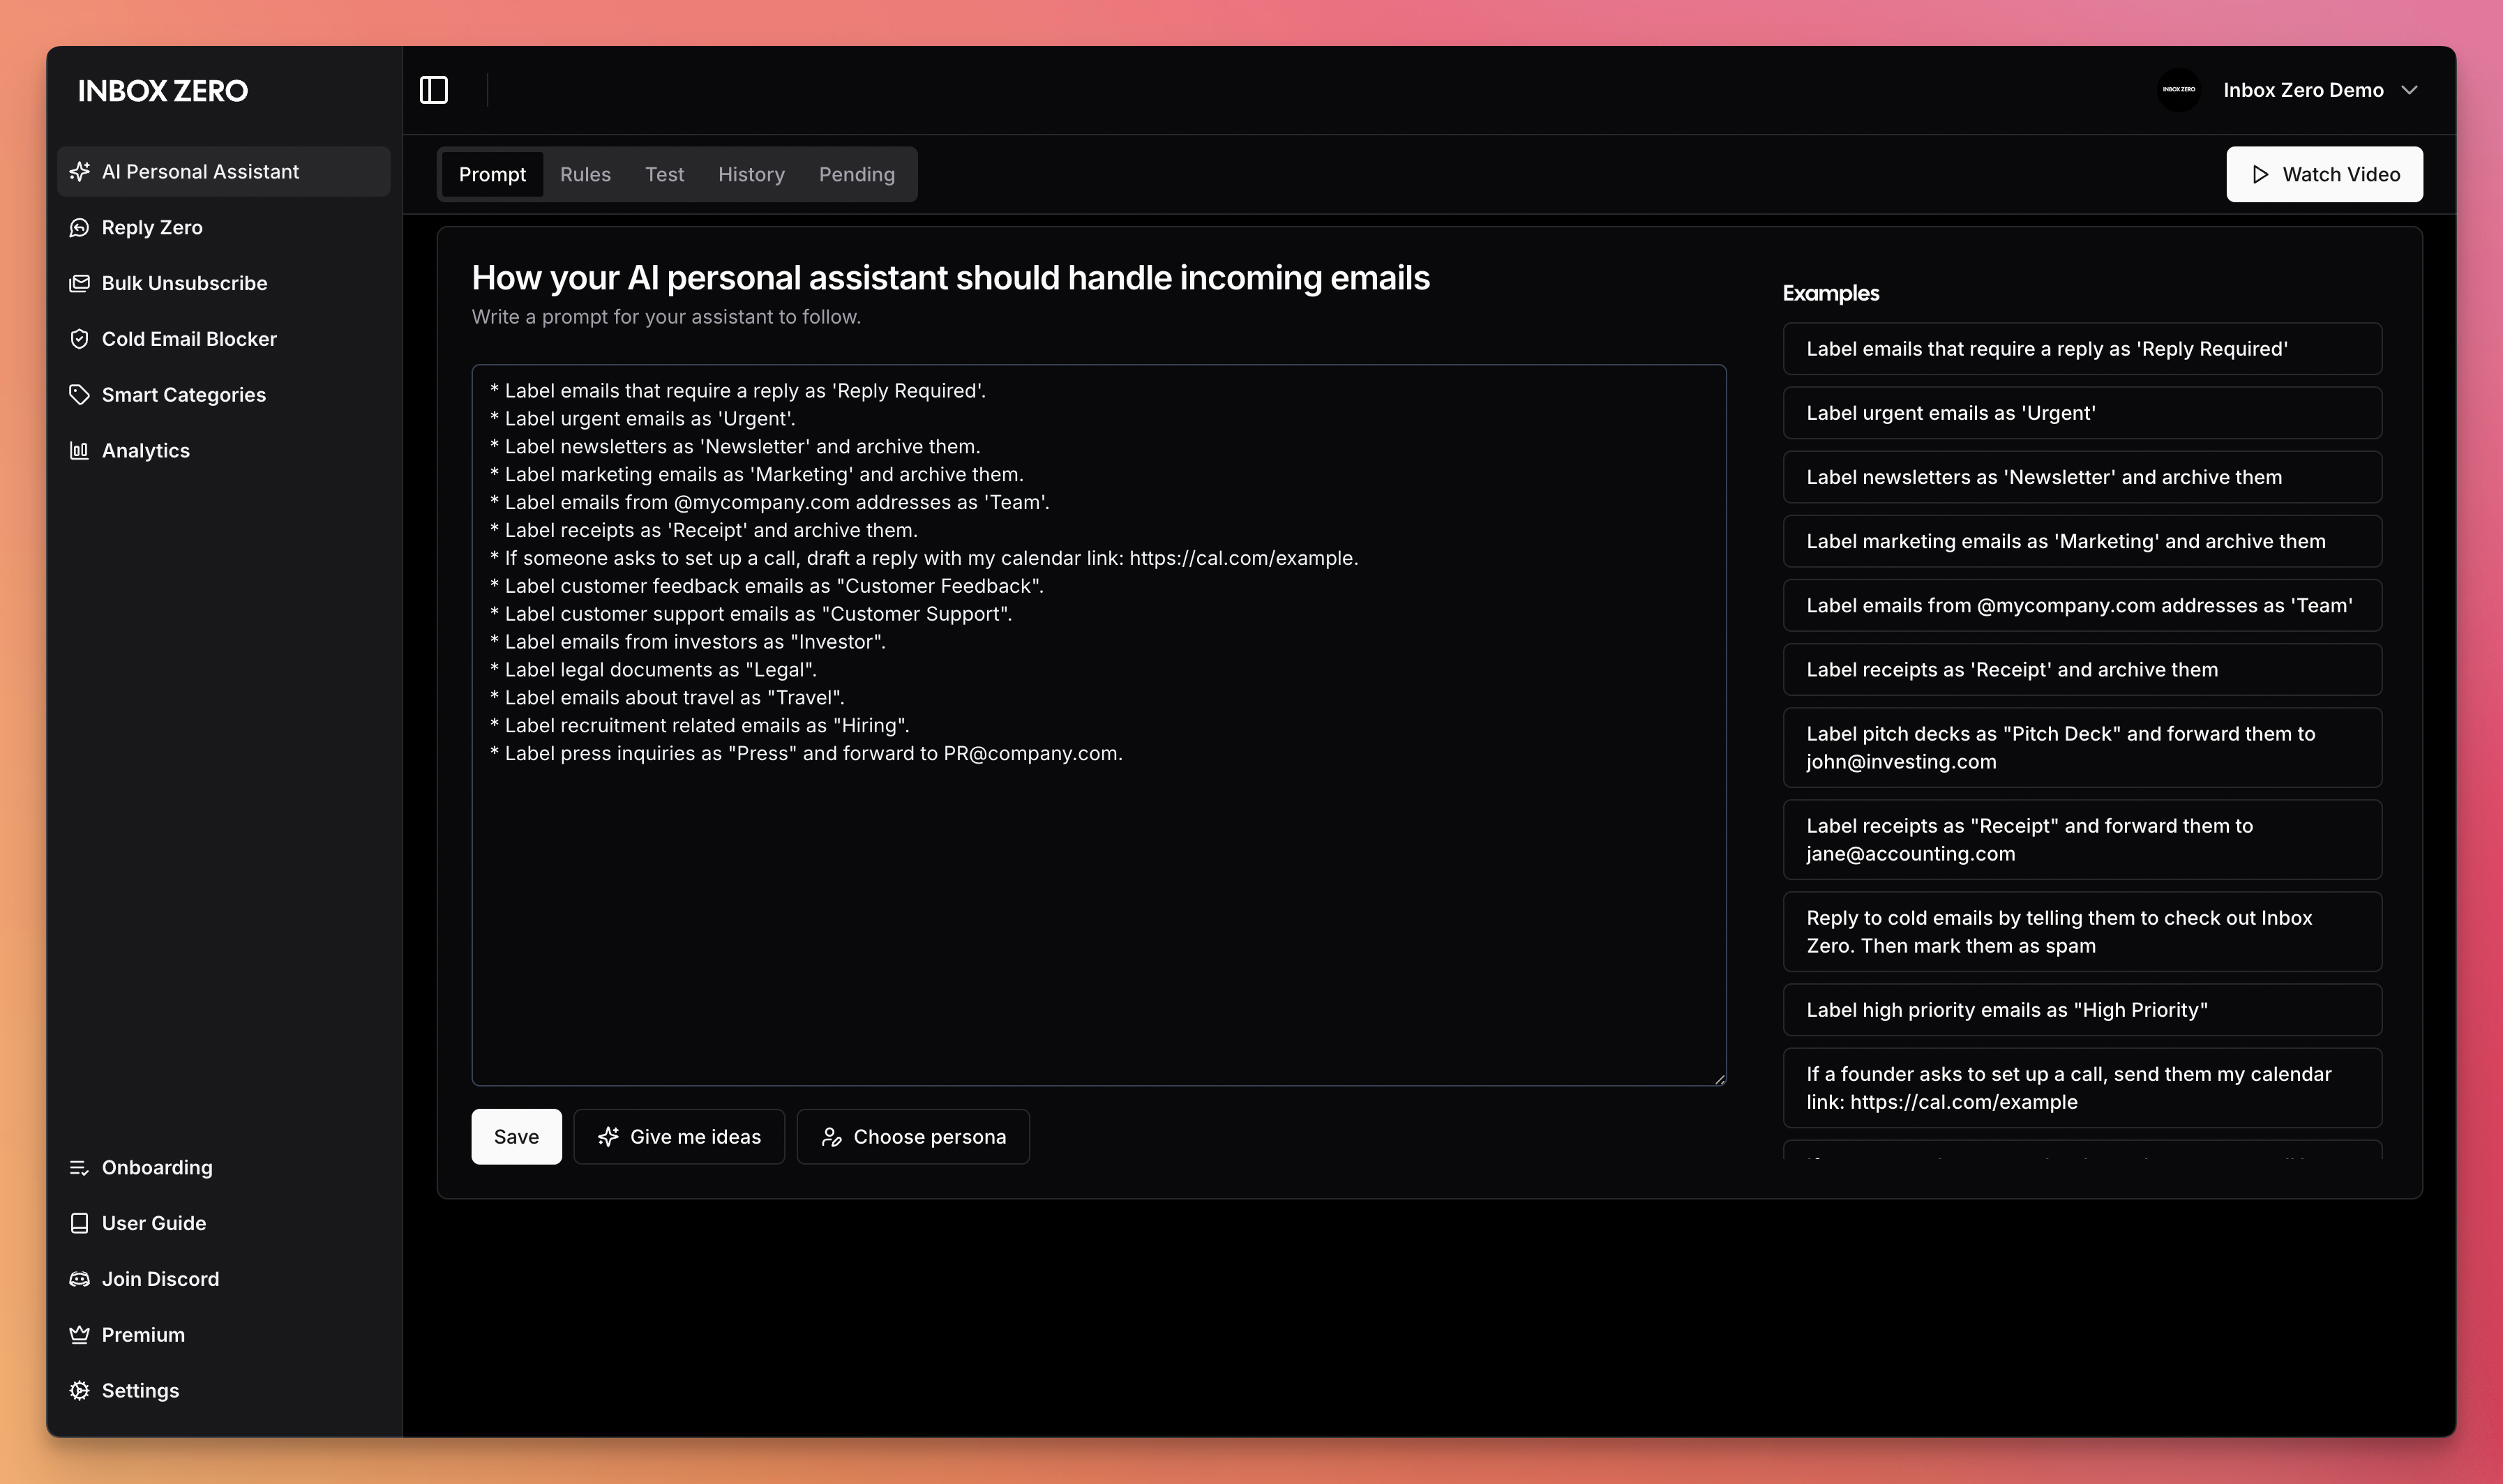
- AI Personal Assistant: Manages your email for you based on a plain text prompt file. It can take any action a human assistant can take on your behalf (Draft reply, Label, Archive, Reply, Forward, Mark Spam, and even call a webhook).
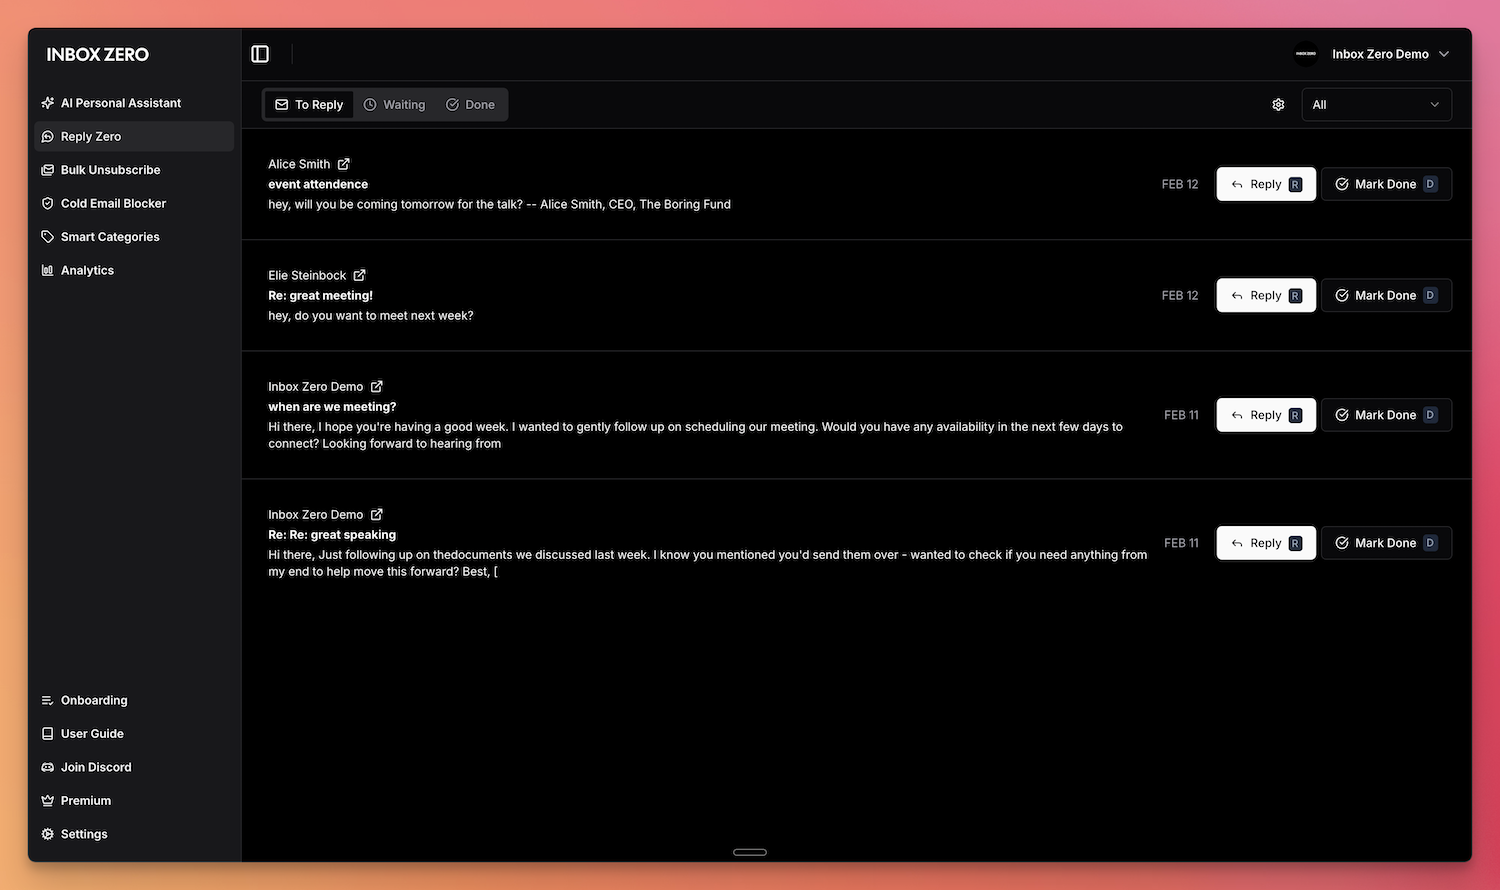
- Reply Zero: Track emails that need your reply and those awaiting responses.
- Smart Categories: Categorize everyone that’s ever emailed you.
- Bulk Unsubscriber: Quickly unsubscribe from emails you never read in one-click.
- Cold Email Blocker: Automatically block cold emails.
- Email Analytics: Track your email activity with daily, weekly, and monthly stats.
Learn more in our docs.
Feature Screenshots
 |
 |
|---|---|
| AI Assistant | Reply Zero |
 |
 |
| Gmail client | Bulk Unsubscriber |
Demo Video
Built with
Star History
Feature Requests
To request a feature open a GitHub issue, or join our Discord.
Getting Started for Developers
We offer a hosted version of Inbox Zero at https://getinboxzero.com. To self-host follow the steps below.
Setup
Here’s a video on how to set up the project. It covers the same steps mentioned in this document. But goes into greater detail on setting up the external services.
Requirements
- Node.js >= 18.0.0
- pnpm >= 8.6.12
- Docker desktop (recommended but optional)
Make sure you have the above installed before starting.
The external services that are required are (detailed setup instructions below):
Updating .env file: secrets
Create your own .env file from the example supplied:
cp apps/web/.env.example apps/web/.env
cd apps/web
pnpm install
Set the environment variables in the newly created .env. You can see a list of required variables in: apps/web/env.ts.
The required environment variables:
Secrets:
NEXTAUTH_SECRET– can be any random string (try usingopenssl rand -hex 32for a quick secure random string)GOOGLE_ENCRYPT_SECRET– Secret key for encrypting OAuth tokens (try usingopenssl rand -hex 32for a secure key)GOOGLE_ENCRYPT_SALT– Salt for encrypting OAuth tokens (try usingopenssl rand -hex 16for a secure salt)
Redis:
UPSTASH_REDIS_URL– Redis URL from Upstash. (can be empty if you are using Docker Compose)UPSTASH_REDIS_TOKEN– Redis token from Upstash. (or specify your own random string if you are using Docker Compose)
When using Vercel with Fluid Compute turned off, you should set MAX_DURATION=300 or lower. See Vercel limits for different plans here.
Updating .env file with Google OAuth credentials:
GOOGLE_CLIENT_ID– Google OAuth client ID. More info hereGOOGLE_CLIENT_SECRET– Google OAuth client secret. More info here
Go to Google Cloud. Create a new project if necessary.
Create new credentials:
-
If the banner shows up, configure consent screen (if not, you can do this later)
- Click the banner, then Click
Get Started. - Choose a name for your app, and enter your email.
- In Audience, choose
External - Enter your contact information
- Agree to the User Data policy and then click
Create. - Return to APIs and Services using the left sidebar.
- Click the banner, then Click
-
Create new credentials:
- Click the
+Create Credentialsbutton. Choose OAuth Client ID. - In
Application Type, ChooseWeb application - Choose a name for your web client
- In Authorized JavaScript origins, add a URI and enter
http://localhost:3000 - In
Authorized redirect URIsenterhttp://localhost:3000/api/auth/callback/google - Click
Create. - A popup will show up with the new credentials, including the Client ID and secret.
- Click the
-
Update .env file:
- Copy the Client ID to
GOOGLE_CLIENT_ID - Copy the Client secret to
GOOGLE_CLIENT_SECRET
- Copy the Client ID to
-
Update scopes
- Go to
Data Accessin the left sidebar (or click link above) - Click
Add or remove scopes - Copy paste the below into the
Manually add scopesbox:
https://www.googleapis.com/auth/userinfo.profile https://www.googleapis.com/auth/userinfo.email https://www.googleapis.com/auth/gmail.modify https://www.googleapis.com/auth/gmail.settings.basic https://www.googleapis.com/auth/contacts- Click
Update - Click
Savein the Data Access page.
- Go to
-
Add yourself as a test user
- Go to Audience
- In the
Test userssection, click+Add users - Enter your email and press
Save
Updating .env file with LLM parameters
You need to set an LLM, but you can use a local one too:
For the LLM, you can use Anthropic, OpenAI, or Anthropic on AWS Bedrock. You
can also use Ollama by setting the following enviroment variables:
OLLAMA_BASE_URL=http://localhost:11434/api
NEXT_PUBLIC_OLLAMA_MODEL=phi3
Note: If you need to access Ollama hosted locally and the application is running on Docker setup, you can use http://host.docker.internal:11434/api as the base URL. You might also need to set OLLAMA_HOST to 0.0.0.0 in the Ollama configuration file.
You can select the model you wish to use in the app on the /settings page of the app.
If you are using local ollama, you can set it to be default:
DEFAULT_LLM_PROVIDER=ollama
If this is the case you must also set the ECONOMY_LLM_PROVIDER environment variable.
Redis and Postgres
We use Postgres for the database.
For Redis, you can use Upstash Redis or set up your own Redis instance.
You can run Postgres & Redis locally using docker-compose
docker-compose up -d # -d will run the services in the background
Running the app
To run the migrations:
pnpm prisma migrate dev
To run the app locally for development (slower):
pnpm run dev
Or from the project root:
turbo dev
To build and run the app locally in production mode (faster):
pnpm run build
pnpm start
Open http://localhost:3000 to view the app in your browser.
Premium
Many features are available only to premium users. To upgrade yourself, make yourself an admin in the .env: [email protected]
Then upgrade yourself at: http://localhost:3000/admin.
Set up push notifications via Google PubSub to handle emails in real time
Follow instructions here.
Set env var GOOGLE_PUBSUB_TOPIC_NAME.
When creating the subscription select Push and the url should look something like: https://www.getinboxzero.com/api/google/webhook?token=TOKEN or https://abc.ngrok-free.app/api/google/webhook?token=TOKEN where the domain is your domain. Set GOOGLE_PUBSUB_VERIFICATION_TOKEN in your .env file to be the value of TOKEN.
To run in development ngrok can be helpful:
ngrok http 3000
# or with an ngrok domain to keep your endpoint stable (set `XYZ`):
ngrok http --domain=XYZ.ngrok-free.app 3000
And then update the webhook endpoint in the Google PubSub subscriptions dashboard.
To start watching emails visit: /api/google/watch/all
Watching for email updates
Set a cron job to run these:
The Google watch is necessary. Others are optional.
Here are some easy ways to run cron jobs. Upstash is a free, easy option. I could never get the Vercel vercel.json. Open to PRs if you find a fix for that.
Contributing to the project
You can view open tasks in our GitHub Issues.
Join our Discord to discuss tasks and check what’s being worked on.
ARCHITECTURE.md explains the architecture of the project (LLM generated).
Dev Tools Supporting MCP
The following are the main code editors that support the Model Context Protocol. Click the link to visit the official website for more information.


