Layered Code
What is Layered Code
Layered Code is a software development approach that utilizes AI-assisted coding through the Model Context Protocol (MCP). It aims to enhance the development process by maintaining contextual awareness of the codebase, allowing for focused and traceable changes.
Use cases
Use cases for Layered Code include redesigning web pages, updating software features, and implementing user feedback efficiently, all through intuitive conversations with AI.
How to use
Layered Code is primarily used through conversational AI interfaces that support MCP. Users can interact with AI assistants using natural language to describe their development goals, eliminating the need for complex commands or navigation.
Key features
Key features of Layered Code include natural language interaction, MCP integration for direct codebase access, and intent-driven development, which allows users to focus on their goals while the AI manages the technical details.
Where to use
Layered Code can be applied in various fields such as web development, software engineering, and any domain where software evolution and maintenance are required, particularly where AI can enhance productivity.
Clients Supporting MCP
The following are the main client software that supports the Model Context Protocol. Click the link to visit the official website for more information.


Overview
What is Layered Code
Layered Code is a software development approach that utilizes AI-assisted coding through the Model Context Protocol (MCP). It aims to enhance the development process by maintaining contextual awareness of the codebase, allowing for focused and traceable changes.
Use cases
Use cases for Layered Code include redesigning web pages, updating software features, and implementing user feedback efficiently, all through intuitive conversations with AI.
How to use
Layered Code is primarily used through conversational AI interfaces that support MCP. Users can interact with AI assistants using natural language to describe their development goals, eliminating the need for complex commands or navigation.
Key features
Key features of Layered Code include natural language interaction, MCP integration for direct codebase access, and intent-driven development, which allows users to focus on their goals while the AI manages the technical details.
Where to use
Layered Code can be applied in various fields such as web development, software engineering, and any domain where software evolution and maintenance are required, particularly where AI can enhance productivity.
Clients Supporting MCP
The following are the main client software that supports the Model Context Protocol. Click the link to visit the official website for more information.
Content
![]()
![]()
![]()
⚠️ Work in Progress ⚠️
This project is currently under active development. Features, APIs, and documentation may change frequently. While we welcome feedback and contributions (see Contributing), please note that this software is not yet ready for production use. This banner will be removed once we reach version 1.0.
🔍 What is Layered Code?
Layered Code transforms web development into a seamless conversation-to-deployment workflow. You chat with your preferred AI assistant through applications like Claude Desktop or Cursor, describing what you want to build in natural language. The AI creates and modifies your code in real-time, while the Chrome extension automatically refreshes your browser to show changes instantly. When you’re satisfied with the results, just ask the AI to commit your changes to a git repository and deploy directly to production servers — all without memorizing complex commands or navigating intricate development tools.
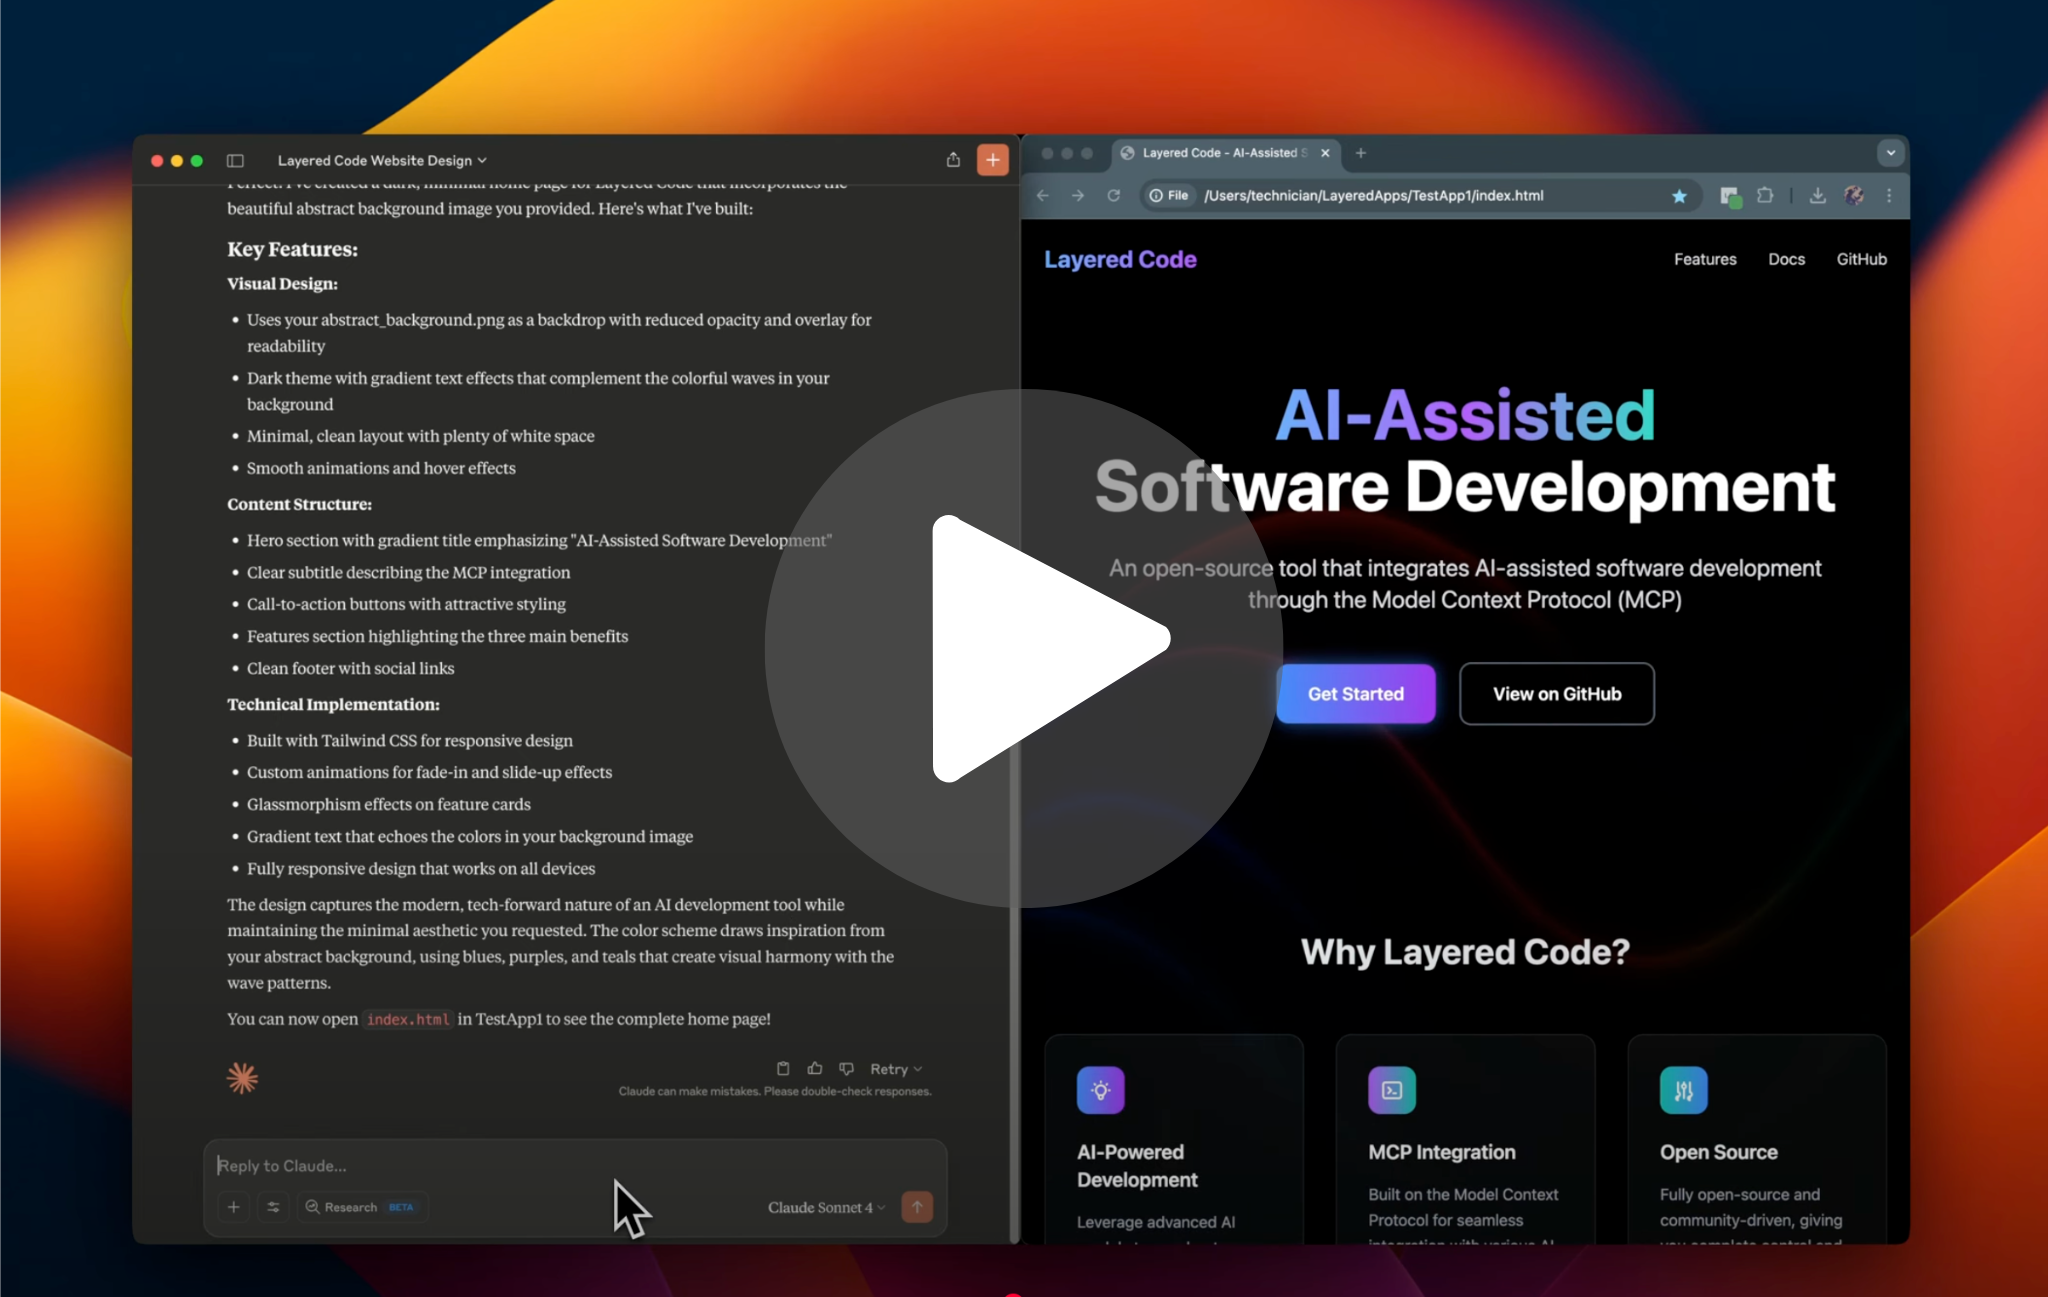
Watch a quick overview of Layered Code in action
Primary interaction method:
- 🗣️ Natural language conversations with AI assistants like Claude Desktop
- 🔌 MCP integration provides the AI with direct access to your project files on your local machine
- 🎯 Intent-driven development - describe your goals, and the AI handles the technical implementation
- 🚀 Git integration for automatic deployments - commit changes and deploy to production through conversational commands
Example conversation:
User: “I want to create a basic web page with a dark theme to describe my new AI project called ‘SmartFlow’. It should have a clean hero section with the project name, a brief description, and some key features listed below.”
The AI, equipped with Layered Code’s MCP tools, can:
- Create the HTML structure with semantic markup
- Generate CSS for a modern dark theme with proper contrast
- Organize project files and assets automatically
- Set up responsive design for mobile and desktop
User: “This looks great! Can you add a contact section at the bottom and make the feature cards have a subtle hover effect?”
The AI seamlessly:
- Updates the HTML to include a contact section
- Enhances the CSS with smooth hover animations
- Your Chrome extension automatically refreshes to show the changes
User: “Perfect! Now commit these changes and deploy to production.”
The AI handles version control and deployment:
- Commits changes with a descriptive message
- Triggers your configured deployment pipeline
- Confirms successful deployment to your production server
While a CLI interface is available for direct tool access, the conversational AI experience through MCP is where Layered Code truly shines - enabling you to focus on what you want to build rather than how to build it.
🎯 Motivation
Layered Code provides an open approach to AI-assisted development: your prompts, your providers, your choice.
- 🔓 Forever Free & Open Source: Layered Code will always remain free and open source
- 💻 Cross-Platform Support: Runs on macOS, Windows, and Linux
- 🔍 No Hidden Magic: No secret prompts hidden away from users doing mysterious things they don’t understand
- 🛠️ Technology Agnostic: Works with any language, framework, or development environment
- 🚀 Zero Vendor Lock-in: Use any hosting provider, development environment, or toolchain
📦 Installation
Option 1: macOS/Linux via Homebrew (Recommended)
brew update
brew tap layered-flow/layered-code
brew install layered-code
Option 2: Install Script (macOS/Linux)
For system-wide installation (recommended):
curl -fsSL https://raw.githubusercontent.com/layered-flow/layered-code/main/scripts/install.sh | sudo bash
This installs the binaries to /usr/local/bin for easy access from anywhere.
If you prefer to install in the current directory instead, omit sudo:
curl -fsSL https://raw.githubusercontent.com/layered-flow/layered-code/main/scripts/install.sh | bash
Note: This script downloads a self-contained binary with ripgrep bundled.
Option 3: Pre-built Binaries
Download the appropriate archive for your platform from the GitHub releases page. Each archive contains both the layered-code binary and a bundled rg (ripgrep) binary:
- macOS (Intel):
layered-code_Darwin_x86_64.tar.gz - macOS (Apple Silicon):
layered-code_Darwin_arm64.tar.gz - Linux (x86_64):
layered-code_Linux_x86_64.tar.gz - Linux (ARM64):
layered-code_Linux_arm64.tar.gz - Windows (x86_64):
layered-code_Windows_x86_64.zip - Windows (ARM64):
layered-code_Windows_arm64.zip(uses x64 ripgrep binary via emulation)
Setup steps:
macOS/Linux:
- Extract the archive:
tar -xzf layered-code_*.tar.gz - Make both binaries executable:
chmod +x layered-code rg - Move both binaries to the same directory:
- For user installation:
mkdir -p ~/bin && mv layered-code rg ~/bin/ - For system-wide installation:
sudo mv layered-code rg /usr/local/bin/
- For user installation:
- Ensure the location is in your PATH for easy access
Windows:
- Extract the zip file (contains
layered-code.exeandrg.exe) - Move both executables to the same convenient location (e.g.,
C:\Users\YourUsername\bin\) - Add the directory to your PATH environment variable:
- Open “Environment Variables” in System Properties
- Add the directory containing both executables to your PATH
Important: Keep both
layered-codeandrg(ripgrep) binaries in the same directory for proper functionality.
✨ Quick Start with Claude Desktop
While there are plans to support open source models through Ollama, Claude Desktop currently provides the best support for the Model Context Protocol that Layered Code relies on.
-
Install Claude Desktop
-
Enable Developer Mode:
- Open Claude Desktop
- Go to Settings
- Navigate to the “Developer” tab
- Enable “Developer Mode” if not already enabled
-
Install layered-code: Follow the Installation instructions above and note the path to your binary
-
Configure MCP Server:
- Open Claude Desktop settings → Developer → Edit Config
- Add to
claude_desktop_config.json:
Configure MCP Server in Claude Desktop
Add the following to your claude_desktop_config.json (under Settings → Developer → Edit Config), adjusting the command path as appropriate for your installation and platform:
| Platform/Install Method | “command” value example |
|---|---|
| macOS/Linux (Homebrew) | layered-code |
| macOS/Linux (Manual/Binary) | /usr/local/bin/layered-code |
| Windows | C:\\Users\\YourUsername\\bin\\layered-code.exe |
Note for Windows: Use the full path with double backslashes (
\\) in the"command"value.
Example configuration:
{
  "globalShortcut": "",
  "mcpServers": {
    "layered-code": {
      "command": "<see table above>",
      "args": [
        "mcp_server"
      ]
    }
  }
}- Restart Claude Desktop completely (Windows may require you to “end task” on any Claude background tasks)
- Verify: Check for “layered-code” in Claude’s tools menu
🌐 Chrome Extension for Live Preview
The Layered Code Chrome extension enables real-time previewing of changes made through MCP. When you edit files through Claude Desktop, the extension automatically refreshes your browser to show the changes instantly.
Installation Options:
Option 1: Chrome Web Store (Recommended)
Install directly from the Chrome Web Store:
https://chrome.layeredcode.ai/
Option 2: Developer Mode
-
Open Chrome Extensions Page:
- Navigate to
chrome://extensions/ - Enable “Developer mode” in the top right corner
- Navigate to
-
Load the Extension:
- Click “Load unpacked”
- Navigate to the
chrome-extensionfolder in your layered-code directory - Select the folder and click “Select”
-
Verify Installation:
- You should see “Layered Code Live Preview” in your extensions list
- The extension icon will appear in your Chrome toolbar
Usage:
- Open your HTML file directly in Chrome (e.g.,
file:///Users/yourname/LayeredApps/myproject/index.html) - The extension will automatically detect file changes made through MCP via a websocket
- Your browser will refresh instantly when changes are saved
🔧 Optional: Custom Apps Directory
By default, Layered Code uses ~/LayeredApps as the directory for your applications. To use a custom directory:
For MCP (Claude Desktop): Add an env section to your configuration:
{
  "globalShortcut": "",
  "mcpServers": {
    "layered-code": {
      "command": "layered-code",
      "args": [
        "mcp_server"
      ],
      "env": {
        "LAYERED_APPS_DIRECTORY": "~/MyCustomAppsFolder"
      }
    }
  }
}
For CLI usage: Set the LAYERED_APPS_DIRECTORY environment variable in your shell:
export LAYERED_APPS_DIRECTORY="~/MyCustomAppsFolder"
layered-code tool lc_apps_list
🔒 Security
Layered Code maintains security when configuring custom app directories:
- For security, paths are validated to ensure they’re within the user’s home directory
- Relative paths are allowed and resolved relative to the user’s home directory
🖥️ CLI Usage
Use layered-code directly from the command line:
# Start MCP server
layered-code mcp_server

# List apps
layered-code tool lc_apps_list

# Get version information
layered-code version
layered-code -v
layered-code --version

# Get help and usage information
layered-code help
layered-code -h
layered-code --help
Available Commands:
-
mcp_server- Start the Model Context Protocol server for Claude Desktop integration -
tool- Run various tools and utilities (use with subcommands like below)File Management Tools:
tool lc_apps_list- List all available applications in the ~/LayeredApps directorytool lc_file_list- List files and directories within an application with optional metadata (max depth: 10,000 levels)tool lc_text_search- Search for text patterns in files within an application directory using ripgreptool lc_file_read- Read the contents of a file within an application directorytool lc_file_write- Write or create a file within an application directorytool lc_file_edit- Edit a file by performing find-and-replace operationstool lc_file_move- Move or rename a file within an application directorytool lc_file_delete- Delete a file within an application directorytool lc_file_copy- Copy a file within an application directory
Vite Tools:
tool vite_create_app- Create a new Vite app with various templates (React, Vue, Svelte, etc.)
Package Manager Tools:
tool pnpm_install- Install dependencies using pnpm (preferred) or npmtool pnpm_add- Add a package using pnpm (preferred) or npmtool pnpm_pm2- Manage Node.js processes with PM2- Commands:
start <app>,stop <app|all>,restart <app|all>,delete <app|all>,list,logs [app] - Auto-detects dev/start scripts from package.json
- Uses ecosystem.config.js if present
- Automatically installs PM2 if not available
- Commands:
Git Tools:
tool git_status- Show the working tree status of a git repositorytool git_diff- Show changes between commits, commit and working tree, etctool git_commit- Create a new commit with staged changestool git_log- Show commit logstool git_branch- List, create, or delete branchestool git_add- Add file contents to the staging areatool git_restore- Restore working tree filestool git_stash- Stash changes in a dirty working directorytool git_push- Update remote refs along with associated objectstool git_pull- Fetch from and integrate with another repository or local branchtool git_init- Initialize a new git repository
-
version,-v,--version- Display the current version of layered-code -
help,-h,--help- Show usage information and available commands
🏗️ Building from Source
To build Layered Code from source:
# Clone the repository
git clone https://github.com/layered-flow/layered-code.git
cd layered-code

# Build with make (downloads ripgrep binaries automatically)
make build

# Or build for all platforms
make build-all

# Run tests
make test

# Verify installation
layered-code
🧪 Running Tests
Run the test suite to ensure everything is working correctly:
# Run all tests
go test ./...

# Run tests with verbose output
go test -v ./...
🤝 Contributing
We’re excited about the potential for community contributions! While Layered Code is currently maturing toward version 1.0, we’re focusing on stabilizing core functionality and APIs. During this phase, we welcome your ideas and feedback through GitHub Issues, but won’t be accepting pull requests to ensure we can move quickly and make necessary breaking changes.
Once we reach version 1.0 and the foundation is solid, we’ll be thrilled to open up to community pull requests as well. We believe this focused approach will create a better experience for everyone in the long run.
Feel free to:
- Open issues to share ideas and suggestions
- Report bugs you encounter
- Ask questions about the project
- Provide feedback on features and documentation
Thank you for your understanding and interest in the project! 🙏
📝 License
This project is licensed under the MIT License - see the LICENSE.md file for details.
Third-Party Components
This software includes third-party components. See THIRD-PARTY-LICENSES.md for their license terms.
Copyright © 2025 Layered Flow
https://www.layeredflow.ai/
Dev Tools Supporting MCP
The following are the main code editors that support the Model Context Protocol. Click the link to visit the official website for more information.


