Mcp Server Cortex
What is Mcp Server Cortex
mcp-server-cortex is a server that acts as a bridge to expose the analysis capabilities of a Cortex instance for Model Context Protocol (MCP) clients, enabling them to utilize Cortex analyzers for threat intelligence tasks.
Use cases
Use cases for mcp-server-cortex include automating threat intelligence workflows, enriching observables for security investigations, and integrating with other security tools for enhanced analysis capabilities.
How to use
To use mcp-server-cortex, ensure you have the Rust toolchain installed, a running Cortex instance with the necessary API key, and configured analyzers. Install the server by downloading a pre-compiled binary and follow the setup instructions to connect it to your Cortex instance.
Key features
Key features of mcp-server-cortex include centralized analysis from a single point, extensibility for adding new analyzers, automation of observable enrichment, integration with TheHive, and secure API-key based access.
Where to use
mcp-server-cortex can be used in cybersecurity environments, specifically for threat intelligence analysis, incident response, and any scenario requiring observable analysis.
Clients Supporting MCP
The following are the main client software that supports the Model Context Protocol. Click the link to visit the official website for more information.


Overview
What is Mcp Server Cortex
mcp-server-cortex is a server that acts as a bridge to expose the analysis capabilities of a Cortex instance for Model Context Protocol (MCP) clients, enabling them to utilize Cortex analyzers for threat intelligence tasks.
Use cases
Use cases for mcp-server-cortex include automating threat intelligence workflows, enriching observables for security investigations, and integrating with other security tools for enhanced analysis capabilities.
How to use
To use mcp-server-cortex, ensure you have the Rust toolchain installed, a running Cortex instance with the necessary API key, and configured analyzers. Install the server by downloading a pre-compiled binary and follow the setup instructions to connect it to your Cortex instance.
Key features
Key features of mcp-server-cortex include centralized analysis from a single point, extensibility for adding new analyzers, automation of observable enrichment, integration with TheHive, and secure API-key based access.
Where to use
mcp-server-cortex can be used in cybersecurity environments, specifically for threat intelligence analysis, incident response, and any scenario requiring observable analysis.
Clients Supporting MCP
The following are the main client software that supports the Model Context Protocol. Click the link to visit the official website for more information.
Content
MCP Server for Cortex
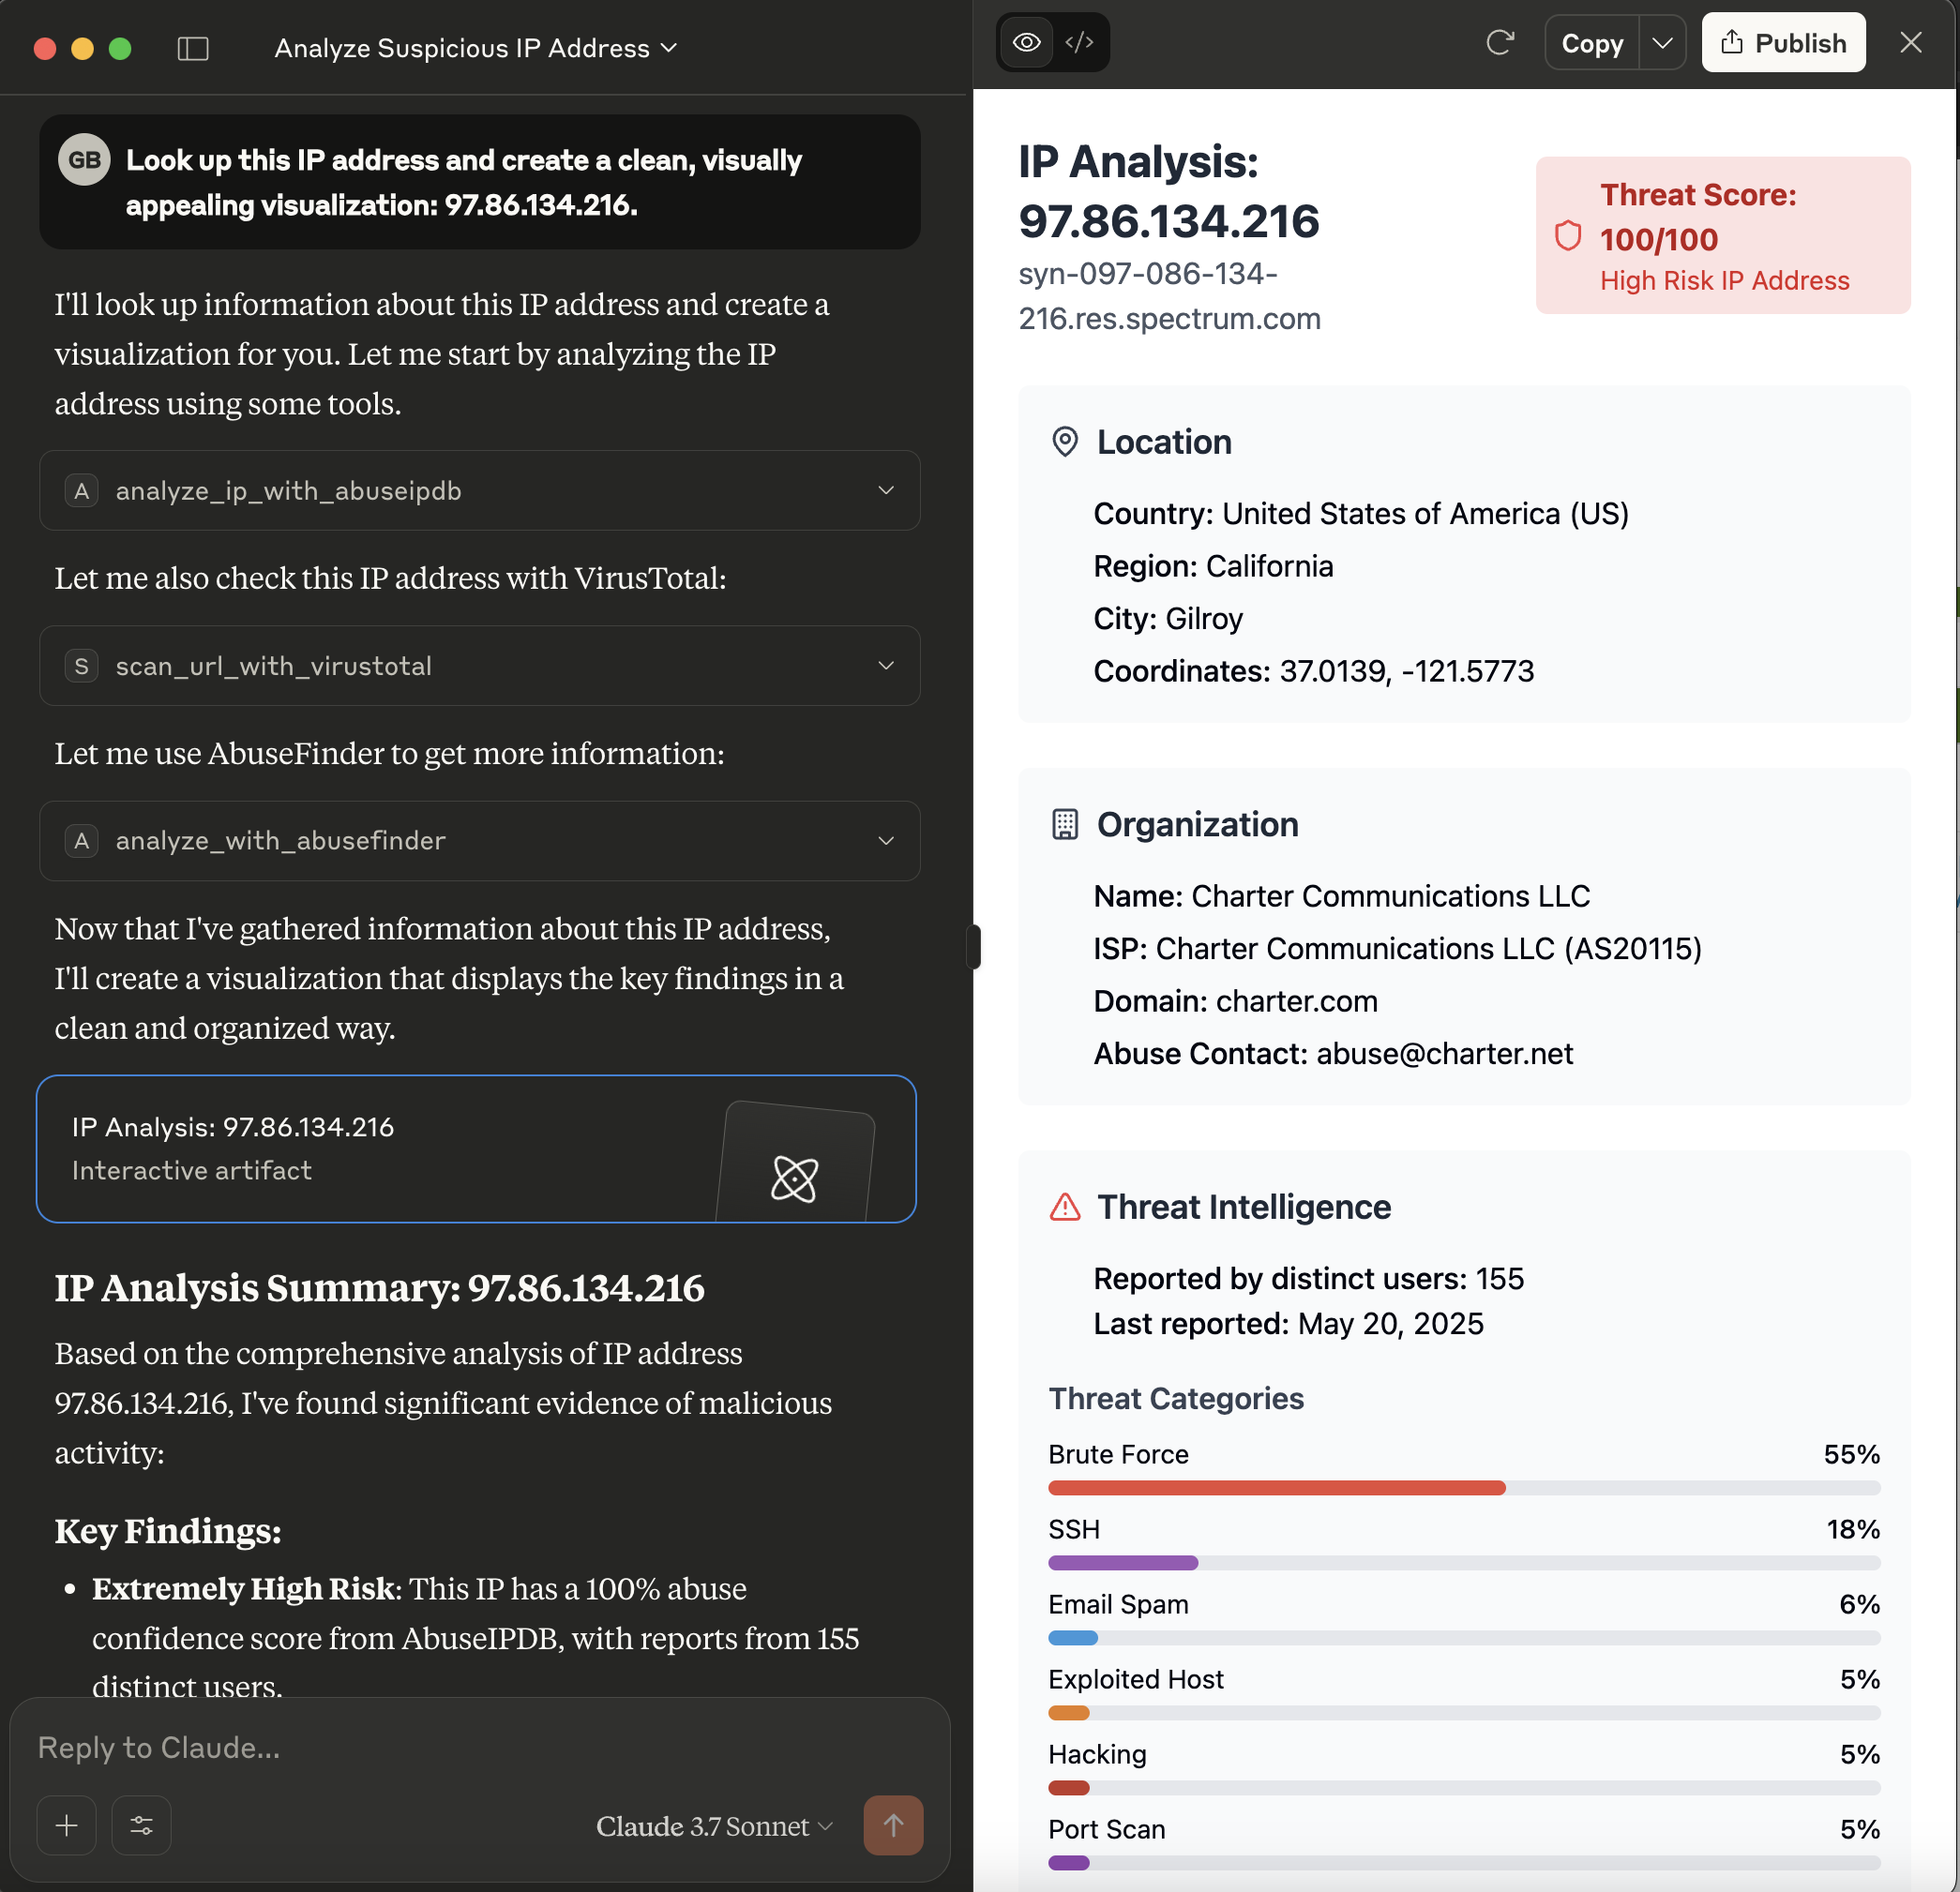
This server acts as a bridge, exposing the powerful analysis capabilities of a Cortex instance as tools consumable by Model Context Protocol (MCP) clients, such as large language models like Claude. It allows these clients to leverage Cortex analyzers for threat intelligence tasks.
What is Cortex?
Cortex is a powerful, free, and open-source observable analysis and active response engine. It allows you to analyze observables (like IPs, URLs, domains, files, etc.) using a variety of “analyzers” – modular pieces of code that connect to external services or perform local analysis.
Benefits of using Cortex (and this MCP server):
- Centralized Analysis: Run various analyses from a single point.
- Extensibility: Easily add new analyzers for different threat intelligence feeds and tools.
- Automation: Automate the process of enriching observables.
- Integration: Designed to work closely with TheHive, a Security Incident Response Platform (SIRP), but can also be used standalone.
- Security: API-key based access to protect your Cortex instance.
This MCP server makes these benefits accessible to MCP-compatible clients, enabling them to request analyses and receive structured results.
Prerequisites
- Rust Toolchain: Ensure you have Rust installed (visit rustup.rs).
- Cortex Instance: A running Cortex instance is required.
- The server needs network access to this Cortex instance.
- An API key for Cortex with permissions to list analyzers and run jobs.
- Configured Analyzers: The specific analyzers you intend to use (e.g.,
AbuseIPDB_1_0,Abuse_Finder_3_0,VirusTotal_Scan_3_1) must be enabled and correctly configured within your Cortex instance.
Installation
The recommended way to install the MCP Server for Cortex is to download a pre-compiled binary for your operating system.
-
Go to the Releases Page:
Navigate to the GitHub Releases page. -
Download the Binary:
Find the latest release and download the appropriate binary for your operating system (e.g.,mcp-server-cortex-linux-amd64,mcp-server-cortex-macos-amd64,mcp-server-cortex-windows-amd64.exe). -
Place and Prepare the Binary:
- Move the downloaded binary to a suitable location on your system (e.g.,
/usr/local/binon Linux/macOS, or a dedicated folder likeC:\Program Files\MCP Servers\on Windows). - For Linux/macOS: Make the binary executable:
chmod +x /path/to/your/mcp-server-cortex - Ensure the directory containing the binary is in your system’s
PATHif you want to run it without specifying the full path.
- Move the downloaded binary to a suitable location on your system (e.g.,
Alternatively, you can build the server from source (see the Building section below).
Configuration
The server is configured using the following environment variables:
CORTEX_ENDPOINT: The full URL to your Cortex API.- Example:
http://localhost:9000/api
- Example:
CORTEX_API_KEY: Your API key for authenticating with the Cortex instance.RUST_LOG(Optional): Controls the logging level for the server.- Example:
info(for general information) - Example:
mcp_server_cortex=debug,cortex_client=info(for detailed server logs and info from the cortex client library)
- Example:
Cortex Analyzer Configuration
For the tools provided by this MCP server to function correctly, the corresponding analyzers must be enabled and properly configured within your Cortex instance. The server relies on these Cortex analyzers to perform the actual analysis tasks.
The tools currently use the following analyzers by default (though these can often be overridden via tool parameters):
analyze_ip_with_abuseipdb: Uses an analyzer likeAbuseIPDB_1_0.- This analyzer typically requires an API key from AbuseIPDB. Ensure this is configured in Cortex.
analyze_with_abusefinder: Uses an analyzer likeAbuse_Finder_3_0.- AbuseFinder might have its own configuration requirements or dependencies within Cortex.
scan_url_with_virustotal: Uses an analyzer likeVirusTotal_Scan_3_1.- This analyzer requires a VirusTotal API key. Ensure this is configured in Cortex.
Key Points:
- Enable Analyzers: Make sure the analyzers you intend to use are enabled in your Cortex instance’s “Organization” -> “Analyzers” section.
- Configure Analyzers: Each analyzer will have its own configuration page within Cortex where you’ll need to input API keys, set thresholds, or define other operational parameters. Refer to the documentation for each specific Cortex analyzer.
- Test in Cortex: It’s a good practice to test the analyzers directly within the Cortex UI first to ensure they are working as expected before trying to use them via this MCP server.
If an analyzer is not configured, not enabled, or misconfigured (e.g., invalid API key), the corresponding tool call from the MCP client will likely fail or return an error from Cortex.
Example: Claude Desktop Configuration
For MCP clients like Claude Desktop, you typically configure them by specifying the command to launch the MCP server and any necessary environment variables for that server.
-
Build or Download the Server Binary:
Ensure you have themcp-server-cortexexecutable. If you’ve built it from source, it will be intarget/debug/mcp_server_cortexortarget/release/mcp_server_cortex. -
Configure Your LLM Client (e.g., Claude Desktop):
-
The method for configuring your LLM client will vary depending on the client itself.
-
For clients that support MCP, you will typically need to point the client to the path of the
mcp-server-cortexexecutable. -
Example for Claude Desktop
claude_desktop_config.json:
You would modify your Claude Desktop configuration file (usuallyclaude_desktop_config.json) to include an entry for this server.For instance, if your
mcp-server-cortexbinary is located at/opt/mcp-servers/mcp-server-cortex, your configuration might look like this:
-
Available Tools
The server provides the following tools, which can be called by an MCP client:
-
analyze_ip_with_abuseipdb- Description: Analyzes an IP address using an AbuseIPDB analyzer (or a similarly configured IP reputation analyzer) via Cortex. Returns the job report if successful.
- Parameters:
ip(string, required): The IP address to analyze.analyzer_name(string, optional): The specific name of the AbuseIPDB analyzer instance in Cortex. Defaults toAbuseIPDB_1_0.
-
analyze_with_abusefinder- Description: Analyzes various types of data (IP, domain, FQDN, URL, or email) using an AbuseFinder analyzer via Cortex. Returns the job report if successful.
- Parameters:
data(string, required): The data to analyze (e.g., “1.1.1.1”, “example.com”, “http://evil.com/malware”, “[email protected]”).data_type(string, required): The type of the data. Must be one of:ip,domain,fqdn,url,mail.analyzer_name(string, optional): The specific name of the AbuseFinder analyzer instance in Cortex. Defaults toAbuse_Finder_3_0.
-
scan_url_with_virustotal- Description: Scans a URL using a VirusTotal_Scan analyzer (e.g.,
VirusTotal_Scan_3_1) via Cortex. Returns the job report if successful. - Parameters:
url(string, required): The URL to scan.analyzer_name(string, optional): The specific name of the VirusTotal_Scan analyzer instance in Cortex. Defaults toVirusTotal_Scan_3_1.
- Description: Scans a URL using a VirusTotal_Scan analyzer (e.g.,
Building
To build the server from source, ensure you have the Rust toolchain installed (as mentioned in the “Prerequisites” section).
-
Clone the repository (if you haven’t already):
git clone https://github.com/gbrigandi/mcp-server-cortex.git
cd mcp-server-cortex
If you are already working within a cloned repository and are in its root directory, you can skip this step.
-
Build the project using Cargo:
- For a debug build:
The executable will be located atcargo buildtarget/debug/mcp-server-cortex. - For a release build (recommended for performance and actual use):
The executable will be located atcargo build --releasetarget/release/mcp-server-cortex.
- For a debug build:
After building, you can run the server executable. Refer to the “Configuration” section for required environment variables and the “Example: Claude Desktop Configuration” for how an MCP client might launch the server.
Dev Tools Supporting MCP
The following are the main code editors that support the Model Context Protocol. Click the link to visit the official website for more information.


