Mcp Server Example Ecom
What is Mcp Server Example Ecom
mcp-server-example-ecom is a demonstration project that showcases how to build a Model Context Protocol (MCP) server that integrates with a simple E-commerce API, allowing AI assistants to interact with business systems through the MCP protocol.
Use cases
Use cases include enabling AI assistants to help users browse products, manage shopping carts, and complete purchases, thereby providing a seamless shopping experience without requiring users to interact directly with the E-commerce API.
How to use
To use mcp-server-example-ecom, set up the E-commerce API by navigating to the ‘/ecom’ directory, installing the necessary dependencies with npm, and then running the server. The MCP server can then be used to facilitate interactions between AI assistants and the E-commerce API.
Key features
Key features include a RESTful E-commerce API for managing products, carts, and checkouts, and an MCP server that allows AI assistants to interact with the E-commerce functionalities without direct API access.
Where to use
mcp-server-example-ecom can be used in the e-commerce sector, particularly for integrating AI assistants into online shopping platforms to enhance user experience and streamline transactions.
Clients Supporting MCP
The following are the main client software that supports the Model Context Protocol. Click the link to visit the official website for more information.


Overview
What is Mcp Server Example Ecom
mcp-server-example-ecom is a demonstration project that showcases how to build a Model Context Protocol (MCP) server that integrates with a simple E-commerce API, allowing AI assistants to interact with business systems through the MCP protocol.
Use cases
Use cases include enabling AI assistants to help users browse products, manage shopping carts, and complete purchases, thereby providing a seamless shopping experience without requiring users to interact directly with the E-commerce API.
How to use
To use mcp-server-example-ecom, set up the E-commerce API by navigating to the ‘/ecom’ directory, installing the necessary dependencies with npm, and then running the server. The MCP server can then be used to facilitate interactions between AI assistants and the E-commerce API.
Key features
Key features include a RESTful E-commerce API for managing products, carts, and checkouts, and an MCP server that allows AI assistants to interact with the E-commerce functionalities without direct API access.
Where to use
mcp-server-example-ecom can be used in the e-commerce sector, particularly for integrating AI assistants into online shopping platforms to enhance user experience and streamline transactions.
Clients Supporting MCP
The following are the main client software that supports the Model Context Protocol. Click the link to visit the official website for more information.
Content
MCP Server Example: E-commerce Integration
This repository demonstrates how to build a Model Context Protocol (MCP) server that integrates with a simple E-commerce API. It shows how AI assistants can interact with business systems through the MCP protocol.
Overview
This project consists of two main components:
- E-commerce API: A simple RESTful API for an e-commerce store (products, cart, checkout)
- MCP Server: Exposes the e-commerce functionality to AI assistants via MCP
With this integration, AI assistants like Claude can help users browse products, manage shopping carts, and complete purchases without needing direct access to the underlying API.
System Architecture
graph LR
    U[User] -- Chats with --> CD[Claude Desktop]

    subgraph "MCP Integration"
        CD -- Requests --> MCPS[MCP Server]
        MCPS -- Tool calls --> CD
    end

    subgraph "Business System"
        MCPS -- REST API calls --> ECOM[E-commerce API]
        ECOM -- JSON responses --> MCPS
        ECOM -- Persists data --> DB[(In-memory\nDatabase)]
    end

    style CD fill:#f9d6c5,stroke:#333,stroke-width:2px
    style MCPS fill:#c5e1f9,stroke:#333,stroke-width:2px
    style ECOM fill:#d6f9c5,stroke:#333,stroke-width:2px
    style DB fill:#e1c5f9,stroke:#333,stroke-width:2px
The MCP server acts as a bridge between Claude for Desktop and the E-commerce system. Claude can use MCP tools to interact with the e-commerce API without needing direct access to the API endpoints. This approach allows AI assistants to safely interact with business systems through standardized interfaces.
Project Structure
/ecom- E-commerce API server (Express.js + TypeScript)/mcp- Model Context Protocol server connecting to the e-commerce API
Getting Started
Prerequisites
- Node.js (v16+ recommended)
- npm or yarn
- Claude for Desktop (optional, for testing)
Installation & Setup
-
Set up the E-commerce API
cd ecom
npm install
npm run dev
The API will be available at
http://localhost:3000 -
Set up the MCP Server
cd mcp
npm install
npm run build
Note: You don’t need to start MCP server as it will be run by MCP host automatically.
Using with Claude for Desktop
To use this MCP server with Claude for Desktop:
-
Make sure both the E-commerce API and MCP server are running
-
Open your Claude for Desktop configuration file:
- On MacOS:
~/Library/Application Support/Claude/claude_desktop_config.json - On Windows:
%AppData%\Claude\claude_desktop_config.json
Alternatively you can go to Claude > Settings > Developer > Edit config which will lead you to this file.
- On MacOS:
-
Add the MCP server configuration:
{
  "mcpServers": {
    "ecommerce": {
      "command": "node",
      "args": [
        "/ABSOLUTE/PATH/TO/mcp/build/index.js"
      ]
    }
  }
}
Replace
/ABSOLUTE/PATH/TO/with the actual path to your project. -
Restart Claude for Desktop
-
Verify the server is connected by checking for the tools icon in the Claude interface
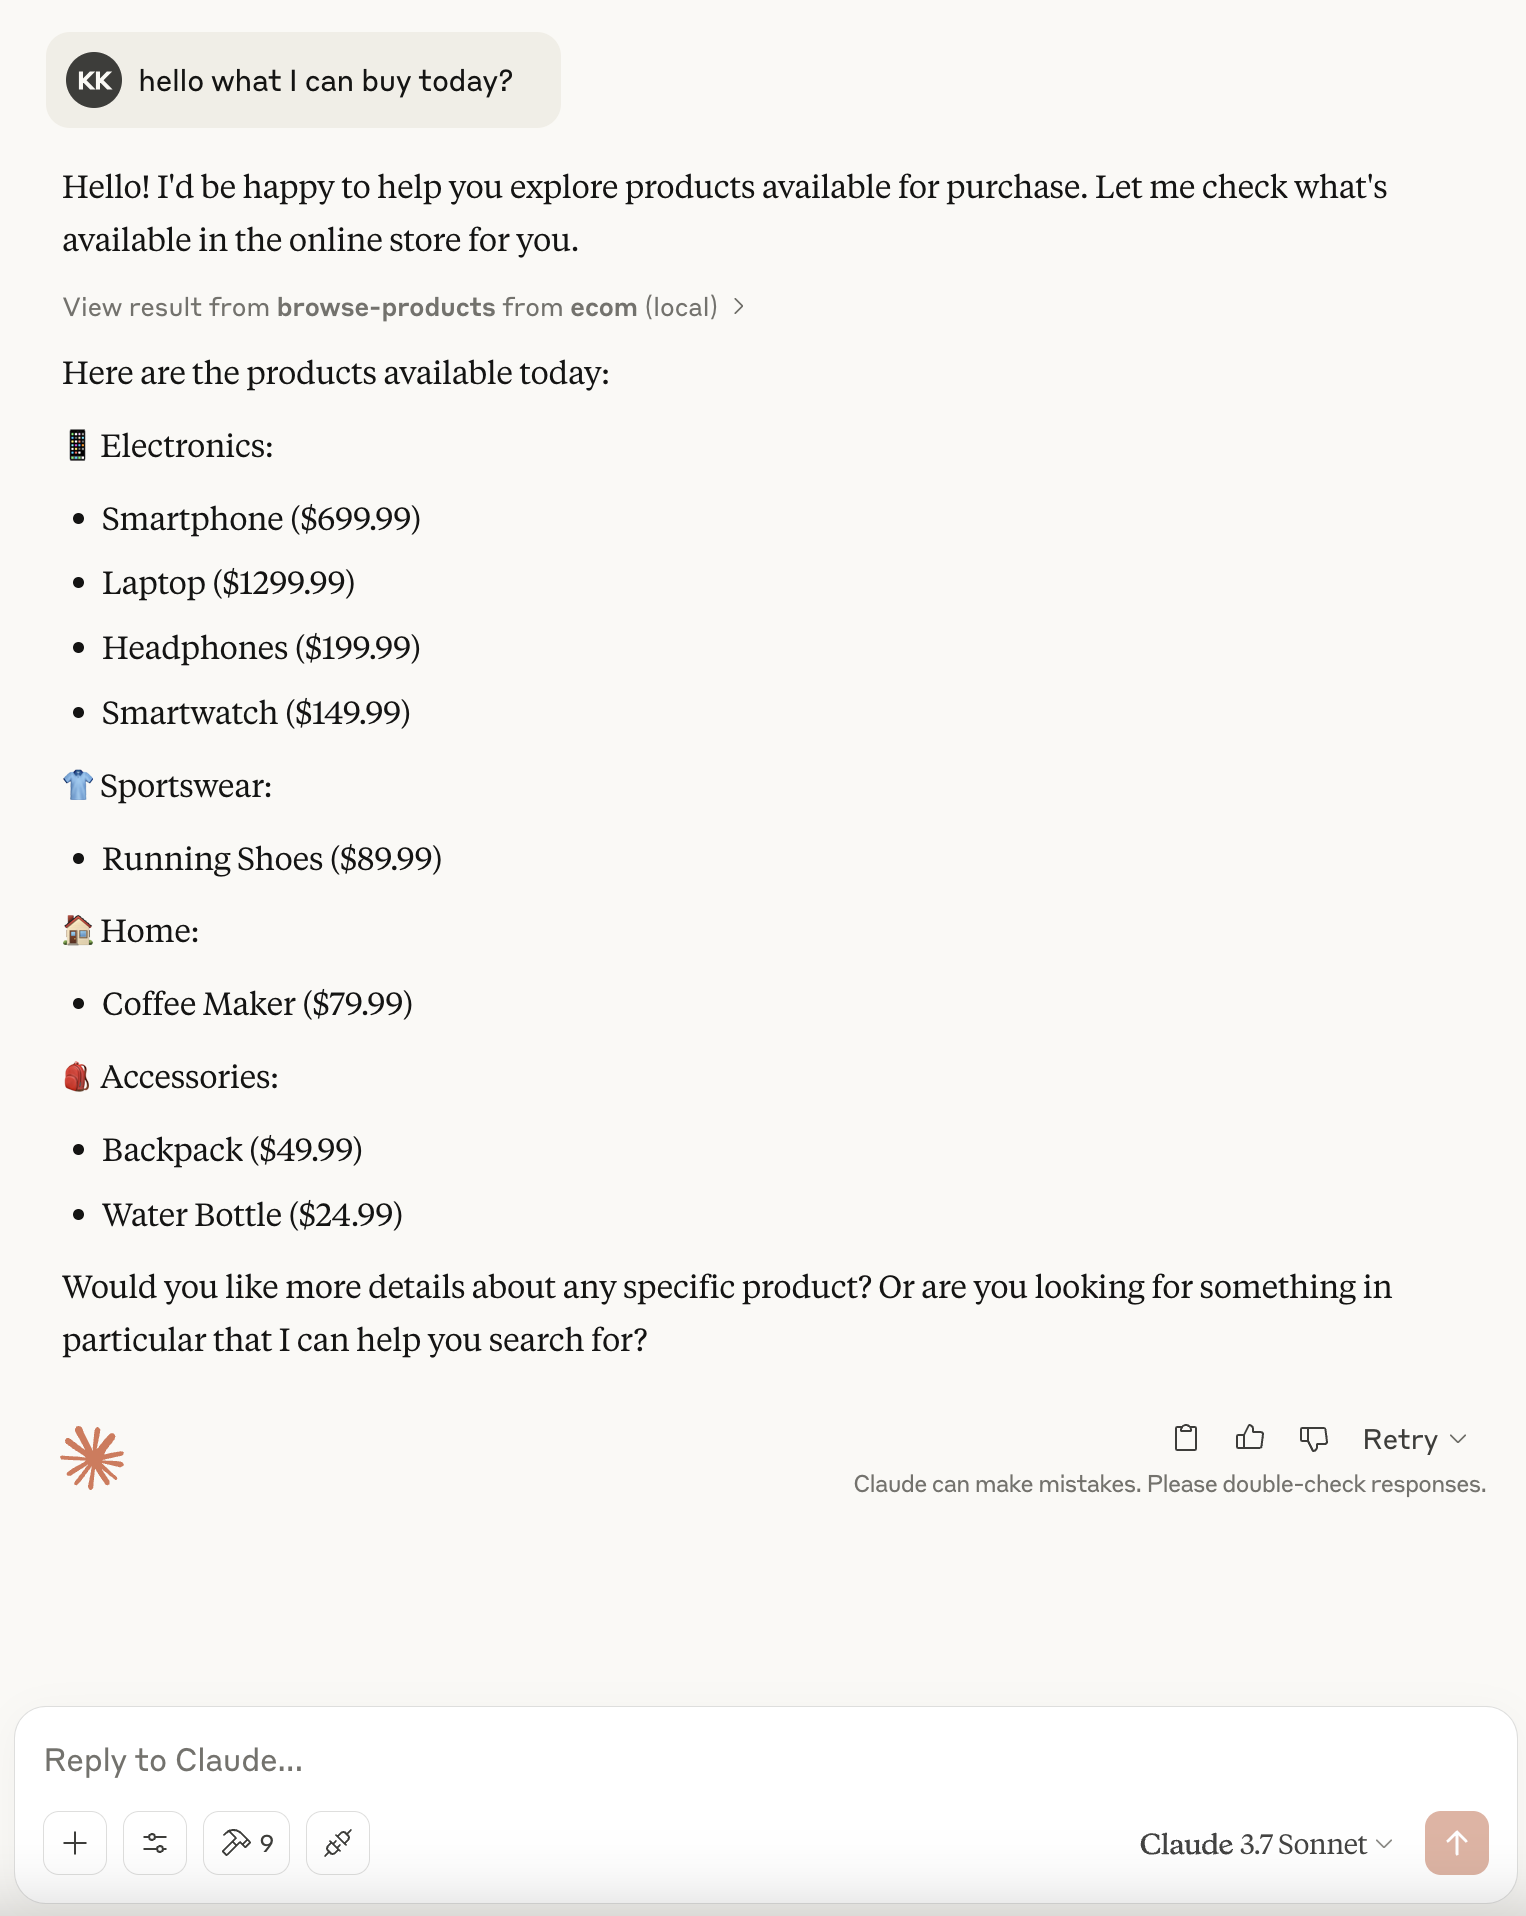
- After that you can simply use provided functionalities on chat.
// add claude-chat.png
Using with VS Code
If you’re using the Claude AI extension for VS Code:
- Open VS Code settings (File > Preferences > Settings)
- Search for “Claude MCP Servers”
- Add a new server with:
- Name:
ecommerce - Command:
node - Args:
["/ABSOLUTE/PATH/TO/mcp/build/index.js"]
- Name:
Features
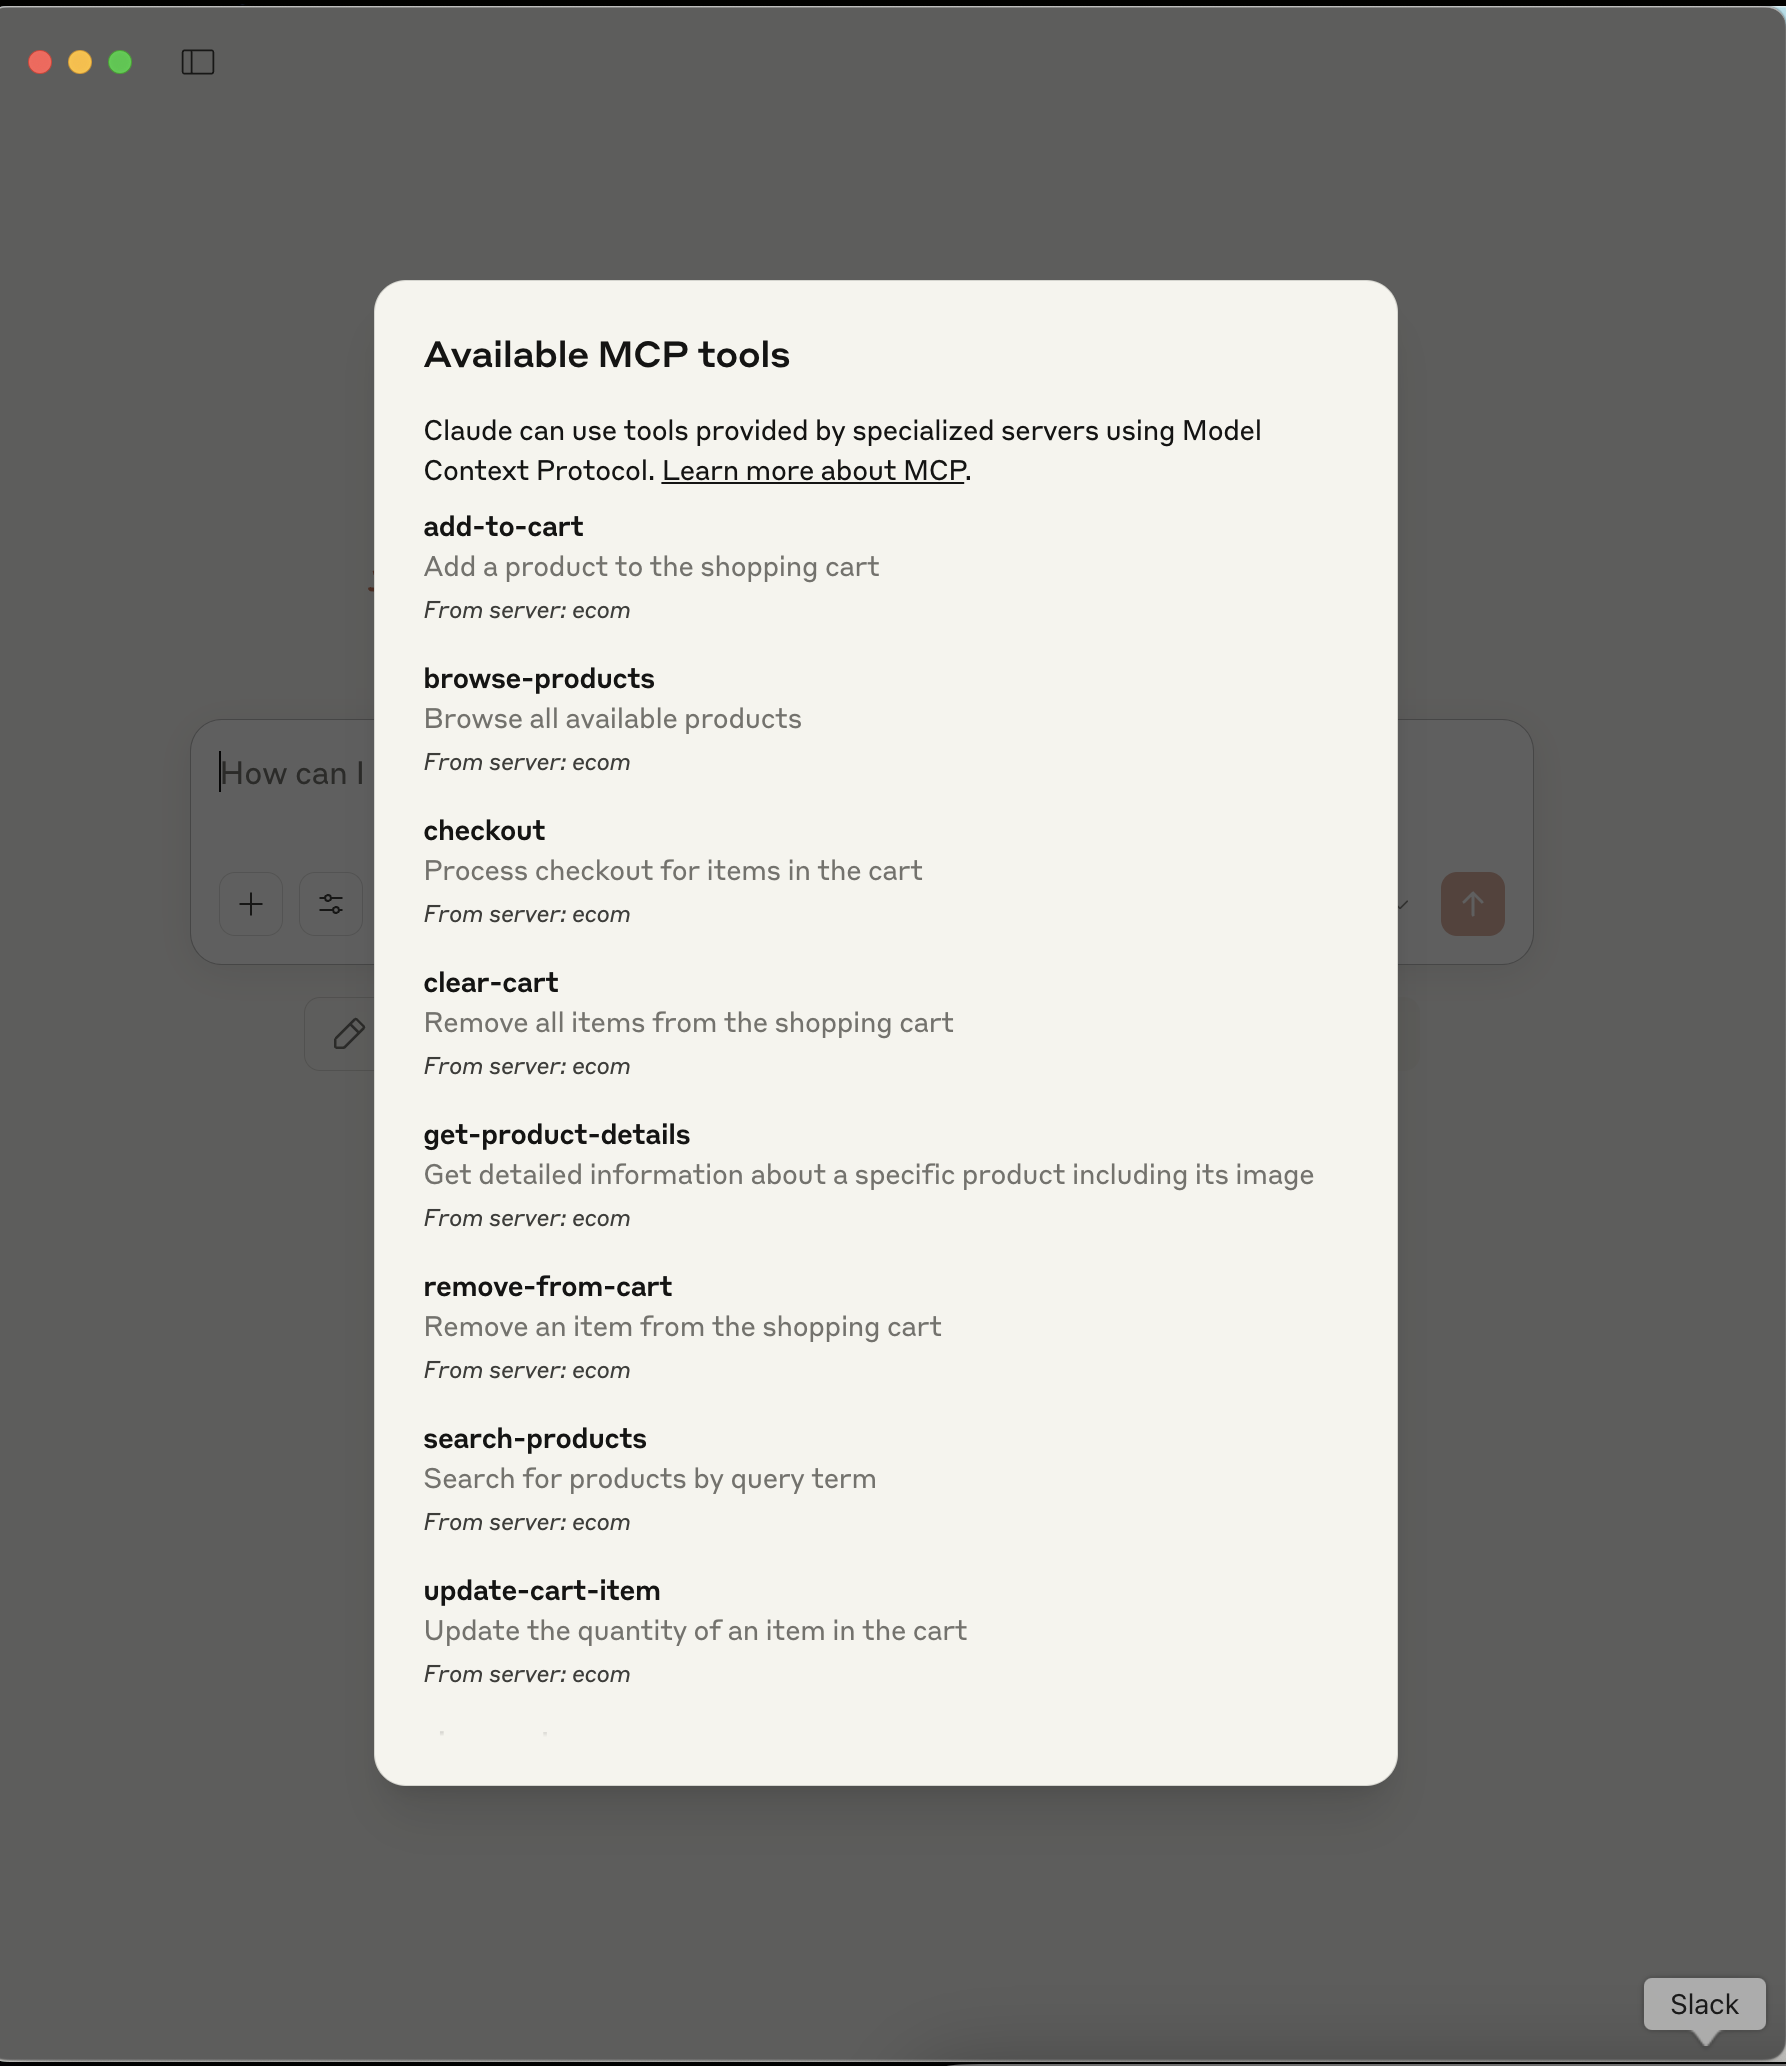
The MCP server exposes the following tools:
- Product browsing and search
- Product details
- Cart management (view, add, update, remove)
- Checkout processing
Example Prompts
Try these prompts with Claude once connected:
- “Show me what products are available”
- “Find me a laptop under $1000”
- “Add the 4K TV to my cart”
- “How much is in my cart right now?”
- “Help me check out”
Contributing
Contributions are welcome! This is meant as a learning resource for the MCP community.
License
MIT
Resources
Dev Tools Supporting MCP
The following are the main code editors that support the Model Context Protocol. Click the link to visit the official website for more information.


