Mcp Weather Sample
What is Mcp Weather Sample
mcp-weather-sample is a modified sample code from the official MCP documentation that enables weather querying using AWS Bedrock’s Converse API, supporting multiple Tool use queries.
Use cases
Use cases include building chatbots that provide weather updates, integrating weather data into mobile applications, and developing analytical tools that require historical weather data for research.
How to use
To use mcp-weather-sample, set up your environment by installing necessary packages and dependencies, then run the provided commands to start the MCP inspector and interact with the weather querying functionalities.
Key features
Key features include integration with AWS Bedrock’s Converse API, support for multiple Tool use queries, and compliance with the Model Context Protocol (MCP) standards for seamless interaction with large language models.
Where to use
mcp-weather-sample can be used in various fields such as weather forecasting applications, data analysis tools, and any system that requires real-time weather information retrieval.
Clients Supporting MCP
The following are the main client software that supports the Model Context Protocol. Click the link to visit the official website for more information.


Overview
What is Mcp Weather Sample
mcp-weather-sample is a modified sample code from the official MCP documentation that enables weather querying using AWS Bedrock’s Converse API, supporting multiple Tool use queries.
Use cases
Use cases include building chatbots that provide weather updates, integrating weather data into mobile applications, and developing analytical tools that require historical weather data for research.
How to use
To use mcp-weather-sample, set up your environment by installing necessary packages and dependencies, then run the provided commands to start the MCP inspector and interact with the weather querying functionalities.
Key features
Key features include integration with AWS Bedrock’s Converse API, support for multiple Tool use queries, and compliance with the Model Context Protocol (MCP) standards for seamless interaction with large language models.
Where to use
mcp-weather-sample can be used in various fields such as weather forecasting applications, data analysis tools, and any system that requires real-time weather information retrieval.
Clients Supporting MCP
The following are the main client software that supports the Model Context Protocol. Click the link to visit the official website for more information.
Content
MCP系列:启动你的第一个MCP Server并与之交互
一、背景
1、为何出现了MCP
MCP的全程是Model Context Protocol (MCP),是由Anthropic公司发起的开源项目,旨在为大模型和第三方工具调用定义一个规范的、标准的接口,便于更多开发者编写的工具代码能够兼容通用。
MCP是对大语言模型(LLM)的Tool use部分的补充,符合MCP标准编写的代码可以向Plug-in插件一样快速集成到自己的代码和工具中。目前社区已经流行着几百到上千种工具,从这些工具的大类型上可分类为对远程API的调用(例如搜索引擎、获取信息、代码提交)、对本地电脑的shell、文件系统、进程、屏幕截图、GUI交互事件的调用、对其他第三方系统包括更多开源组件的调用等。
MCP分成Client和Server端,二者之间通信方式是本机的STDIO或者HTTP-SSE,传输协议是JSON-RPC 2.0。其中STDIO是使用本机标准的Standard IN and Out作为输入输出,适合本机上的进程间通信;HTTP-SSE是指客户端通过HTTP Post方式向Server传输数据,而Server以SSE(Server-Sent Events)方式向客户端发送数据。
2、MCP和大模型Tool Use的区别
MCP本质上对Tool use的抽象和提升,与大模型对话的过程必须要当前大模型支持Tool use,才可以在Prompt中传递对应的Tool参数。而原有Tool use工具完成的任务被封装到MCP Server中,由MCP Client触发调用。Tool use工具执行结果生成的信息,以MCP Server和Client约定的格式返回。
MCP Client和Server可以分别由不同编程语言、不同开发团队开发维护。原来开发大模型的Tool use工具,是按照任意形式随意编写代码的,但是代码不能被别的项目和更多用户复用,符合MCP Client/Server规范的代码,可以作为Tool被别的应用系统调用。
3、MCP架构图
谈到架构图,大部分教程都引用了MCP官网的架构图。本文也引用这张。
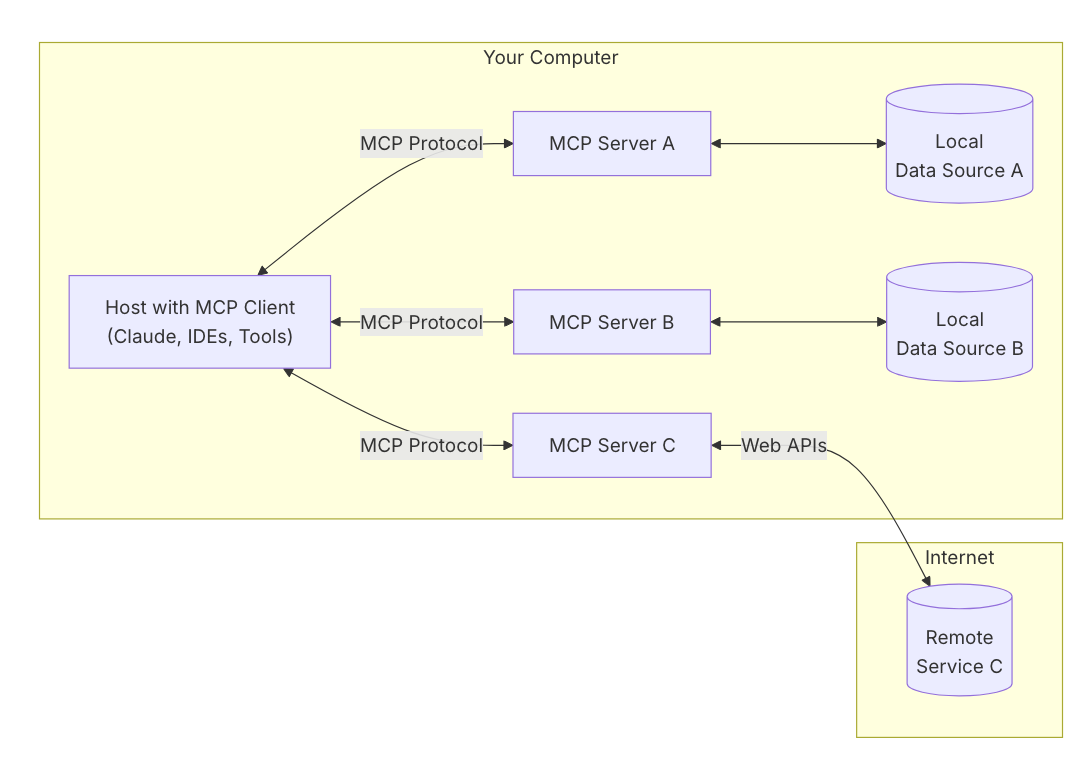
本文后续要构建的Demo中,主要部分均按照这张架构图构建。
4、常见问题FAQ
Q:MCP是否依赖特定开发语言
A:不依赖。一般用Python和NodeJS为主。
Q:MCP是否依赖特定大模型
A:不依赖。但不同模型功能不一样。例如不是所有模型都支持compute use,或者一些模型不支持多模态,无法输入图像。
Q:MCP是否必须在运行大模型的程序一起,是否能独立部署
A:不限制,如果在本机运行,则使用stdio方式更高效;如果在其他机器运行,则使用HTTP方式通信。
Q:MCP使用什么工具调试?
A:MCP Inspector,基于Python或者NodeJS的工具,监听本地端口http://localhost:5173,然后使用浏览器访问之。
Q:MCP有什么常用工具?
A:开发MCP可使用各开发语言的SDK,包括Python、Java、TypeScript等。其中Python包管理uv是主要工具,可有效管理Python运行环境,解决多版本的python库依赖问题。另外nodejs的npm可直接启动MCP Inspector,很多MCP Server是使用Node开发的。
基于以上信息,本文做一个Demo来理解MCP和Tooluse的概念。
二、使用MCP调试工具
在MacOS上安装包管理工具homebrew,并安装NodeJS软件包,以获得npx包管理工具。
/bin/bash -c "$(curl -fsSL https://raw.githubusercontent.com/Homebrew/install/HEAD/install.sh)"
brew install node
npm install -g npm@latest
pip3 install mcp
启动调试工具,这里无需从Github下载源代码,可以直接启动MCP inspector。执行如下命令。
npx @modelcontextprotocol/inspector
可以看到返回结果如下:
Starting MCP inspector...
Proxy server listening on port 3000

🔍 MCP Inspector is up and running at http://localhost:5173 🚀
现在用浏览器访问http://localhost:5173。即可看到MCP Inspector的GUI界面。如下截图。

有了调试工具,现在开始开发MCP Server。
三、用MCP官网文档查询天气的例子构建一个MCP Server
这里以MCP官网的Get Started里边的Quickstart - For Server Developers给出的查询天气的MCP Server为例。
1、安装环境
安装uv工具。
curl -LsSf https://astral.sh/uv/install.sh | sh
创建项目并部署依赖环境。
uv init mcp-server-whether
cd mcp-server-whether
uv venv
source .venv/bin/activate
uv add "mcp[cli]" httpx
2、部署代码
编写如下代码,保存在目录mcp-server-weather中,文件名叫做为weather.py。
这段代码的MCP Server以stdio的方式运行,本身不需要监听端口,当通过stdio接收到MCP Client的请求后,自身再对外发起向https://api.weather.gov的访问。
由于代码太长,这里就不再粘贴全文了,代码已经放在Github的这里。点击链接查看代码。
3、开启调试
由于这个MCP Server是以stdio的方式工作,自身不监听端口,因此无法直接通过网络调试,要调试它必须借助MCP Inspector。
在上一个章节介绍了通过Node启动MCP Inspector,此外还可以通过python有的包管理两种启动inspector的命令,一是通过python。执行如下代码。
uv run mcp dev weather.py
返回结果如下:
Starting MCP inspector...
Proxy server listening on port 3000

🔍 MCP Inspector is up and running at http://localhost:5173 🚀
现在打开浏览器,访问刚才返回的地址http://localhost:5173/。可看到MCP Inspector界面。
在左侧选择协议位置,从Transport Type下拉框中选择STDIO,在Command里边输入uv,在Arguments参数位置,输入run --with mcp mcp run weather.py。然后点击Connect按钮。
点击页面中间上方的Tools标签页,在点击List Tools按钮,即可看到下方列出了本MCP Server的两种工具,分别叫做get_alerts和get_forecast两种方法。如下截图。
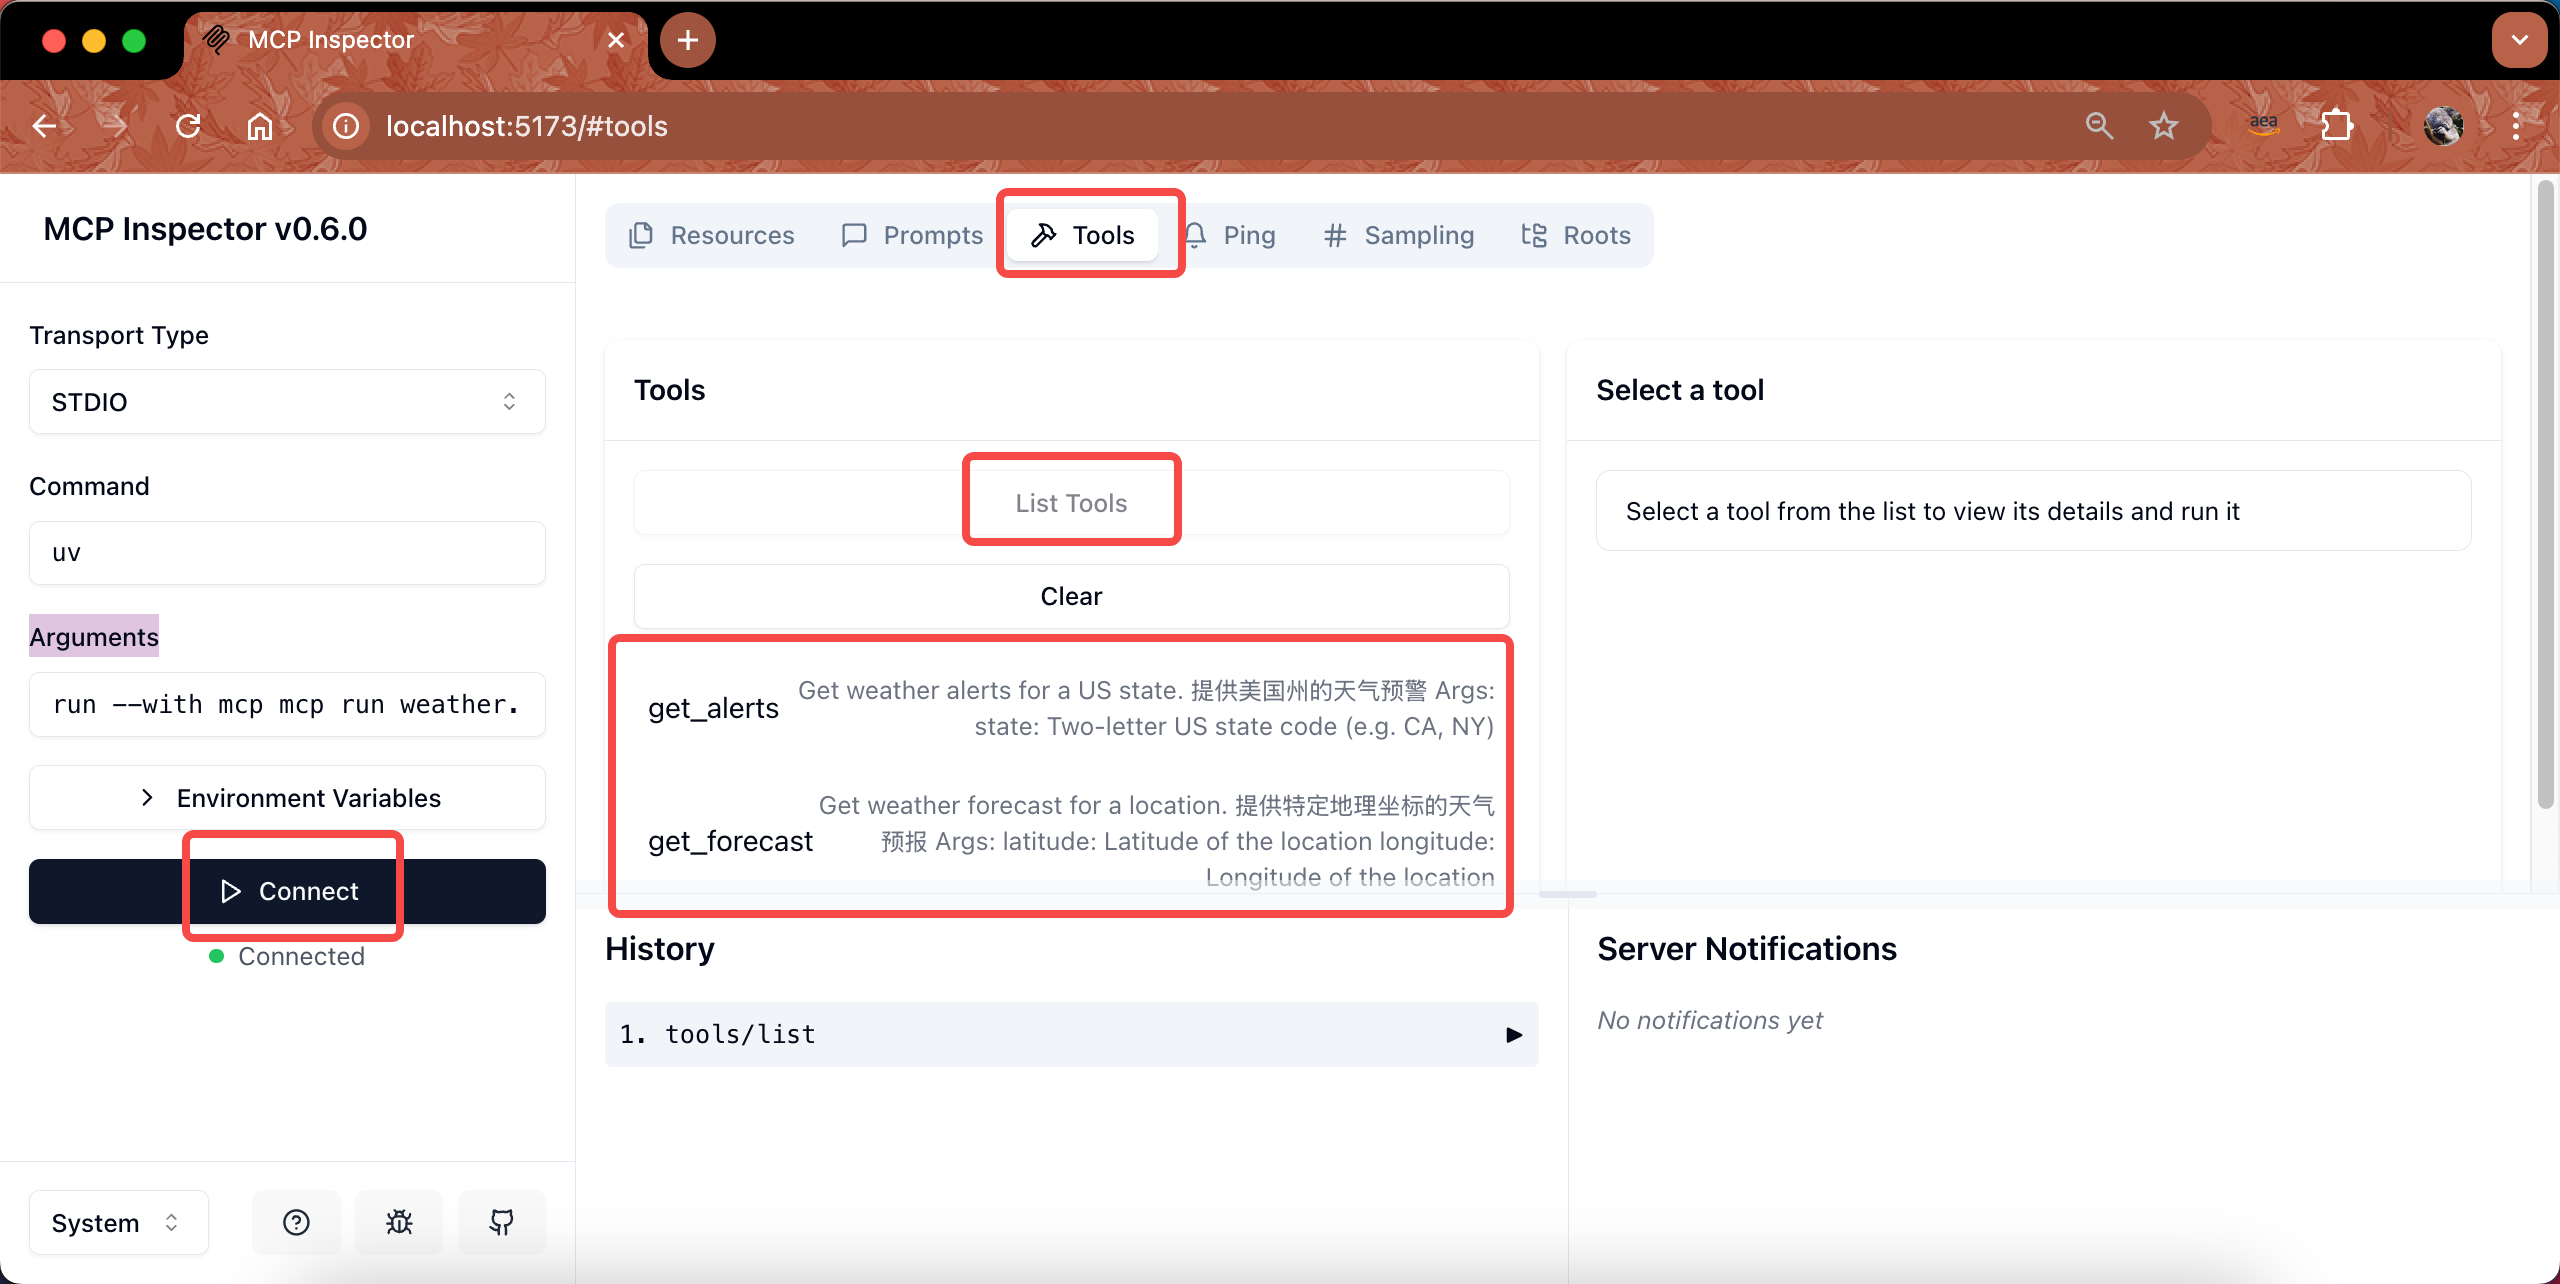
可看到查询本MCP可用的tool成功。
至此Server调试完毕,可以在终端上按CTRL+C键,停止刚才uv工具启动的调试。
四、构建一个以命令行为基础的MCP Client并连接到Server
1、如何构建MCP Client
MCP官网文档这里有一个Sample例子,不过其调用的是Anthropic官方Claude,并不是调用AWS Bedrock的大模型。因此本文这里主要是对其做了改写:
- 1、将调用Anthropic官方API修改为调用AWS Bedrock的Converse API,并可修改profile切换模型(可选Claude 3.5/3.7等支持Tooluse的模型);
- 2、增加了system prompt;
- 3、增加了循环,支持多个Tool的调用,调整了多次tooluse调用后的输出内容(去重);
- 4、在关键环节增加debug的output,直接将关键变量打印到console,便于学习和了解tooluse过程对API参数的拼接组合;
- 5、修改启动方式为通过uv启动。
2、安装环境
从刚才的mcp-server-weather目录中退出来,新建一个目录,并初始化环境。
uv init mcp-client
cd mcp-client
uv venv
source .venv/bin/activate
uv add mcp anthropic python-dotenv boto3 loguru
touch client.py
3、部署代码
编辑如下代码,保存在目录mcp-client中,文件名叫做client.py。
由于代码太长,这里就不再粘贴全文了,代码已经放在Github的这里。点击链接查看代码。
4、访问MCP Server
确保本机有通过AWSCLI配置了AKSK,且AKSK具有访问Bedrock和大模型的权限。
在当前mcp-client目录下,执行如下命令启动。注意替换对应的MCP Server的文件路径。
uv run client.py ../mcp-server-weather/weather.py
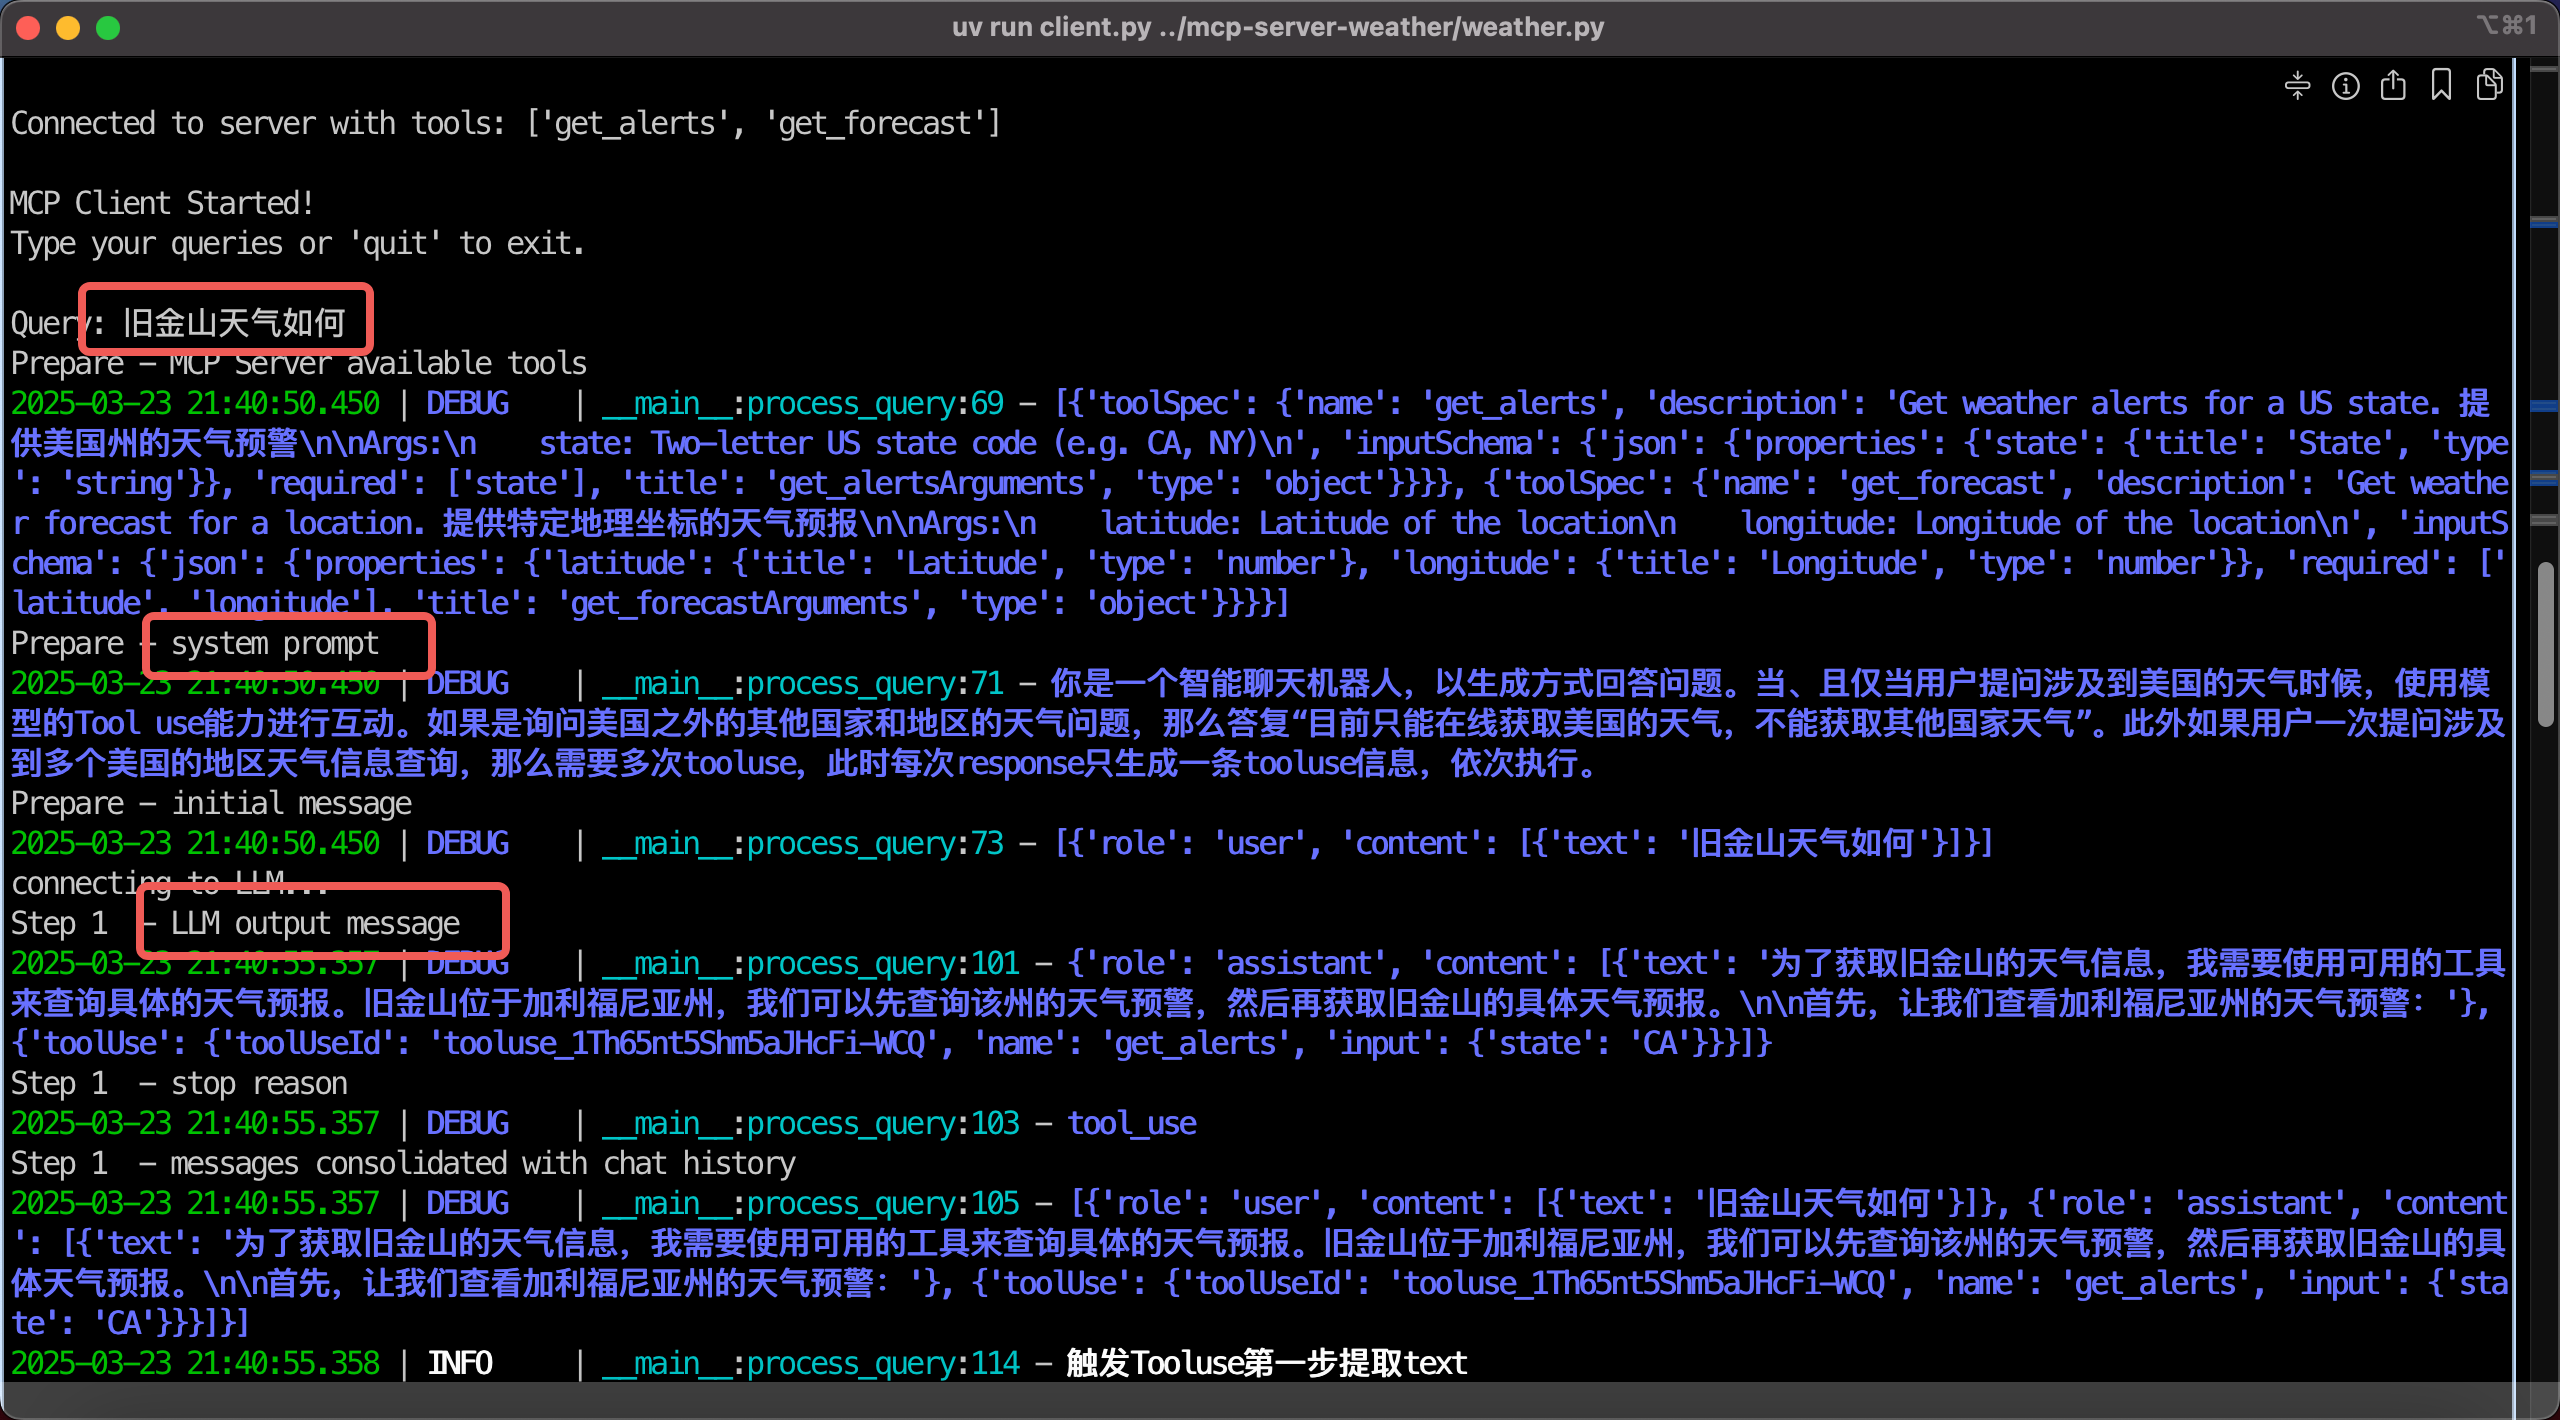
在终端窗口中,可尝试提问。提问后可看到大模型在收到请求后,确认需要调用工具。如下截图。
在确认需要调用Tool后,MCP Client连接到MCP Server,执行并获取结果。这里可以注意Tool use ID是LLM在上一次运行时候生成的。如下截图。
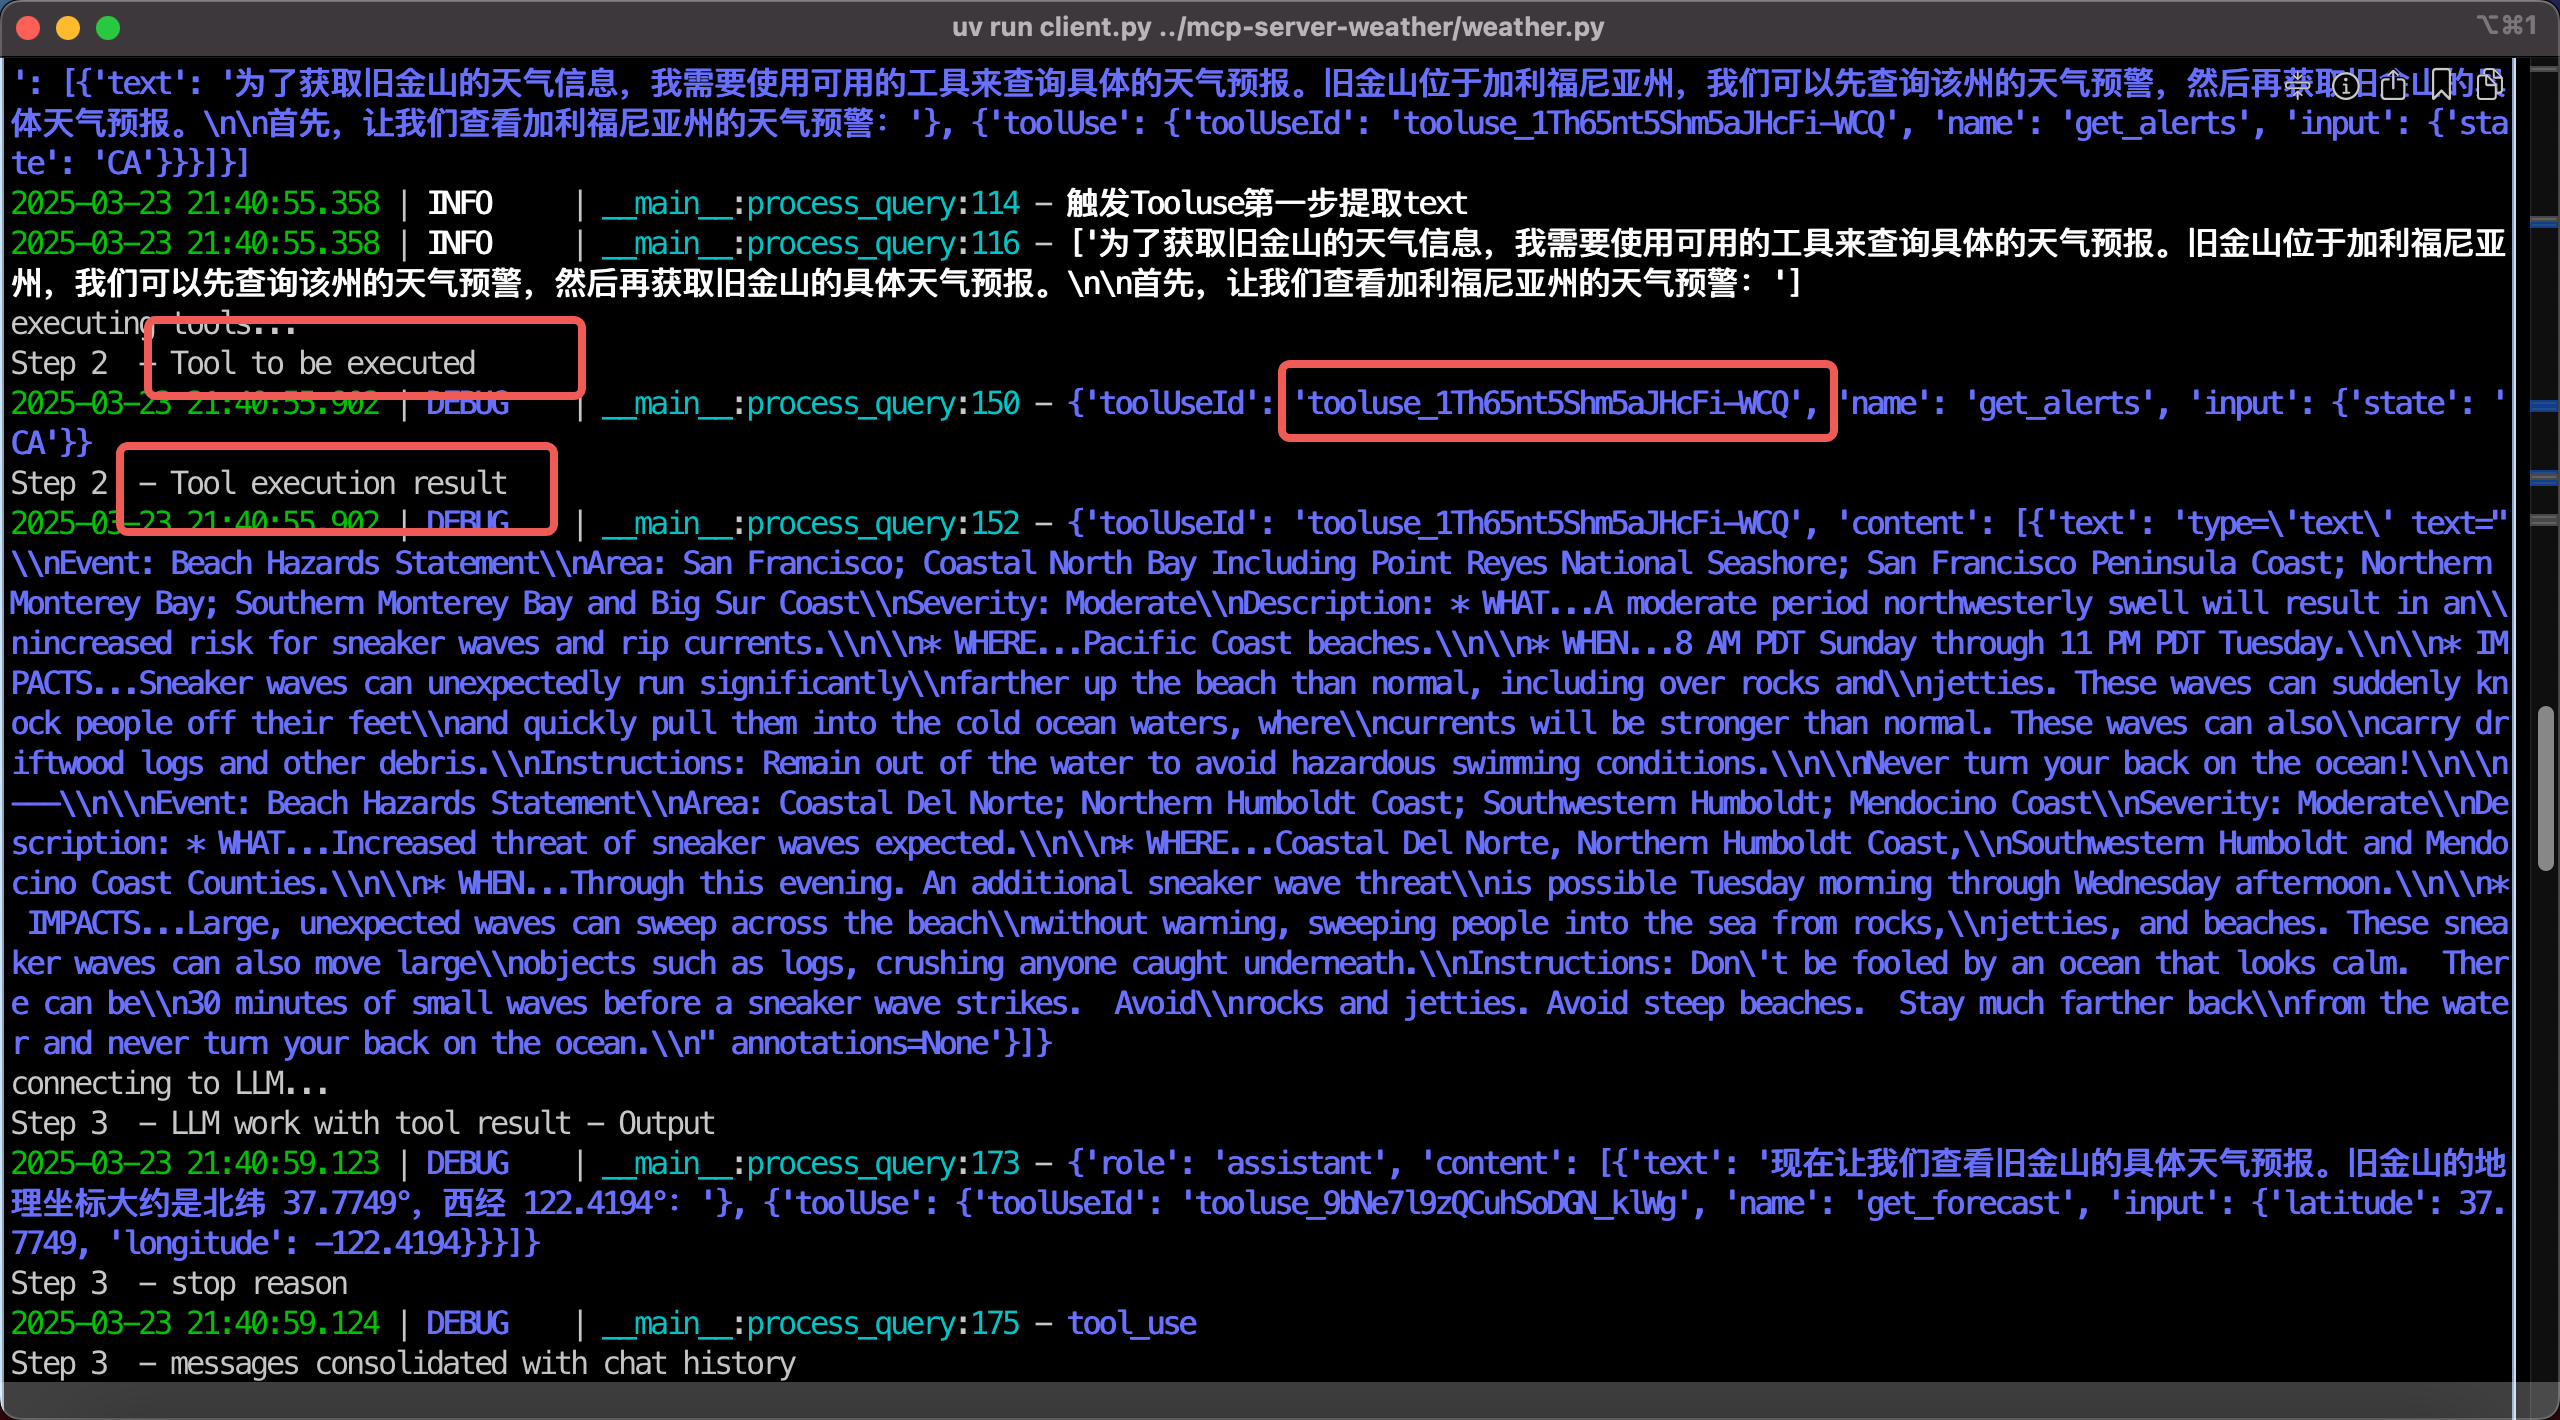
如果需要调用多个工具,那么大模型将会运行多个轮次。如下截图,调用第二个工具。
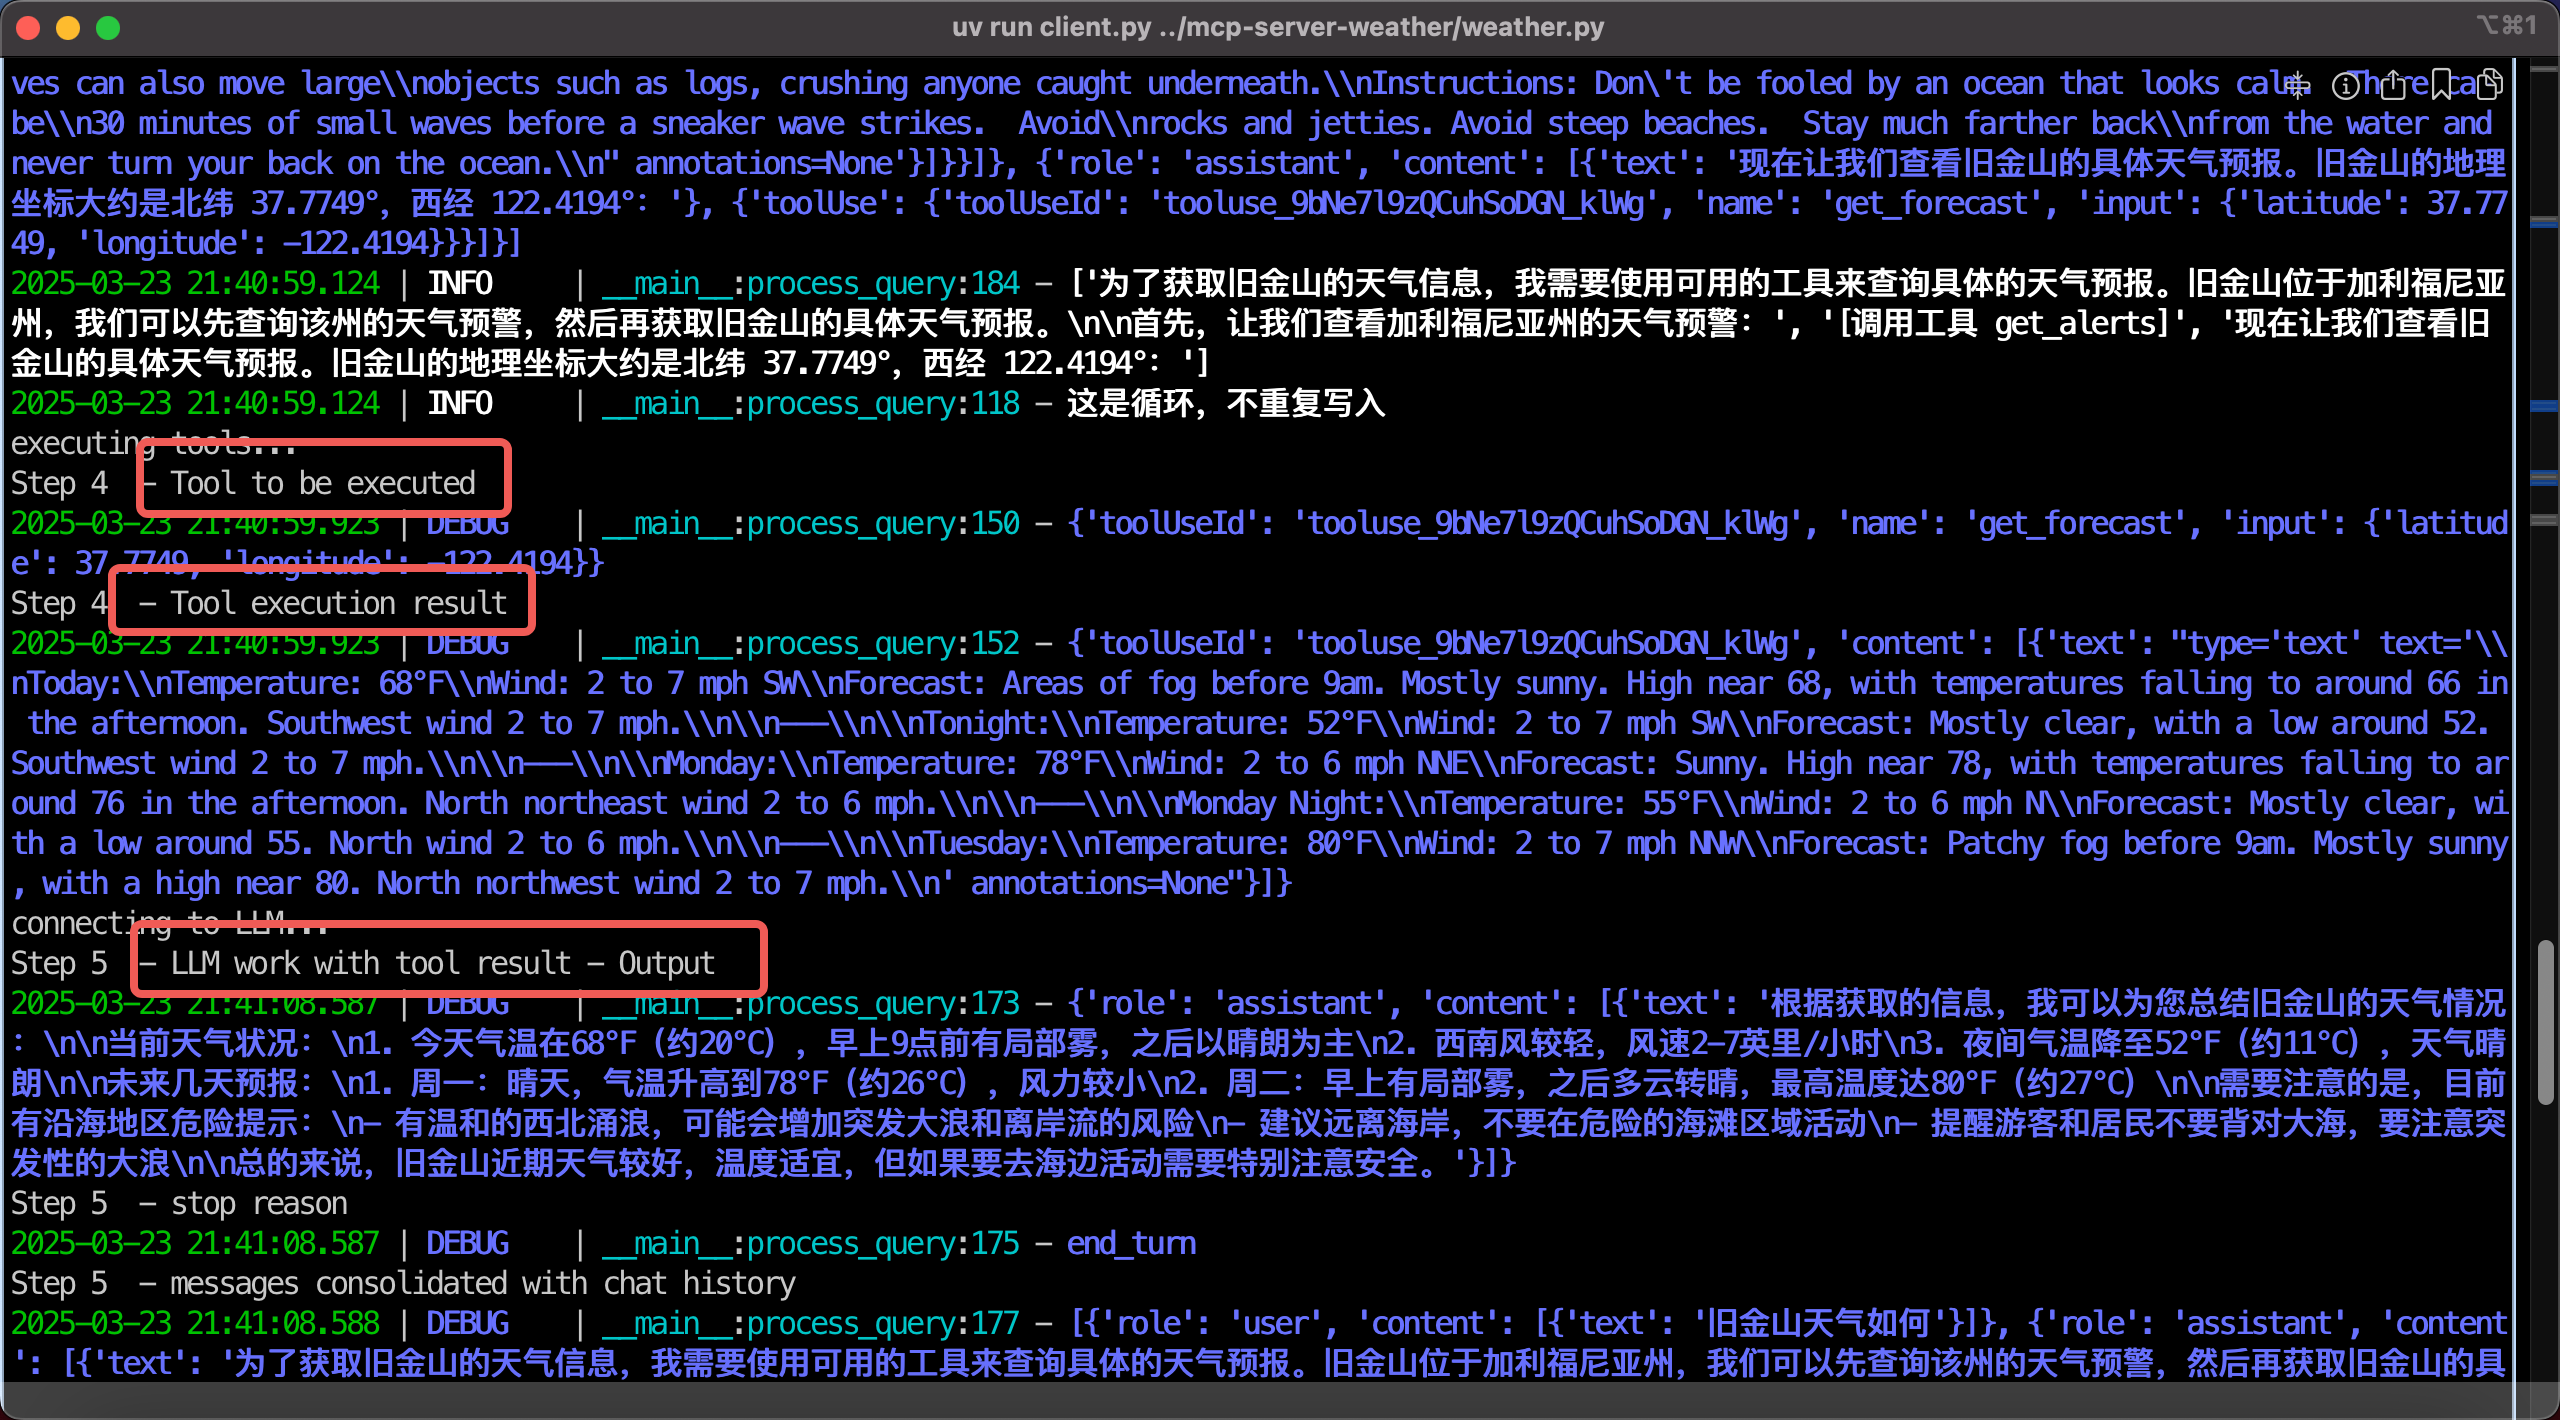
所以Tool use完成后,LLM会总结并重写,生成最终输出结果。如下截图。
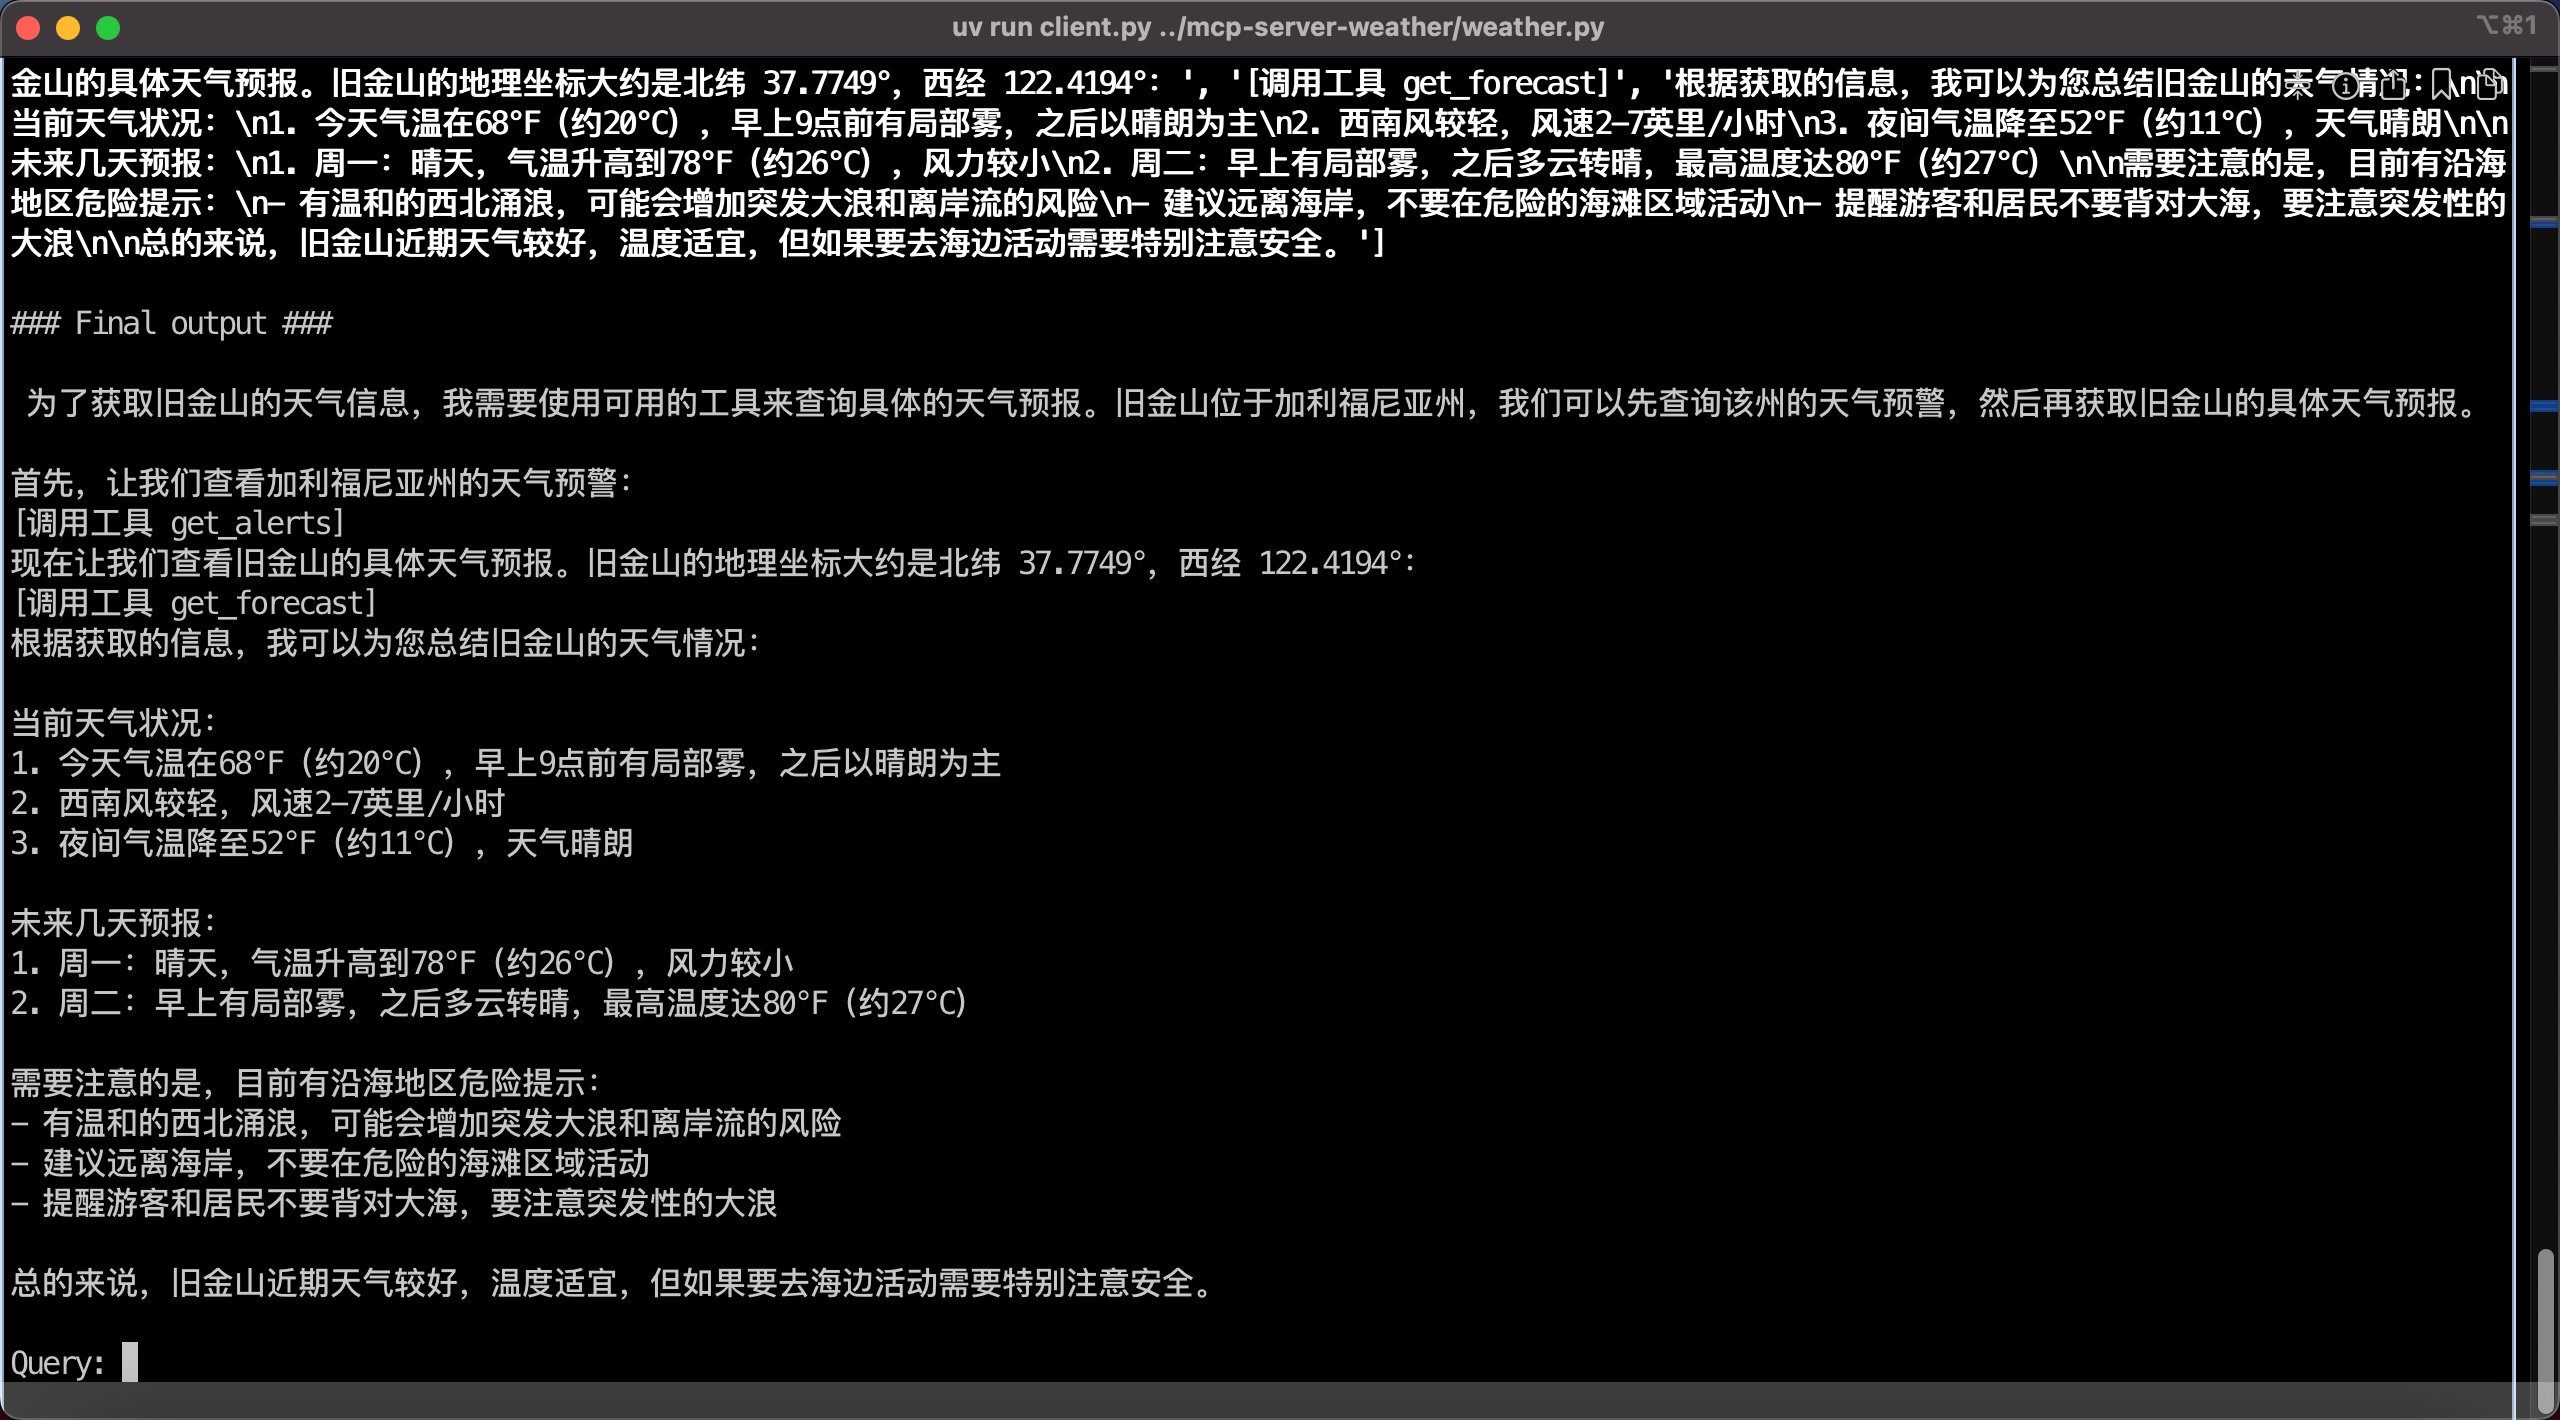
至此可以看到,一个查询天气的MCP Server工作正常,且这个MCP Server使用了stdio本机调用的方式,无需监听端口,节约资源且高效。
五、以上Demo分析
1、主要交互过程
结合以上代码中打印到console的的debug信息,我们可以看出Tool use方式的数据交互,按时间线的流程如下:
-
- 业务代码调用MCP Client,查询可用tool,获取到Tool名称和Description
-
- 将可用Tool的描述信息交互以特定的JSON格式拼接好,结合业务上的User input,组成System prompt,最终发给LLM发起交互
-
- LLM返回结果,判定要执行特定的Tool,此时根据返回结果中assistant标签内可获得LLM确定要执行的Tool名称和Tool use执行ID(预先生成随机字符串作为ID)
-
- 业务代码调用MCP Client,再与MCP Server交互,获取执行Tool use的执行结果
-
- Tool use的执行结果合并上刚才模型预先生成的Tool use执行ID,加上套上user输入标签作为下一轮对话的输入,再次提交给LLM
-
- LLM检查Tool use执行ID确认执行结果,然后再次做改写,输出最终业务结果,或者判定还需要其他Tool,就返回到第2步循环,直到结束
在以上过程中,与MCP Server的主要交互是:
- 查询可用Tool的名称、描述(即功能)
- 执行Tool
在以上过程中,与LLM的主要交互是:
- 判定是否需要Tool,需要的话由LLM分配Tool use执行ID
- 将Tool use执行结果加上Tool use执行ID送回给LLM,判断是否执行成功,以及判断是否还需要其他Tool
- 如果不需要其他Tool了,LLM会做输出结果的全文改写,生成最终返回结果,如果判定还需要其他Tool,那么就继续分配新的Tool名称和Tool use执行ID
- 循环以上过程
由此我们就可以满足有多轮对话能力的场景。
2、MCP Server List tool返回的报文
MCP Server会通过List tool时候声明自己接口的功能,并且声明必须传入的参数。例如本例子中可看到接口收到的信息。
meta=None nextCursor=None tools=[
    Tool(
        name='get_alerts',
        description='Get weather alerts for a US state. 提供美国州的天气预警\n\nArgs:\n    state: Two-letter US state code (e.g. CA, NY)\n',
        inputSchema={
            'properties': {
                'state': {
                    'title': 'State',
                    'type': 'string'
                    }
                },
            'required': ['state'],
            'title': 'get_alertsArguments',
            'type': 'object'
                }
            ),
    Tool(
        name='get_forecast',
        description='Get weather forecast for a location. 提供特定地理坐标的天气预报\n\nArgs:\n    latitude: Latitude of the location\n    longitude:Longitude of the location\n',
        inputSchema={
            'properties': {
                'latitude': {
                    'title': 'Latitude',
                    'type': 'number'
                    },
                'longitude': {
                    'title': 'Longitude',
                    'type': 'number'
                    }
                },
        'required': ['latitude', 'longitude'],
        'title': 'get_forecastArguments',
        'type': 'object'
            }
        )
    ]
以上参数就是MCP Server要求必须传入的参数,传入后MCP Server即可发起对应查询。
3、使用MCP和Tool use的一些注意事项
1) 在本机使用stdio方式的MCP Server具有更好的性能
在前文MCP的架构图中,MCP Client对MCP Server的调用有两种方式,分别是STDIO和HTTP SSE。对于绝大部分本机的交互,例如本机的Shell、本机文件系统、本机进程,使用STDIO更为简单方便,由于不需要监听网络端口,因此性能更好。对于要在第三环境运行的独立Server,可使用HTTP SSE的方式,但构建时候也需要注意部分HTTP服务器可能不能完整支持SSE。
因此在实际使用中,建议凡是本机场景的,都使用STDIO方式,不用过于迷信HTTP SSE方式。
2) 注意Bedrock上的模型是否支持tool use
上文讲述了LLM与MCP Server交互的步骤,其中关键的第一步是LLM负责判定需要引入Tool use。此时要求LLM必须支持Tool use。大部分模型Anthropic Claude、Amazon Nova Pro等都支持Tool use,但是部分特定版本不支持Tool use。例如截止2025年3月,AWS Bedrock上提供的DeepSeek R1就暂时不支持。
如果在Bedrock上使用的LLM模型不支持tool use,则会收到报错如下:
Error: An error occurred (ValidationException) when calling the Converse operation: This model doesn't support tool use.
3) 注意LLM返回的stop reason
在与LLM多个轮次交互中,每次模型返回结果的JSON里会有一个字段叫STOP REASON,这个字段包含着当前模型执行到哪一步的信息。如果STOP REASON给出的是Tooluse,那么代表此时应该调用MCP Server,然后将MCP Server处理后的结果返回给LLM。如果STOP REASON是Endturn,那么代表这是LLM输出的最终结果,或者是完全不需要Tooluse,或者是多轮Tooluse交互结束后完毕不再需要Tooluse。
此外,STOP REASON还可能有max_tokens等其他原因,请参考Bedrock文档这里。
4) 确保多个Tooluse时候ID的正确
在大模型判定需要执行Tool use时候,LLM返回的信息中,除了上述STOP REASON之外,还会提供Tool名称和Tool use id。这个Tool use id是一个随机字符串,代表特定执行序列。在调用MCP Server完成请求后,将MCP Server生成的结果再次送给大模型,此时一定要匹配上刚才LLM分配的Tool use id。如果这二者不匹配,那么Bedrock的API会返回期望的Tool id错误的信息。
如果提供给LLM多个Tool,有时会出现这样一种场景,那就是LLM判定一个任务需要多次调用多个Tool,并且这几个Tool不是直接顺序关系而是随机顺序执行也可以的场景。此时LLM生成Tool use ID就会一股脑把多个执行任务的ID都生成了,而且每次顺序可能不一样。当执行结果返回时候,LLM可以接受的Tool use ID的返回信息是有顺序要求的。这样一个潜在的顺序问题,可能导致程序报错。比较简单的处理方法可以是在System Prompt中限定模型每次只给出一个Tool use ID,一次就调用一个Tool,如果需要多个工具,模型自己编排好顺序依次执行。这样在编写代码时候就可以采用相对简单的逻辑,一次只处理一个Tool use ID,且每次只返回给LLM一个Tool use结果,皆大欢喜。多次Tool use调用,多循环执行几轮就是了,LLM自己会安排好后续Tool use调用时候再分配新的Tool use ID。
5) 拼接历史消息送回LLM的处理(最后一个必须为user、id要对应)
将MCP Server执行结果返回给LLM时候需要注意,也必须遵循历史对话assistant、user的Role交替的格式返回。对于用户发起的提问,属于user类型毫无疑问,对于模型判定需要引入Tool use的信息,是由模型在assistant的role的标签下提供的。此时要调用MCP了。MCP Server返回的执行结果,也必须套用上user标签放到对话信息和请求记录中,返回给模型。此时不需要额外再增加用户user输入了,只是把tool use ID、tool use执行结果套上user标签发给LLM即可。LLM检查Tool use ID匹配后,会判定执行成功。如果需要后续执行下一个Tool use,模型也会自己处理。
6) 在不使用uv管理环境时候,运行mcp可能会出现的报错的调试
如果不使用uv搭建环境,而是直接将有关python文件下载下来,那么可以这样安装依存性包:
pip3 install mcp anthropic python-dotenv boto3 loguru
然后在本机上确保Python可执行文件的正确,否则会出现找不到Python可执行文件的问题。
sudo ln -s /usr/local/bin/python3 /usr/local/bin/python
这样然后即可运行:
python3 client.py weather.py
六、参考文档
Quickstart - For Server Developers
https://modelcontextprotocol.io/quickstart/server
Quickstart - For Client Developers
https://modelcontextprotocol.io/quickstart/client
Bedrock Converse API tool use - examples
https://docs.aws.amazon.com/bedrock/latest/userguide/tool-use-examples.html
大量第三方MCP Server
Dev Tools Supporting MCP
The following are the main code editors that support the Model Context Protocol. Click the link to visit the official website for more information.


