ZenML MCP Server
What is ZenML MCP Server
The Model Context Protocol (MCP) is an open standard that defines how applications can provide context to Large Language Models (LLMs). It enables seamless interactions between AI models and various data sources and tools, functioning like a universal interface for AI applications.
Use cases
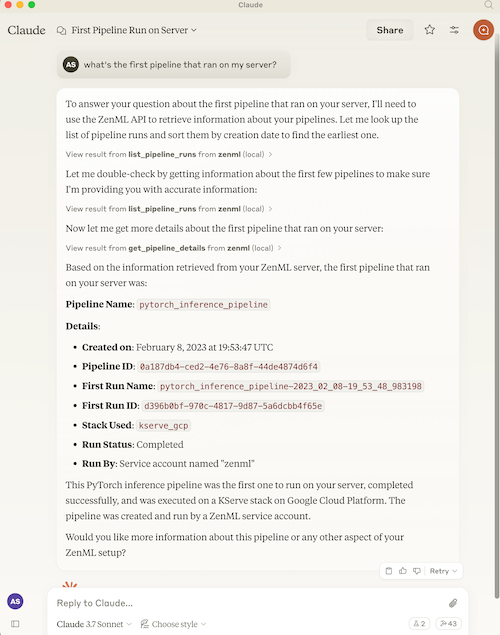
The MCP server for ZenML facilitates real-time access to various information related to machine learning workflows. Use cases include querying details about users, stacks, pipelines, and artifacts, as well as triggering new pipeline runs. This integration is beneficial for developers and data scientists who want to enhance their LLM applications with machine learning capabilities.
How to use
To use the MCP server, first ensure you have a deployed ZenML server and clone the repository. Then, create a configuration file specifying the MCP server details, including the ZenML server URL and API key. Depending on the client (Claude Desktop or Cursor), follow specific setup instructions to integrate the MCP configuration for seamless access to ZenML tools.
Key features
Key features of the MCP server include capabilities to read and retrieve information on users, stacks, pipelines, pipeline runs, and service connectors. Users can also access metadata about artifacts and step code/logs, as well as trigger new pipeline runs when run templates are available.
Where to use
The MCP server can be used with various MCP clients like Claude Desktop and Cursor. It supports applications that need to interact with ZenML’s API, offering a structured way to integrate machine learning tools and models into different environments and workflows.
Clients Supporting MCP
The following are the main client software that supports the Model Context Protocol. Click the link to visit the official website for more information.


Overview
What is ZenML MCP Server
The Model Context Protocol (MCP) is an open standard that defines how applications can provide context to Large Language Models (LLMs). It enables seamless interactions between AI models and various data sources and tools, functioning like a universal interface for AI applications.
Use cases
The MCP server for ZenML facilitates real-time access to various information related to machine learning workflows. Use cases include querying details about users, stacks, pipelines, and artifacts, as well as triggering new pipeline runs. This integration is beneficial for developers and data scientists who want to enhance their LLM applications with machine learning capabilities.
How to use
To use the MCP server, first ensure you have a deployed ZenML server and clone the repository. Then, create a configuration file specifying the MCP server details, including the ZenML server URL and API key. Depending on the client (Claude Desktop or Cursor), follow specific setup instructions to integrate the MCP configuration for seamless access to ZenML tools.
Key features
Key features of the MCP server include capabilities to read and retrieve information on users, stacks, pipelines, pipeline runs, and service connectors. Users can also access metadata about artifacts and step code/logs, as well as trigger new pipeline runs when run templates are available.
Where to use
The MCP server can be used with various MCP clients like Claude Desktop and Cursor. It supports applications that need to interact with ZenML’s API, offering a structured way to integrate machine learning tools and models into different environments and workflows.
Clients Supporting MCP
The following are the main client software that supports the Model Context Protocol. Click the link to visit the official website for more information.
Content
MCP Server for ZenML
This project implements a Model Context Protocol
(MCP) server for interacting with
the ZenML API.
What is MCP?
The Model Context Protocol (MCP) is an open protocol that standardizes how
applications provide context to Large Language Models (LLMs). It acts like a
“USB-C port for AI applications” - providing a standardized way to connect AI
models to different data sources and tools.
MCP follows a client-server architecture where:
- MCP Hosts: Programs like Claude Desktop or IDEs that want to access data through MCP
- MCP Clients: Protocol clients that maintain 1:1 connections with servers
- MCP Servers: Lightweight programs that expose specific capabilities through the standardized protocol
- Local Data Sources: Your computer’s files, databases, and services that MCP servers can securely access
- Remote Services: External systems available over the internet that MCP servers can connect to
What is ZenML?
ZenML is an open-source platform for building and managing ML and AI pipelines.
It provides a unified interface for managing data, models, and experiments.
For more information, see the ZenML website and our documentation.
Features
The server provides MCP tools to access core read functionality from the ZenML
server, providing a way to get live information about:
- Users
- Stacks
- Pipelines
- Pipeline runs
- Pipeline steps
- Services
- Stack components
- Flavors
- Pipeline run templates
- Schedules
- Artifacts (metadata about data artifacts, not the data itself)
- Service Connectors
- Step code
- Step logs (if the step was run on a cloud-based stack)
It also allows you to trigger new pipeline runs (if a run template is present).
Note: This is a beta/experimental release. We’re still exploring how people
will use this integration, so we welcome your feedback and suggestions! Please
join our Slack community to share your experience and
help us improve.
Testing & Quality Assurance
This project includes automated testing to ensure the MCP server remains functional:
- 🔄 Automated Smoke Tests: A comprehensive smoke test runs every 3 days via GitHub Actions
- 🚨 Issue Creation: Failed tests automatically create GitHub issues with detailed debugging information
- ⚡ Fast CI: Uses UV with caching for quick dependency installation and testing
- 🧪 Manual Testing: You can run the smoke test locally using
uv run scripts/test_mcp_server.py zenml_server.py
The automated tests verify:
- MCP protocol connection and handshake
- Server initialization and tool discovery
- Basic tool functionality (when ZenML server is accessible)
- Resource and prompt enumeration
How to use
Prerequisites
You will need to have access to a deployed ZenML server. If you don’t have one,
you can sign up for a free trial at ZenML Pro and we’ll manage the deployment for you.
You will also (probably) need to have uv installed locally. For more information, see
the uv documentation.
We recommend installation via their installer script or via brew if using a
Mac. (Technically you don’t need it, but it makes installation and setup easy.)
You will also need to clone this repository somewhere locally:
git clone https://github.com/zenml-io/mcp-zenml.git
Your MCP config file
The MCP config file is a JSON file that tells the MCP client how to connect to
your MCP server. Different MCP clients will use or specify this differently. Two
commonly-used MCP clients are Claude Desktop and
Cursor, for which we provide installation instructions
below.
You will need to specify your ZenML MCP server in the following format:
{
  "mcpServers": {
    "zenml": {
      "command": "/usr/local/bin/uv",
      "args": [
        "run",
        "path/to/zenml_server.py"
      ],
      "env": {
        "LOGLEVEL": "INFO",
        "NO_COLOR": "1",
        "PYTHONUNBUFFERED": "1",
        "PYTHONIOENCODING": "UTF-8",
        "ZENML_STORE_URL": "https://your-zenml-server-goes-here.com",
        "ZENML_STORE_API_KEY": "your-api-key-here"
      }
    }
  }
}
There are four dummy values that you will need to replace:
- the path to your locally installed
uv(the path listed above is where it
would be on a Mac if you installed it viabrew) - the path to the
zenml_server.pyfile (this is the file that will be run when
you connect to the MCP server). This file is located inside this repository at
the root. You will need to specify the exact full path to this file. - the ZenML server URL (this is the URL of your ZenML server. You can find this
in the ZenML Cloud UI). It will look something likehttps://d534d987a-zenml.cloudinfra.zenml.io. - the ZenML server API key (this is the API key for your ZenML server. You can
find this in the ZenML Cloud UI or read these
docs
on how to create one. For the purposes of the ZenML MCP server we recommend
using a service account.)
You are free to change the way you run the MCP server Python file, but using
uv will probably be the easiest option since it handles the environment and
dependency installation for you.
Installation for use with Claude Desktop
You will need to have Claude Desktop installed.
Once you have installed and opened Claude Desktop, you need to open the
‘Settings’ menu and click on the ‘Developer’ tab. There will be an ‘Edit Config’
button which will open up a file explorer showing you the location of your
config file.
You should paste the contents of the (properly filled in) config file above into
the JSON file revealed in the file explorer. Then just restart Claude Desktop
and it will use the new config. You should be able to see the ZenML server in
the developer settings menu. Chat with Claude and it will use all the new tools
you just gave it access to.
Optional: Improving ZenML Tool Output Display
For a better experience with ZenML tool results, you can configure Claude to
display the JSON responses in a more readable format. In Claude Desktop, go to
Settings → Profile, and in the “What personal preferences should Claude consider
in responses?” section, add something like the following (or use these exact
words!):
When using zenml tools which return JSON strings and you're asked a question, you might want to consider using markdown tables to summarize the results or make them easier to view!
This will encourage Claude to format ZenML tool outputs as markdown tables,
making the information much easier to read and understand.
Installation for use with Cursor
You will need to have Cursor installed.
Cursor works slightly differently to Claude Desktop in that you specify the
config file on a per-repository basis. This means that if you want to use the
ZenML MCP server in multiple repos, you will need to specify the config file in
each of them.
To set it up for a single repository, you will need to:
- create a
.cursorfolder in the root of your repository - inside it, create a
mcp.jsonfile with the content above - go into your Cursor settings and click on the ZenML server to ‘enable’ it.
In our experience, sometimes it shows a red error indicator even though it is
working. You can try it out by chatting in the Cursor chat window. It will let
you know if is able to access the ZenML tools or not.
Dev Tools Supporting MCP
The following are the main code editors that support the Model Context Protocol. Click the link to visit the official website for more information.


