Mcp Control Table Lamp
What is Mcp Control Table Lamp
mcp_control_table_lamp is a complete IoT solution designed to remotely control a table lamp or any other electrical appliance using a NodeMCU microcontroller, a relay module, and MQTT communication through the HiveMQ cloud service.
Use cases
Use cases include controlling lighting in homes or offices, automating appliances based on schedules or events, and integrating with other smart home devices for enhanced functionality.
How to use
To use mcp_control_table_lamp, set up the hardware components including the NodeMCU and relay module, configure the HiveMQ cloud service for MQTT communication, and upload the provided Arduino sketch to the NodeMCU to enable remote control functionality.
Key features
Key features include remote control of appliances via MQTT, secure communication through HiveMQ, and the ability to integrate with various IoT applications using the Model Context Protocol.
Where to use
mcp_control_table_lamp can be used in smart home applications, automation systems, and any scenario where remote control of electrical devices is required.
Clients Supporting MCP
The following are the main client software that supports the Model Context Protocol. Click the link to visit the official website for more information.





Overview
What is Mcp Control Table Lamp
mcp_control_table_lamp is a complete IoT solution designed to remotely control a table lamp or any other electrical appliance using a NodeMCU microcontroller, a relay module, and MQTT communication through the HiveMQ cloud service.
Use cases
Use cases include controlling lighting in homes or offices, automating appliances based on schedules or events, and integrating with other smart home devices for enhanced functionality.
How to use
To use mcp_control_table_lamp, set up the hardware components including the NodeMCU and relay module, configure the HiveMQ cloud service for MQTT communication, and upload the provided Arduino sketch to the NodeMCU to enable remote control functionality.
Key features
Key features include remote control of appliances via MQTT, secure communication through HiveMQ, and the ability to integrate with various IoT applications using the Model Context Protocol.
Where to use
mcp_control_table_lamp can be used in smart home applications, automation systems, and any scenario where remote control of electrical devices is required.
Clients Supporting MCP
The following are the main client software that supports the Model Context Protocol. Click the link to visit the official website for more information.
Content
Smart Lamp Controller
A complete IoT solution with Model Context Protocol to control a table lamp (or any other appliance) remotely using a NodeMCU, relay module, and MQTT communication through HiveMQ cloud service.
Table of Contents
- Overview
- Hardware Requirements
- Software Components
- Setup Instructions
- Usage
- Project Structure
- Troubleshooting
- License
Overview
This project allows you to control a table lamp (or any other electrical appliance) remotely using a NodeMCU microcontroller connected to a relay module. The system uses MQTT protocol via HiveMQ cloud service for secure and reliable communication.
The project consists of three main components:
- NodeMCU with Relay: The hardware that physically controls your lamp
- MQTT Control Server: A Python server with Model Context Protocol that manages the communication
- MCP Proxy: A bridge between the client applications and the server
Hardware Requirements
-
NodeMCU ESP8266: WiFi-enabled microcontroller board
-
Relay Module: Single channel relay (5V)
Software Components
1. Hive.ino
Arduino sketch for the NodeMCU that:
- Connects to your WiFi network
- Establishes a secure connection to HiveMQ MQTT broker
- Subscribes to control commands
- Controls the relay based on received commands
2. mcp_server.py
Model Context Protocol (MCP) server that:
- Implements the MCP specification to expose function calling tools
- Creates an API for interacting with the MQTT broker
- Provides tool endpoints for turning the relay on/off or sending custom commands
- Makes these functions available to Claude Desktop via the proxy
3. proxy.py
JSON-RPC proxy that:
- Acts as a bridge between Claude Desktop and the MCP server
- Forwards tool commands from Claude to the server
- Returns responses back to Claude Desktop
- Enables Claude to control your lamp through natural language
Setup Instructions
Hardware Setup
Connecting NodeMCU to Relay Module
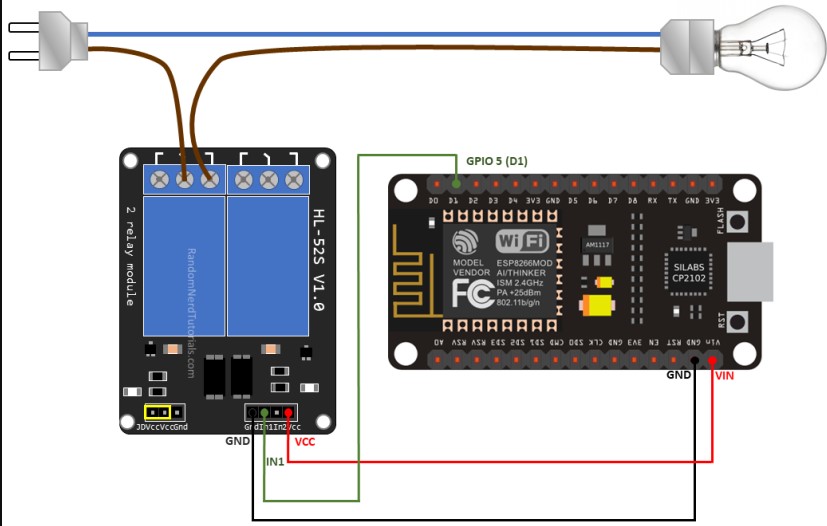
- Connect the components as follows:
| NodeMCU Pin | Relay Module Pin |
|---|---|
| D1 | IN (Signal) |
| 3V3 | VCC |
| GND | GND |
- Connect your lamp to the relay:
- Identify the power cable for your lamp which typically has two wires (live/hot and neutral)
- Cut the live/hot wire (usually brown, red, or black depending on your region)
- Connect one cut end to the “Common” (COM) terminal on the relay
- Connect the other cut end to the “Normally Open” (NO) terminal on the relay
- Leave the neutral wire (usually blue or white) intact and connected directly to your lamp
- When the relay is activated, it will complete the circuit allowing current to flow to the lamp
Wiring diagram:
Power Source (Live) → Relay (COM) → Relay (NO) → Lamp
Power Source (Neutral) → Lamp
⚠️ SAFETY WARNING: Working with mains electricity is dangerous and can be fatal. If you’re not comfortable with electrical wiring, please seek professional assistance. Always work with the power disconnected and consider using lower voltage options like USB-powered lamps for safety.
HiveMQ Cloud Setup
- Visit HiveMQ Cloud and create a free account
- Create a new cluster:
- Click “Create Cluster”
- Choose the free plan
- Select a region closest to you
- Give your cluster a name
- Create credentials:
- Go to “Access Management”
- Click “Add New Credentials”
- Note your username and password
- Note your broker URL (will look like: xxxxxxxx.s1.eu.hivemq.cloud)
NodeMCU Setup
- Install the Arduino IDE from arduino.cc
- Add ESP8266 board support:
- Open Arduino IDE
- Go to File > Preferences
- Add
http://arduino.esp8266.com/stable/package_esp8266com_index.jsonto Additional Board Manager URLs - Go to Tools > Board > Boards Manager
- Search for ESP8266 and install
- Install required libraries:
- Go to Sketch > Include Library > Manage Libraries
- Install “PubSubClient” by Nick O’Leary
- Install “ESP8266WiFi”
- Open the
Hive.inofile - Update the following variables with your information:
const char* ssid = "YOUR_WIFI_SSID"; const char* password = "YOUR_WIFI_PASSWORD"; const char* mqtt_server = "YOUR_HIVEMQ_URL"; const char* mqtt_username = "YOUR_HIVEMQ_USERNAME"; const char* mqtt_password = "YOUR_HIVEMQ_PASSWORD"; - Connect your NodeMCU to your computer via USB
- Select the correct board and port from Tools menu
- Click Upload button to flash the code
Server Setup
- Make sure you have Python 3.7+ installed
- Install required libraries:
pip install paho-mqtt fastapi uvicorn sse-starlette asyncio pydantic - Open
mcp_server.py - Update the MQTTControlTool class with your HiveMQ credentials:
self.broker_address = "YOUR_HIVEMQ_URL" self.broker_port = 8883 self.username = "YOUR_HIVEMQ_USERNAME" self.password = "YOUR_HIVEMQ_PASSWORD" - Start the server:
This will start the server on port 8000python mcp_server.py
Proxy and Claude Desktop Setup
The proxy will be managed by Claude Desktop and does not need to be run separately:
- Ensure the server is running (mcp_server.py)
- Configure Claude Desktop to use the proxy:
- Open Claude Desktop
- Create or edit your Claude Desktop configuration file (
claude_desktop_config.json) - Add the following configuration:
{ "mcpServers": { "tablelamp_proxy": { "command": "python", "args": [ "path/to/your/proxy.py" ] } } } - Replace
path/to/your/proxy.pywith the actual file path to your proxy.py
- Restart Claude Desktop to load the new configuration
- When Claude Desktop starts, it will automatically launch the proxy which connects to your server
With this setup, you can directly ask Claude in natural language to control your lamp, for example: “Turn on my table lamp” or “Turn off the light”.
Usage
Once everything is set up and running:
- The NodeMCU will connect to your WiFi network and the MQTT broker
- The server provides endpoints to control the relay:
/mcp/call_toolendpoint accepts POST requests to turn the relay on/off
- You can control the lamp by:
- Sending “ON” command to turn on the lamp
- Sending “OFF” command to turn off the lamp
Example Commands
Through the proxy (which will be used by clients):
{
  "jsonrpc": "2.0",
  "method": "tools/call",
  "params": {
    "name": "turn_on"
  },
  "id": 1
}
{
"jsonrpc": "2.0",
"method": "tools/call",
"params": {
"name": "turn_off"
},
"id": 2
}Direct API calls to the server:
curl -X POST http://localhost:8000/mcp/call_tool -H "Content-Type: application/json" -d '{"name": "turn_on"}'
curl -X POST http://localhost:8000/mcp/call_tool -H "Content-Type: application/json" -d '{"name": "turn_off"}'
Troubleshooting
NodeMCU Not Connecting
- Verify your WiFi credentials
- Check if your WiFi router uses 2.4GHz (ESP8266 doesn’t support 5GHz)
- Ensure the NodeMCU is within range of your WiFi router
MQTT Connection Issues
- Verify your HiveMQ credentials
- Check your broker URL is correct
- Ensure your HiveMQ plan is active
Relay Not Switching
- Check the wiring between NodeMCU and relay
- Verify the relay is receiving power (indicator LED should be on)
- Test the relay with a simple test sketch
License
This project is licensed under the MIT License - see the LICENSE file for details.
Dev Tools Supporting MCP
The following are the main code editors that support the Model Context Protocol. Click the link to visit the official website for more information.